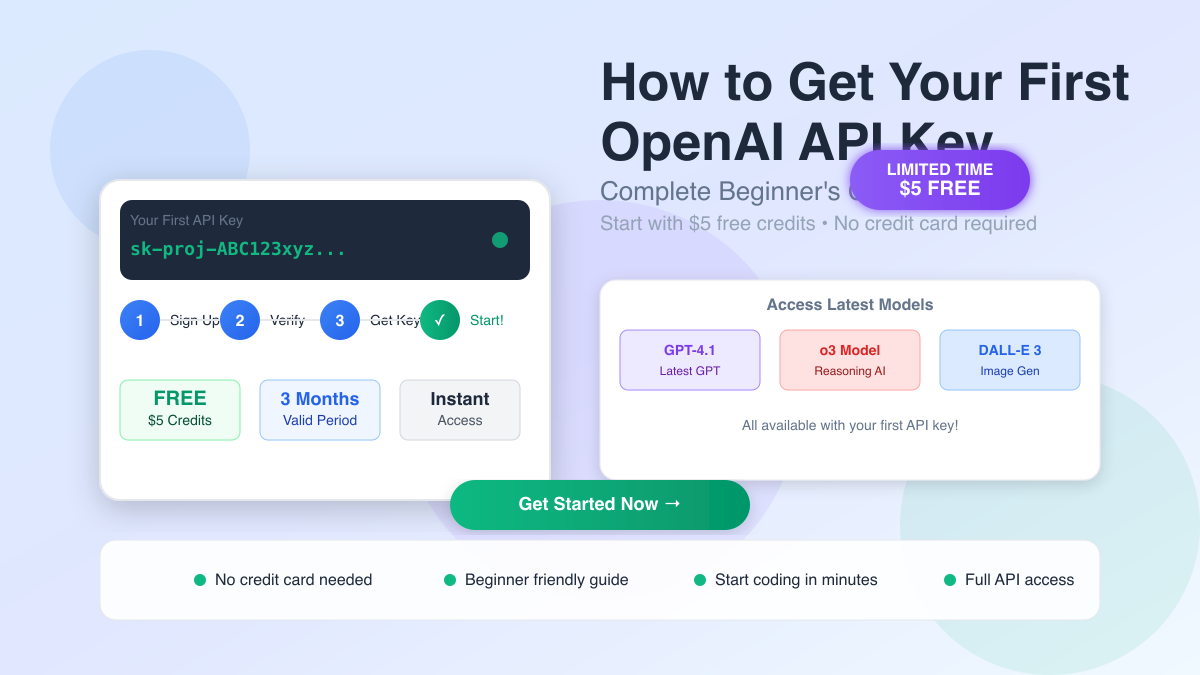
Getting your first OpenAI API key is the gateway to building powerful AI applications. Whether you're creating chatbots, content generators, or intelligent automation tools, you'll need an API key to access GPT-4.1, o3 reasoning models, and DALL-E 3.
In this comprehensive guide, I'll walk you through the exact process of getting your OpenAI API key in 2025, including how to claim your $5 free credits and avoid common pitfalls that trip up beginners.
What You'll Learn in This Guide
- Complete 7-step process to get your OpenAI API key
- How to claim and maximize your $5 free credits (valid for 3 months)
- Security best practices to protect your API key
- Common issues and troubleshooting solutions
- Money-saving alternatives that can reduce costs by 70%
- Latest 2025 platform updates and requirements
Why You Need an OpenAI API Key
An OpenAI API key is your personal authentication credential that allows you to:
- Access all OpenAI models programmatically - GPT-4.1, GPT-4, GPT-3.5, o3, DALL-E 3, Whisper, and more
- Build custom applications - Integrate AI capabilities into your apps, websites, or services
- Control usage and costs - Set spending limits and monitor consumption
- Scale your projects - Handle thousands of requests per minute
- Maintain security - Keep your usage separate from others
Without an API key, you're limited to the ChatGPT web interface, which isn't suitable for automated workflows or custom integrations.
Prerequisites: What You Need Before Starting
Before we dive into the step-by-step process, ensure you have:
✅ A valid email address - You'll need to verify it
✅ A phone number - Required for SMS verification
✅ 5 minutes of time - The entire process is quick
✅ Basic understanding of APIs (optional but helpful)
Note for 2025: OpenAI has simplified the signup process and now offers $5 in free credits to all new users, making it easier than ever to get started.
Step-by-Step Guide: How to Get Your OpenAI API Key
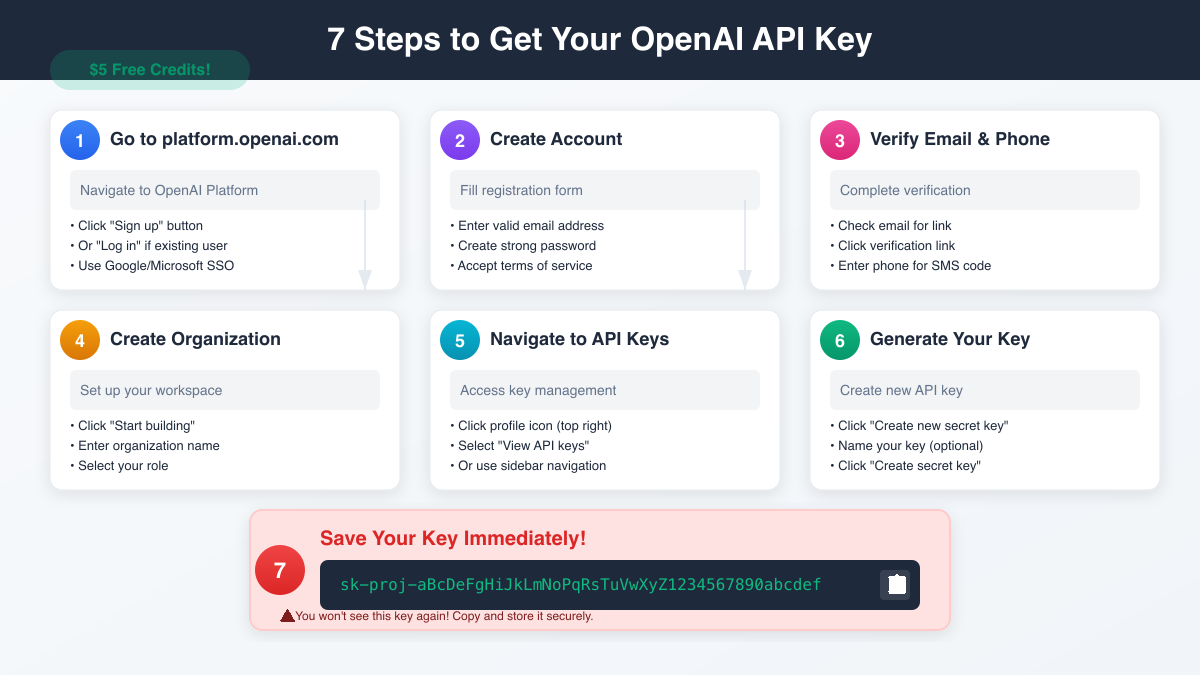
Step 1: Navigate to OpenAI Platform
- Open your web browser and go to platform.openai.com
- You'll see the OpenAI Platform homepage
- Look for the "Sign up" button in the top right corner
- Click it to begin the registration process
Pro tip: If you already have a ChatGPT account, you can use the same credentials - just click "Log in" instead.
Step 2: Create Your OpenAI Account
You have three options for creating your account:
Option A: Email Registration
- Enter your email address
- Create a strong password (minimum 8 characters)
- Click "Continue"
Option B: Google SSO
- Click "Continue with Google"
- Select your Google account
- Authorize OpenAI access
Option C: Microsoft SSO
- Click "Continue with Microsoft"
- Enter your Microsoft credentials
- Grant necessary permissions
Recommendation: Using Google or Microsoft SSO is faster and more secure since you don't need to manage another password.
Step 3: Verify Your Email and Phone
Email Verification:
- Check your inbox for an email from OpenAI
- Click the verification link (valid for 24 hours)
- Return to the platform
Phone Verification:
- Enter your phone number with country code
- Receive SMS with 6-digit code
- Enter the code on the platform
- Click "Verify"
Important: Each phone number can only be associated with one OpenAI account. If you're having issues, ensure the number hasn't been used before.
Step 4: Set Up Your Organization
After verification, you'll need to create an organization:
- Click "Start building" when prompted
- Enter your organization name (can be your personal name)
- Select your intended use:
- Personal projects
- Work/Business
- Academic research
- Other
- Accept the terms of service and usage policies
Note: You can create multiple organizations later if needed, each with separate API keys and billing.
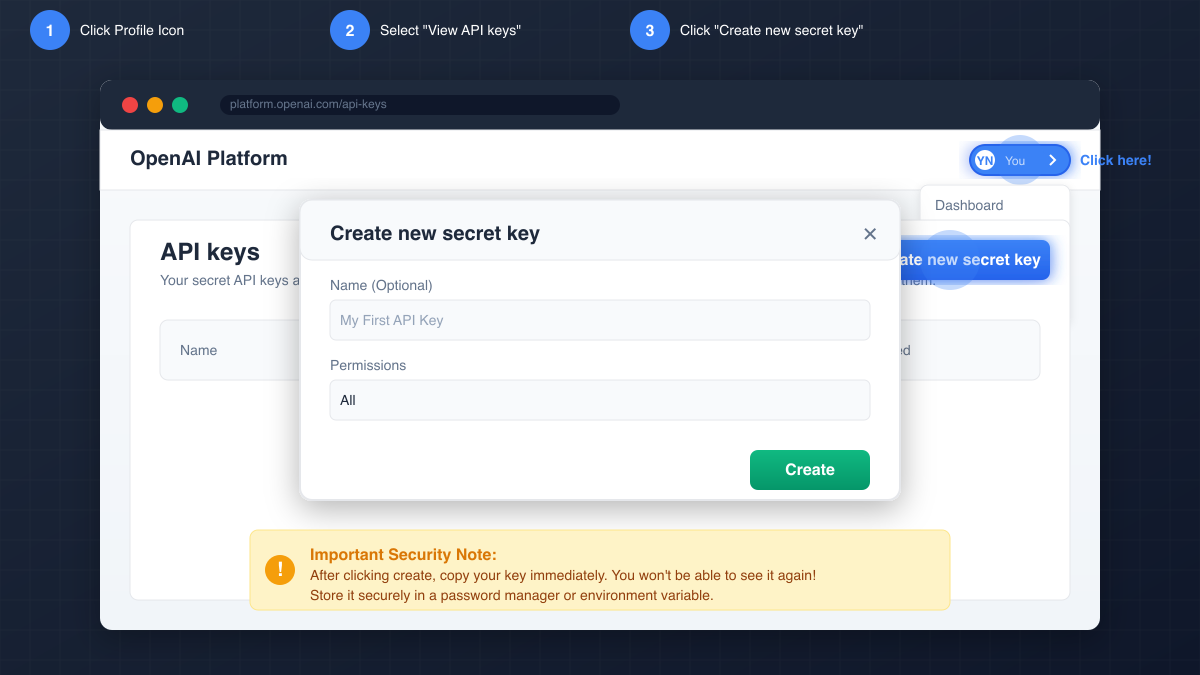
Step 5: Navigate to API Keys Section
Now you need to access the API keys management area:
- Click on your profile icon (top right corner)
- Select "View API keys" from the dropdown menu
- You'll be redirected to the API keys dashboard
- You should see an empty list since you haven't created any keys yet
Step 6: Generate Your First API Key
This is the crucial step where you'll create your actual API key:
- Click the "Create new secret key" button
- (Optional) Give your key a descriptive name like "My First Project"
- Select permissions (leave as "All" for now)
- Click "Create secret key"
Step 7: Save Your API Key Immediately!
⚠️ CRITICAL: This is your only chance to see the full API key!
- Your key will appear in a modal window
- It will look like:
sk-proj-aBcDeFgHiJkLmNoPqRsTuVwXyZ1234567890abcdef - Click the copy button to copy it to your clipboard
- Immediately save it in a secure location:
- Password manager (recommended)
- Environment variable file
- Secure notes app
Never share or expose your API key publicly!
Understanding Your $5 Free Credits (2025 Update)
As of 2025, OpenAI provides new users with $5 in free credits:
Free Credit Details:
- Amount: $5.00 USD
- Validity: 3 months from account creation
- Models covered: All available models
- No credit card required: Start building immediately
What Can You Do with $5?
Based on current pricing, your free credits allow approximately:
- 125,000 tokens with GPT-3.5 Turbo
- 2,500 tokens with GPT-4
- 200 images with DALL-E 3
- 60 minutes of Whisper transcription
This is enough to build and test small applications or evaluate the API for your use case.
Security Best Practices for Your API Key
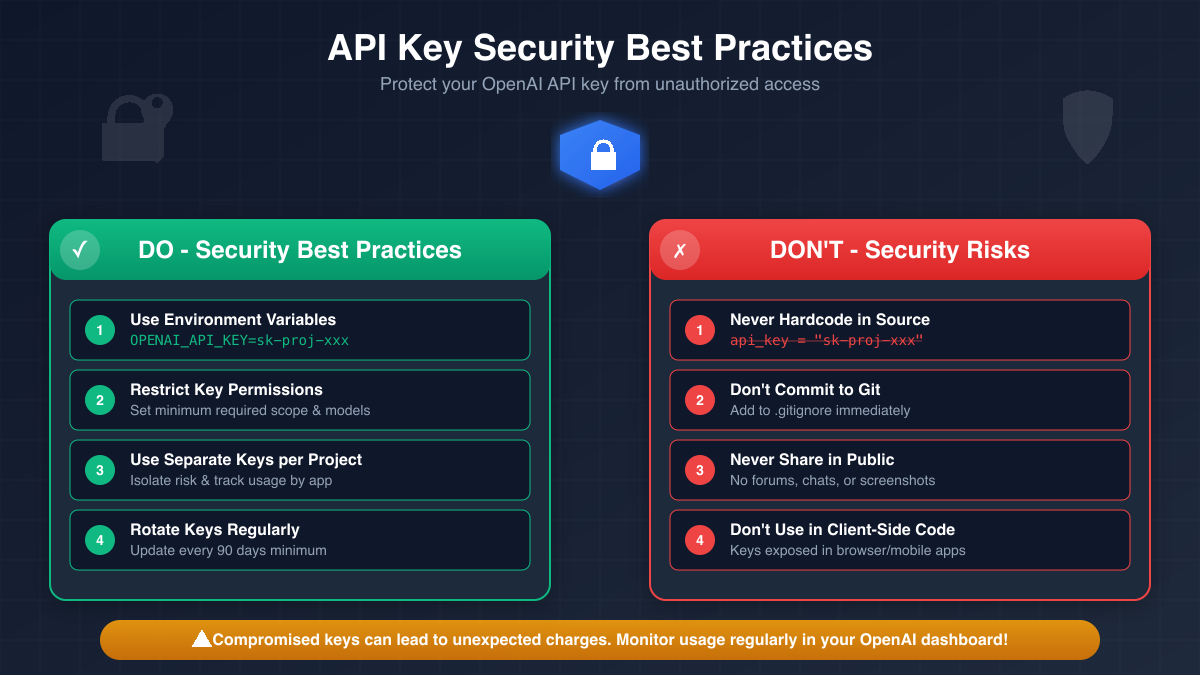
Protecting your API key is crucial to prevent unauthorized usage and unexpected charges:
✅ DO:
-
Store in environment variables
bashexport OPENAI_API_KEY="sk-proj-your-key-here" -
Use different keys for different projects
- Easier to track usage
- Limit damage if compromised
-
Set usage limits
- Configure monthly spending caps
- Enable usage alerts
-
Rotate keys regularly
- Delete and create new keys every 90 days
- Update your applications accordingly
❌ DON'T:
-
Never hardcode in source code
python# WRONG - Never do this! api_key = "sk-proj-abc123..." -
Never commit to version control
- Add to
.gitignoreimmediately - Use
.envfiles locally
- Add to
-
Never share in public forums
- Don't post in Stack Overflow questions
- Avoid screenshots showing keys
-
Never use in client-side code
- Keys in JavaScript are visible to users
- Always use backend/server-side calls
Common Issues and Troubleshooting
Issue 1: "Phone number already in use"
Solution:
- Each phone number can only verify one account
- Use a different number or contact support
- Virtual numbers (Google Voice, etc.) may not work
Issue 2: "Invalid API key provided"
Solution:
- Ensure you copied the entire key
- Check for extra spaces or characters
- Verify the key hasn't been deleted
Issue 3: "Rate limit exceeded"
Solution:
- Free tier has lower rate limits
- Wait a few minutes and retry
- Consider upgrading for higher limits
Issue 4: "No credits remaining"
Solution:
- Check usage dashboard for consumption
- Add payment method to continue
- Consider alternatives like LaoZhang.ai (see below)
Issue 5: "Access denied in my country"
Solution:
- OpenAI isn't available in all countries
- Use a VPN (check OpenAI's terms)
- Try alternative providers
Testing Your API Key
Once you have your key, test it with this simple Python script:
pythonimport os
from openai import OpenAI


client = OpenAI(
    api_key=os.environ.get("OPENAI_API_KEY")
)

# Test the API
try:
    response = client.chat.completions.create(
        model="gpt-3.5-turbo",
        messages=[
            {"role": "user", "content": "Hello, API!"}
        ]
    )
    print("Success! API key is working.")
    print("Response:", response.choices[0].message.content)
except Exception as e:
    print("Error:", str(e))
Save 70% on API Costs with LaoZhang.ai
While OpenAI's API is powerful, costs can add up quickly, especially after your free credits expire. If you're looking to reduce expenses without sacrificing quality, consider LaoZhang.ai.
What is LaoZhang.ai?
LaoZhang.ai is an AI gateway service that provides access to multiple AI models (including OpenAI's) at significantly reduced costs:
- 70% cheaper than direct OpenAI pricing
- Same models: GPT-4, GPT-3.5, Claude, and more
- Simple migration: Just change your base URL
- No quality loss: Direct API calls to providers
- Better reliability: Automatic failover between providers
Quick Comparison:
| Feature | OpenAI Direct | LaoZhang.ai |
|---|---|---|
| GPT-4 per 1M tokens | $30 | $9 (-70%) |
| GPT-3.5 per 1M tokens | $3 | $0.90 (-70%) |
| Free credits | $5 (3 months) | Varies |
| API compatibility | Native | 100% compatible |
| Additional models | OpenAI only | 20+ providers |
How to Switch:
python# Original OpenAI code
client = OpenAI(api_key="sk-...")

# With LaoZhang.ai - just change base_url
client = OpenAI(
    api_key="your-laozhang-key",
    base_url="https://api.laozhang.ai/v1"
)
That's it! Your existing code continues to work with 70% cost savings.
Advanced Tips for API Key Management
1. Implement Key Rotation
Create a rotation schedule:
python# Store multiple keys
KEYS = {
    "primary": os.environ.get("OPENAI_KEY_1"),
    "secondary": os.environ.get("OPENAI_KEY_2"),
    "tertiary": os.environ.get("OPENAI_KEY_3")
}

# Rotate weekly
current_week = datetime.now().isocalendar()[1]
active_key = list(KEYS.values())[current_week % 3]
2. Monitor Usage Programmatically
Track your consumption:
python# Check usage via API
usage = client.billing.usage.retrieve(
    start_date="2025-01-01",
    end_date="2025-01-31"
)
print(f"Total usage: ${usage.total_usage/100:.2f}")
3. Implement Request Logging
Keep track of all API calls:
pythonimport logging

logging.basicConfig(level=logging.INFO)
logger = logging.getLogger(__name__)

def make_api_call(prompt):
    start_time = time.time()
    response = client.chat.completions.create(...)
    duration = time.time() - start_time

    logger.info(f"API call: {duration:.2f}s, "
                f"tokens: {response.usage.total_tokens}")
    return response
Frequently Asked Questions
Q: How long does it take to get an API key?
A: The entire process takes about 5 minutes if you have all prerequisites ready.
Q: Can I use the same API key for multiple projects?
A: Yes, but it's recommended to use separate keys for better security and usage tracking.
Q: What happens when my free credits expire?
A: You'll need to add a payment method to continue using the API. Alternatively, switch to LaoZhang.ai for 70% savings.
Q: Is the API key the same as my ChatGPT login?
A: No, API keys are separate credentials specifically for programmatic access.
Q: Can I regenerate a lost API key?
A: No, you cannot recover lost keys. You must create a new one and update your applications.
Q: Are there usage limits on the free tier?
A: Yes, free tier has rate limits (3 RPM for GPT-4, 60 RPM for GPT-3.5). Paid accounts have higher limits.
What's Next After Getting Your API Key?
Now that you have your OpenAI API key, here's what to do next:
-
Install the OpenAI Python/Node.js SDK
bashpip install openai # Python npm install openai # Node.js -
Build your first application
- Start with a simple chatbot
- Try text summarization
- Experiment with different models
-
Learn prompt engineering
- Optimize your prompts for better results
- Reduce token usage
- Improve response quality
-
Explore advanced features
- Function calling
- Assistants API
- Fine-tuning (when available)
-
Monitor and optimize costs
- Track usage daily
- Implement caching
- Consider alternatives like LaoZhang.ai
Conclusion
Getting your OpenAI API key in 2025 is straightforward with this guide. In just 7 steps, you can go from zero to having full API access with $5 in free credits to experiment with.
Remember these key takeaways:
- Save your API key immediately - you won't see it again
- Follow security best practices - never expose keys publicly
- Monitor your usage - free credits expire after 3 months
- Consider cost-saving alternatives - LaoZhang.ai offers 70% savings
- Start building - the best way to learn is by doing
Whether you're building the next AI unicorn or just experimenting with the technology, your OpenAI API key is the first step on an exciting journey into the world of artificial intelligence.
Ready to get started? Head to platform.openai.com and claim your API key today. And if costs become a concern, remember that LaoZhang.ai offers the same powerful models at 70% lower prices.
Happy coding, and welcome to the AI revolution! 🚀