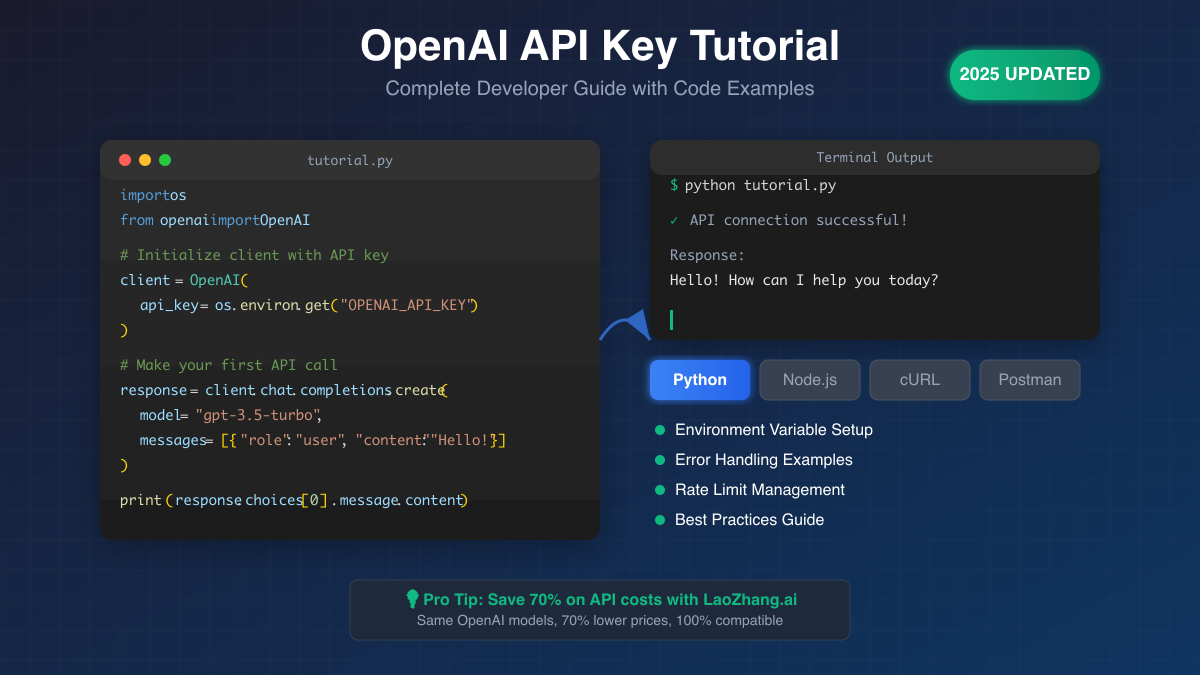
Ready to build AI-powered applications with OpenAI's API? This comprehensive tutorial will teach you everything you need to know about using your OpenAI API key effectively, from basic setup to advanced error handling.
Whether you're using Python, JavaScript, or just getting started with Postman, this guide has you covered with practical, working examples that you can use immediately in your projects.
What You'll Learn in This Tutorial
- Environment setup across Windows, macOS, and Linux
- Working code examples in Python and JavaScript/Node.js
- Postman configuration for API testing
- Error handling and retry strategies
- Rate limit management and best practices
- Cost optimization techniques (save 70% with alternatives)
- Security best practices for production applications
Prerequisites
Before starting this tutorial, ensure you have:
✅ An OpenAI API key (get one at platform.openai.com)
✅ Python 3.7+ or Node.js 14+ installed
✅ Basic programming knowledge
✅ A code editor (VS Code recommended)
Step 1: Setting Up Your Environment
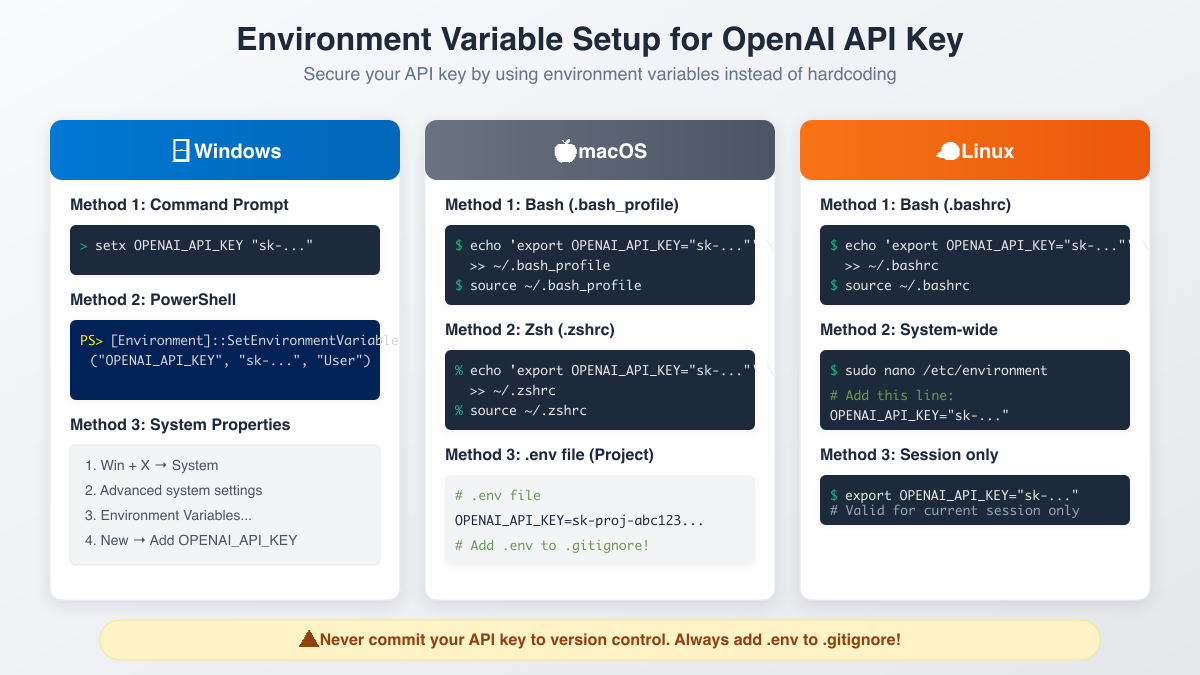
The first and most important step is securely storing your API key using environment variables. Never hardcode your API key directly in your source code!
Windows Setup
Option 1: Command Prompt
bashsetx OPENAI_API_KEY "sk-proj-your-key-here"
Option 2: PowerShell
powershell[Environment]::SetEnvironmentVariable("OPENAI_API_KEY", "sk-proj-your-key-here", "User")
Option 3: System Properties
- Press Win + X → System
- Click "Advanced system settings"
- Click "Environment Variables"
- Add new variable:
OPENAI_API_KEY
macOS/Linux Setup
For Bash users:
bashecho 'export OPENAI_API_KEY="sk-proj-your-key-here"' >> ~/.bashrc
source ~/.bashrc
For Zsh users (macOS default):
bashecho 'export OPENAI_API_KEY="sk-proj-your-key-here"' >> ~/.zshrc
source ~/.zshrc
For project-specific setup:
bashecho "OPENAI_API_KEY=sk-proj-your-key-here" > .env # Add to .gitignore echo ".env" >> .gitignore
Step 2: Python Tutorial
Installation
First, install the OpenAI Python library:
bashpip install openai
Basic Usage Example
pythonimport os
from openai import OpenAI

# Initialize the client
client = OpenAI(
    api_key=os.environ.get("OPENAI_API_KEY")
)

# Make your first API call
try:
    response = client.chat.completions.create(
        model="gpt-3.5-turbo",
        messages=[
            {"role": "system", "content": "You are a helpful assistant."},
            {"role": "user", "content": "Hello! Can you explain what an API is?"}
        ],
        temperature=0.7,
        max_tokens=150
    )

    print(response.choices[0].message.content)

except Exception as e:
    print(f"An error occurred: {e}")
Advanced Example with Streaming
pythonimport os
from openai import OpenAI

client = OpenAI(api_key=os.environ.get("OPENAI_API_KEY"))

# Stream responses for better user experience
stream = client.chat.completions.create(
    model="gpt-3.5-turbo",
    messages=[{"role": "user", "content": "Write a haiku about programming"}],
    stream=True
)

for chunk in stream:
    if chunk.choices[0].delta.content is not None:
        print(chunk.choices[0].delta.content, end="")
Function Calling Example
pythonimport json
from openai import OpenAI

client = OpenAI(api_key=os.environ.get("OPENAI_API_KEY"))

# Define a function for the model to use
functions = [
    {
        "name": "get_weather",
        "description": "Get the current weather in a location",
        "parameters": {
            "type": "object",
            "properties": {
                "location": {
                    "type": "string",
                    "description": "The city and state, e.g. San Francisco, CA"
                },
                "unit": {
                    "type": "string",
                    "enum": ["celsius", "fahrenheit"]
                }
            },
            "required": ["location"]
        }
    }
]

response = client.chat.completions.create(
    model="gpt-3.5-turbo",
    messages=[{"role": "user", "content": "What's the weather in New York?"}],
    functions=functions,
    function_call="auto"
)

# Check if the model wants to call a function
if response.choices[0].message.function_call:
    function_name = response.choices[0].message.function_call.name
    function_args = json.loads(response.choices[0].message.function_call.arguments)
    print(f"Function: {function_name}")
    print(f"Arguments: {function_args}")
Step 3: JavaScript/Node.js Tutorial
Installation
Install the OpenAI Node.js library:
bashnpm install openai
# or
yarn add openai
Basic Usage Example
javascriptconst OpenAI = require('openai');

// Initialize the client
const openai = new OpenAI({
    apiKey: process.env.OPENAI_API_KEY
});

async function main() {
    try {
        const response = await openai.chat.completions.create({
            model: "gpt-3.5-turbo",
            messages: [
                { role: "system", content: "You are a helpful assistant." },
                { role: "user", content: "Hello! Can you explain what an API is?" }
            ],
            temperature: 0.7,
            max_tokens: 150
        });

        console.log(response.choices[0].message.content);

    } catch (error) {
        console.error('Error:', error);
    }
}

main();
ES6 Module Syntax
javascriptimport OpenAI from 'openai';

const openai = new OpenAI({
    apiKey: process.env.OPENAI_API_KEY
});

// Using async/await with ES6
const getChatResponse = async (prompt) => {
    const response = await openai.chat.completions.create({
        model: "gpt-3.5-turbo",
        messages: [{ role: "user", content: prompt }],
        temperature: 0.7
    });

    return response.choices[0].message.content;
};

// Usage
getChatResponse("What is machine learning?")
    .then(console.log)
    .catch(console.error);
Streaming Example
javascriptconst OpenAI = require('openai');

const openai = new OpenAI({
    apiKey: process.env.OPENAI_API_KEY
});

async function streamChat() {
    const stream = await openai.chat.completions.create({
        model: "gpt-3.5-turbo",
        messages: [{ role: "user", content: "Tell me a story" }],
        stream: true
    });

    for await (const chunk of stream) {
        process.stdout.write(chunk.choices[0]?.delta?.content || '');
    }
}

streamChat();
Step 4: API Request/Response Flow
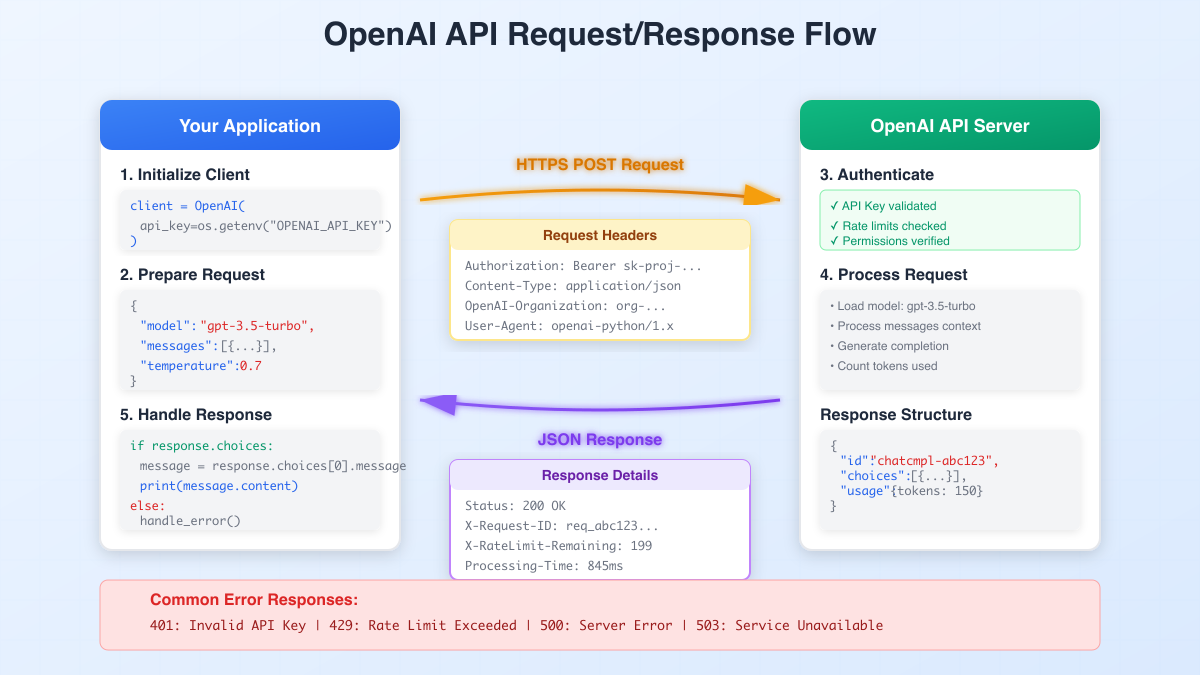
Understanding the API flow helps you debug issues and optimize performance:
- Client Initialization: Your app creates an OpenAI client with your API key
- Request Preparation: Format your prompt and parameters
- HTTPS Request: Sent to
api.openai.comwith authentication headers - Server Processing: OpenAI validates, processes, and generates response
- Response Handling: Parse the JSON response and handle any errors
Request Headers
httpPOST https://api.openai.com/v1/chat/completions
Authorization: Bearer sk-proj-your-key-here
Content-Type: application/json
OpenAI-Organization: org-optional
Request Body Example
json{
    "model": "gpt-3.5-turbo",
    "messages": [
        {"role": "system", "content": "You are a helpful assistant."},
        {"role": "user", "content": "Hello!"}
    ],
    "temperature": 0.7,
    "max_tokens": 150,
    "n": 1,
    "stream": false
}
Response Structure
json{
    "id": "chatcmpl-abc123",
    "object": "chat.completion",
    "created": 1677858242,
    "model": "gpt-3.5-turbo-0613",
    "usage": {
        "prompt_tokens": 13,
        "completion_tokens": 17,
        "total_tokens": 30
    },
    "choices": [
        {
            "message": {
                "role": "assistant",
                "content": "Hello! How can I assist you today?"
            },
            "finish_reason": "stop",
            "index": 0
        }
    ]
}
Step 5: Error Handling Best Practices
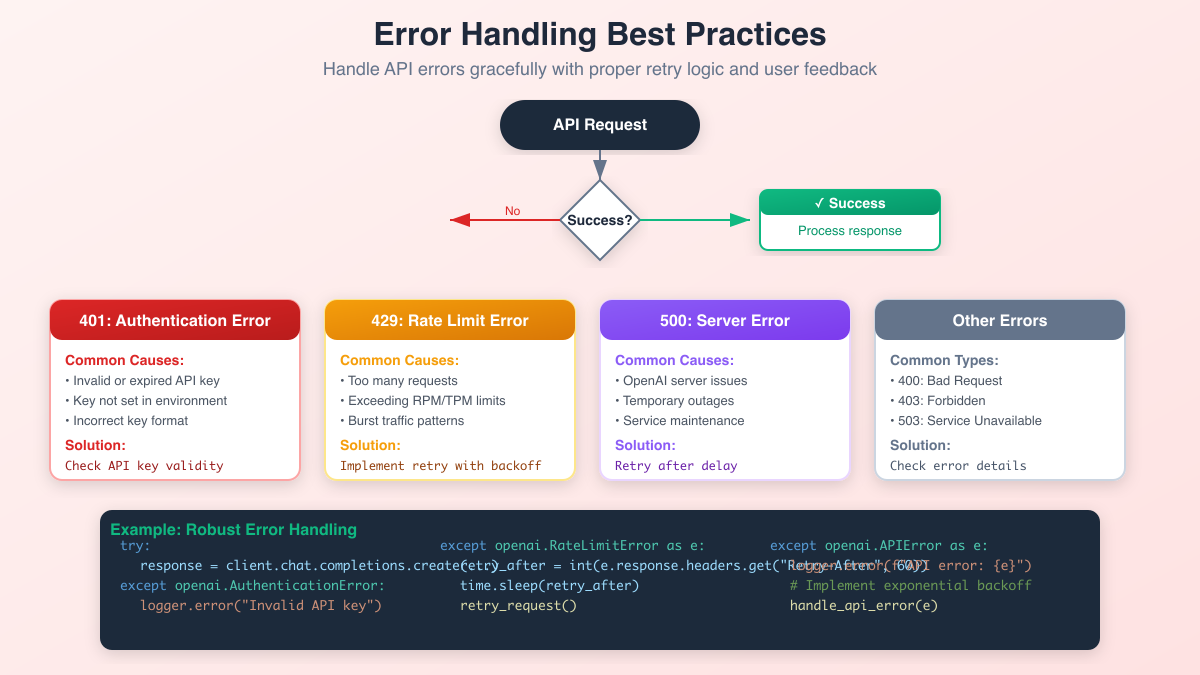
Robust error handling is crucial for production applications. Here's how to handle common errors:
Python Error Handling
pythonimport time
from openai import OpenAI
import openai

client = OpenAI(api_key=os.environ.get("OPENAI_API_KEY"))

def make_api_call_with_retry(messages, max_retries=3):
    for attempt in range(max_retries):
        try:
            response = client.chat.completions.create(
                model="gpt-3.5-turbo",
                messages=messages
            )
            return response

        except openai.AuthenticationError:
            print("Authentication failed. Check your API key.")
            raise

        except openai.RateLimitError as e:
            if attempt < max_retries - 1:
                # Get retry delay from headers if available
                retry_after = int(e.response.headers.get("Retry-After", 60))
                print(f"Rate limit hit. Waiting {retry_after} seconds...")
                time.sleep(retry_after)
            else:
                raise

        except openai.APIError as e:
            if attempt < max_retries - 1:
                # Exponential backoff
                wait_time = (2 ** attempt) * 5
                print(f"API error. Retrying in {wait_time} seconds...")
                time.sleep(wait_time)
            else:
                raise

        except Exception as e:
            print(f"Unexpected error: {e}")
            raise
JavaScript Error Handling
javascriptconst OpenAI = require('openai');

const openai = new OpenAI({
    apiKey: process.env.OPENAI_API_KEY
});

async function makeAPICallWithRetry(messages, maxRetries = 3) {
    for (let attempt = 0; attempt < maxRetries; attempt++) {
        try {
            const response = await openai.chat.completions.create({
                model: "gpt-3.5-turbo",
                messages: messages
            });
            return response;

        } catch (error) {
            if (error.status === 401) {
                console.error('Authentication failed. Check your API key.');
                throw error;

            } else if (error.status === 429) {
                if (attempt < maxRetries - 1) {
                    const retryAfter = error.headers?.['retry-after'] || 60;
                    console.log(`Rate limit hit. Waiting ${retryAfter} seconds...`);
                    await new Promise(resolve => setTimeout(resolve, retryAfter * 1000));
                } else {
                    throw error;
                }

            } else if (error.status >= 500) {
                if (attempt < maxRetries - 1) {
                    const waitTime = Math.pow(2, attempt) * 5000;
                    console.log(`Server error. Retrying in ${waitTime/1000} seconds...`);
                    await new Promise(resolve => setTimeout(resolve, waitTime));
                } else {
                    throw error;
                }

            } else {
                throw error;
            }
        }
    }
}
Common Error Types and Solutions
| Error Code | Type | Common Causes | Solution |
|---|---|---|---|
| 401 | Authentication Error | Invalid API key, expired key | Check key validity |
| 429 | Rate Limit Error | Too many requests | Implement backoff |
| 400 | Bad Request | Invalid parameters | Validate input |
| 500 | Server Error | OpenAI server issues | Retry with delay |
| 503 | Service Unavailable | Temporary outage | Wait and retry |
Step 6: Postman Setup and Testing
Postman is excellent for testing API endpoints before implementing them in code.
Setting Up Postman
-
Create a new request
- Method: POST
- URL:
https://api.openai.com/v1/chat/completions
-
Add Headers
Authorization: Bearer {{api_key}} Content-Type: application/json -
Configure Environment Variables
- Create an environment
- Add variable:
api_key= your OpenAI API key
-
Request Body
json{
    "model": "gpt-3.5-turbo",
    "messages": [
        {
            "role": "user",
            "content": "Hello, API!"
        }
    ],
    "temperature": 0.7
}
Pre-request Script for Token Counting
javascript// Rough token estimation
const messages = pm.request.body.raw;
const parsed = JSON.parse(messages);
let tokenCount = 0;

parsed.messages.forEach(msg => {
    tokenCount += msg.content.split(' ').length * 1.3;
});

console.log(`Estimated tokens: ${Math.ceil(tokenCount)}`);
Test Scripts
javascript// Validate response
pm.test("Status code is 200", () => {
    pm.response.to.have.status(200);
});

pm.test("Response has choices", () => {
    const jsonData = pm.response.json();
    pm.expect(jsonData).to.have.property('choices');
    pm.expect(jsonData.choices).to.be.an('array');
});

// Save response for later use
pm.test("Save assistant response", () => {
    const jsonData = pm.response.json();
    pm.environment.set("last_response", jsonData.choices[0].message.content);
});
Step 7: Rate Limits and Optimization
Understanding Rate Limits
OpenAI enforces rate limits based on two metrics:
- RPM (Requests Per Minute): Number of API calls
- TPM (Tokens Per Minute): Total tokens processed
| Tier | GPT-4 RPM | GPT-4 TPM | GPT-3.5 RPM | GPT-3.5 TPM |
|---|---|---|---|---|
| Free | 3 | 40,000 | 3 | 40,000 |
| Tier 1 | 500 | 30,000 | 3,500 | 60,000 |
| Tier 2 | 5,000 | 450,000 | 3,500 | 80,000 |
Rate Limit Handler
pythonclass RateLimitHandler:
    def __init__(self, rpm_limit=60, tpm_limit=40000):
        self.rpm_limit = rpm_limit
        self.tpm_limit = tpm_limit
        self.request_times = []
        self.token_counts = []

    def can_make_request(self, estimated_tokens):
        now = time.time()
        minute_ago = now - 60

        # Clean old entries
        self.request_times = [t for t in self.request_times if t > minute_ago]
        self.token_counts = [(t, c) for t, c in self.token_counts if t > minute_ago]

        # Check RPM
        if len(self.request_times) >= self.rpm_limit:
            return False, "RPM limit reached"

        # Check TPM
        current_tokens = sum(c for _, c in self.token_counts)
        if current_tokens + estimated_tokens > self.tpm_limit:
            return False, "TPM limit reached"

        return True, "OK"

    def record_request(self, token_count):
        now = time.time()
        self.request_times.append(now)
        self.token_counts.append((now, token_count))
Step 8: Cost Optimization with LaoZhang.ai
While OpenAI's API is powerful, costs can add up quickly. If you're looking to reduce expenses by 70% without sacrificing quality, consider using LaoZhang.ai.
What is LaoZhang.ai?
LaoZhang.ai is an AI gateway that provides access to OpenAI models (and others) at significantly reduced prices:
- 70% cheaper than direct OpenAI pricing
- 100% API compatible - just change the base URL
- Same models and quality
- Better reliability with automatic failover
Quick Migration Guide
Python:
python# Original OpenAI
client = OpenAI(api_key="sk-...")

# With LaoZhang.ai
client = OpenAI(
    api_key="your-laozhang-key",
    base_url="https://api.laozhang.ai/v1"
)
JavaScript:
javascript// Original OpenAI
const openai = new OpenAI({ apiKey: "sk-..." });

// With LaoZhang.ai
const openai = new OpenAI({
    apiKey: "your-laozhang-key",
    baseURL: "https://api.laozhang.ai/v1"
});
Cost Comparison
| Model | OpenAI Direct | LaoZhang.ai | Savings |
|---|---|---|---|
| GPT-4 | $30/1M tokens | $9/1M tokens | 70% |
| GPT-3.5 | $3/1M tokens | $0.90/1M tokens | 70% |
| GPT-4-Vision | $30/1M tokens | $9/1M tokens | 70% |
That's it! Your existing code continues to work with massive cost savings.
Advanced Tips and Best Practices
1. Implement Request Queuing
pythonimport asyncio
from collections import deque

class APIRequestQueue:
    def __init__(self, max_concurrent=5):
        self.queue = deque()
        self.max_concurrent = max_concurrent
        self.active_requests = 0

    async def add_request(self, request_func):
        self.queue.append(request_func)
        await self.process_queue()

    async def process_queue(self):
        while self.queue and self.active_requests < self.max_concurrent:
            request_func = self.queue.popleft()
            self.active_requests += 1
            asyncio.create_task(self._execute_request(request_func))

    async def _execute_request(self, request_func):
        try:
            await request_func()
        finally:
            self.active_requests -= 1
            await self.process_queue()
2. Token Estimation
pythondef estimate_tokens(text):
    # Rough estimation: ~1 token per 4 characters
    # More accurate: use tiktoken library
    return len(text) / 4

def estimate_cost(prompt_tokens, completion_tokens, model="gpt-3.5-turbo"):
    # Prices as of 2025
    prices = {
        "gpt-3.5-turbo": {"prompt": 0.0015, "completion": 0.002},
        "gpt-4": {"prompt": 0.03, "completion": 0.06}
    }

    model_prices = prices.get(model, prices["gpt-3.5-turbo"])
    prompt_cost = (prompt_tokens / 1000) * model_prices["prompt"]
    completion_cost = (completion_tokens / 1000) * model_prices["completion"]

    return prompt_cost + completion_cost
3. Response Caching
pythonimport hashlib
import json
from datetime import datetime, timedelta

class ResponseCache:
    def __init__(self, ttl_minutes=60):
        self.cache = {}
        self.ttl = timedelta(minutes=ttl_minutes)

    def _get_cache_key(self, messages, model, temperature):
        # Create unique key from request parameters
        content = json.dumps({
            "messages": messages,
            "model": model,
            "temperature": temperature
        }, sort_keys=True)
        return hashlib.md5(content.encode()).hexdigest()

    def get(self, messages, model, temperature):
        key = self._get_cache_key(messages, model, temperature)
        if key in self.cache:
            entry = self.cache[key]
            if datetime.now() - entry["timestamp"] < self.ttl:
                return entry["response"]
        return None

    def set(self, messages, model, temperature, response):
        key = self._get_cache_key(messages, model, temperature)
        self.cache[key] = {
            "response": response,
            "timestamp": datetime.now()
        }
4. Monitoring and Logging
pythonimport logging
from datetime import datetime

class APIMonitor:
    def __init__(self):
        self.logger = logging.getLogger("openai_api")
        self.metrics = {
            "total_requests": 0,
            "total_tokens": 0,
            "total_cost": 0,
            "errors": {}
        }

    def log_request(self, model, tokens, cost, duration):
        self.metrics["total_requests"] += 1
        self.metrics["total_tokens"] += tokens
        self.metrics["total_cost"] += cost

        self.logger.info(f"API Request: model={model}, tokens={tokens}, "
                        f"cost=${cost:.4f}, duration={duration:.2f}s")

    def log_error(self, error_type, message):
        self.metrics["errors"][error_type] = self.metrics["errors"].get(error_type, 0) + 1
        self.logger.error(f"API Error: type={error_type}, message={message}")

    def get_daily_summary(self):
        return {
            "date": datetime.now().strftime("%Y-%m-%d"),
            "requests": self.metrics["total_requests"],
            "tokens": self.metrics["total_tokens"],
            "cost": f"${self.metrics['total_cost']:.2f}",
            "errors": self.metrics["errors"]
        }
Security Best Practices
-
Never expose API keys in client-side code
- Use server-side proxy endpoints
- Implement proper authentication
-
Rotate keys regularly
- Set up key rotation schedule
- Monitor for compromised keys
-
Implement rate limiting on your endpoints
pythonfrom flask_limiter import Limiter limiter = Limiter( app, key_func=lambda: get_remote_address(), default_limits=["200 per day", "50 per hour"] ) @app.route("/api/chat") @limiter.limit("5 per minute") def chat_endpoint(): # Your API logic pass -
Audit and monitor usage
- Track API calls by user
- Set up alerts for unusual activity
- Review logs regularly
Troubleshooting Common Issues
Issue: "Invalid API Key"
python# Check key format
if not api_key.startswith("sk-"):
    print("Invalid key format")

# Verify environment variable
print(f"Key loaded: {bool(os.environ.get('OPENAI_API_KEY'))}")
Issue: "Connection Timeout"
python# Increase timeout
client = OpenAI(
    api_key=os.environ.get("OPENAI_API_KEY"),
    timeout=60.0  # 60 seconds
)
Issue: "Context Length Exceeded"
pythondef truncate_messages(messages, max_tokens=4000):
    # Keep system message and truncate from oldest user messages
    system_msg = [m for m in messages if m["role"] == "system"]
    other_msgs = [m for m in messages if m["role"] != "system"]

    # Estimate tokens and truncate if needed
    while estimate_total_tokens(system_msg + other_msgs) > max_tokens:
        if len(other_msgs) > 1:
            other_msgs.pop(0)  # Remove oldest
        else:
            break

    return system_msg + other_msgs
Conclusion
You now have a comprehensive understanding of how to use OpenAI's API effectively. From basic setup to advanced error handling and optimization, you're equipped to build robust AI-powered applications.
Key takeaways:
- Always use environment variables for API keys
- Implement proper error handling with retries
- Monitor your usage and costs
- Consider alternatives like LaoZhang.ai for significant savings
- Follow security best practices in production
Remember, the OpenAI API is powerful but can be expensive at scale. If you're building production applications or need to reduce costs, LaoZhang.ai offers the same models at 70% lower prices with 100% API compatibility.
Happy coding! 🚀