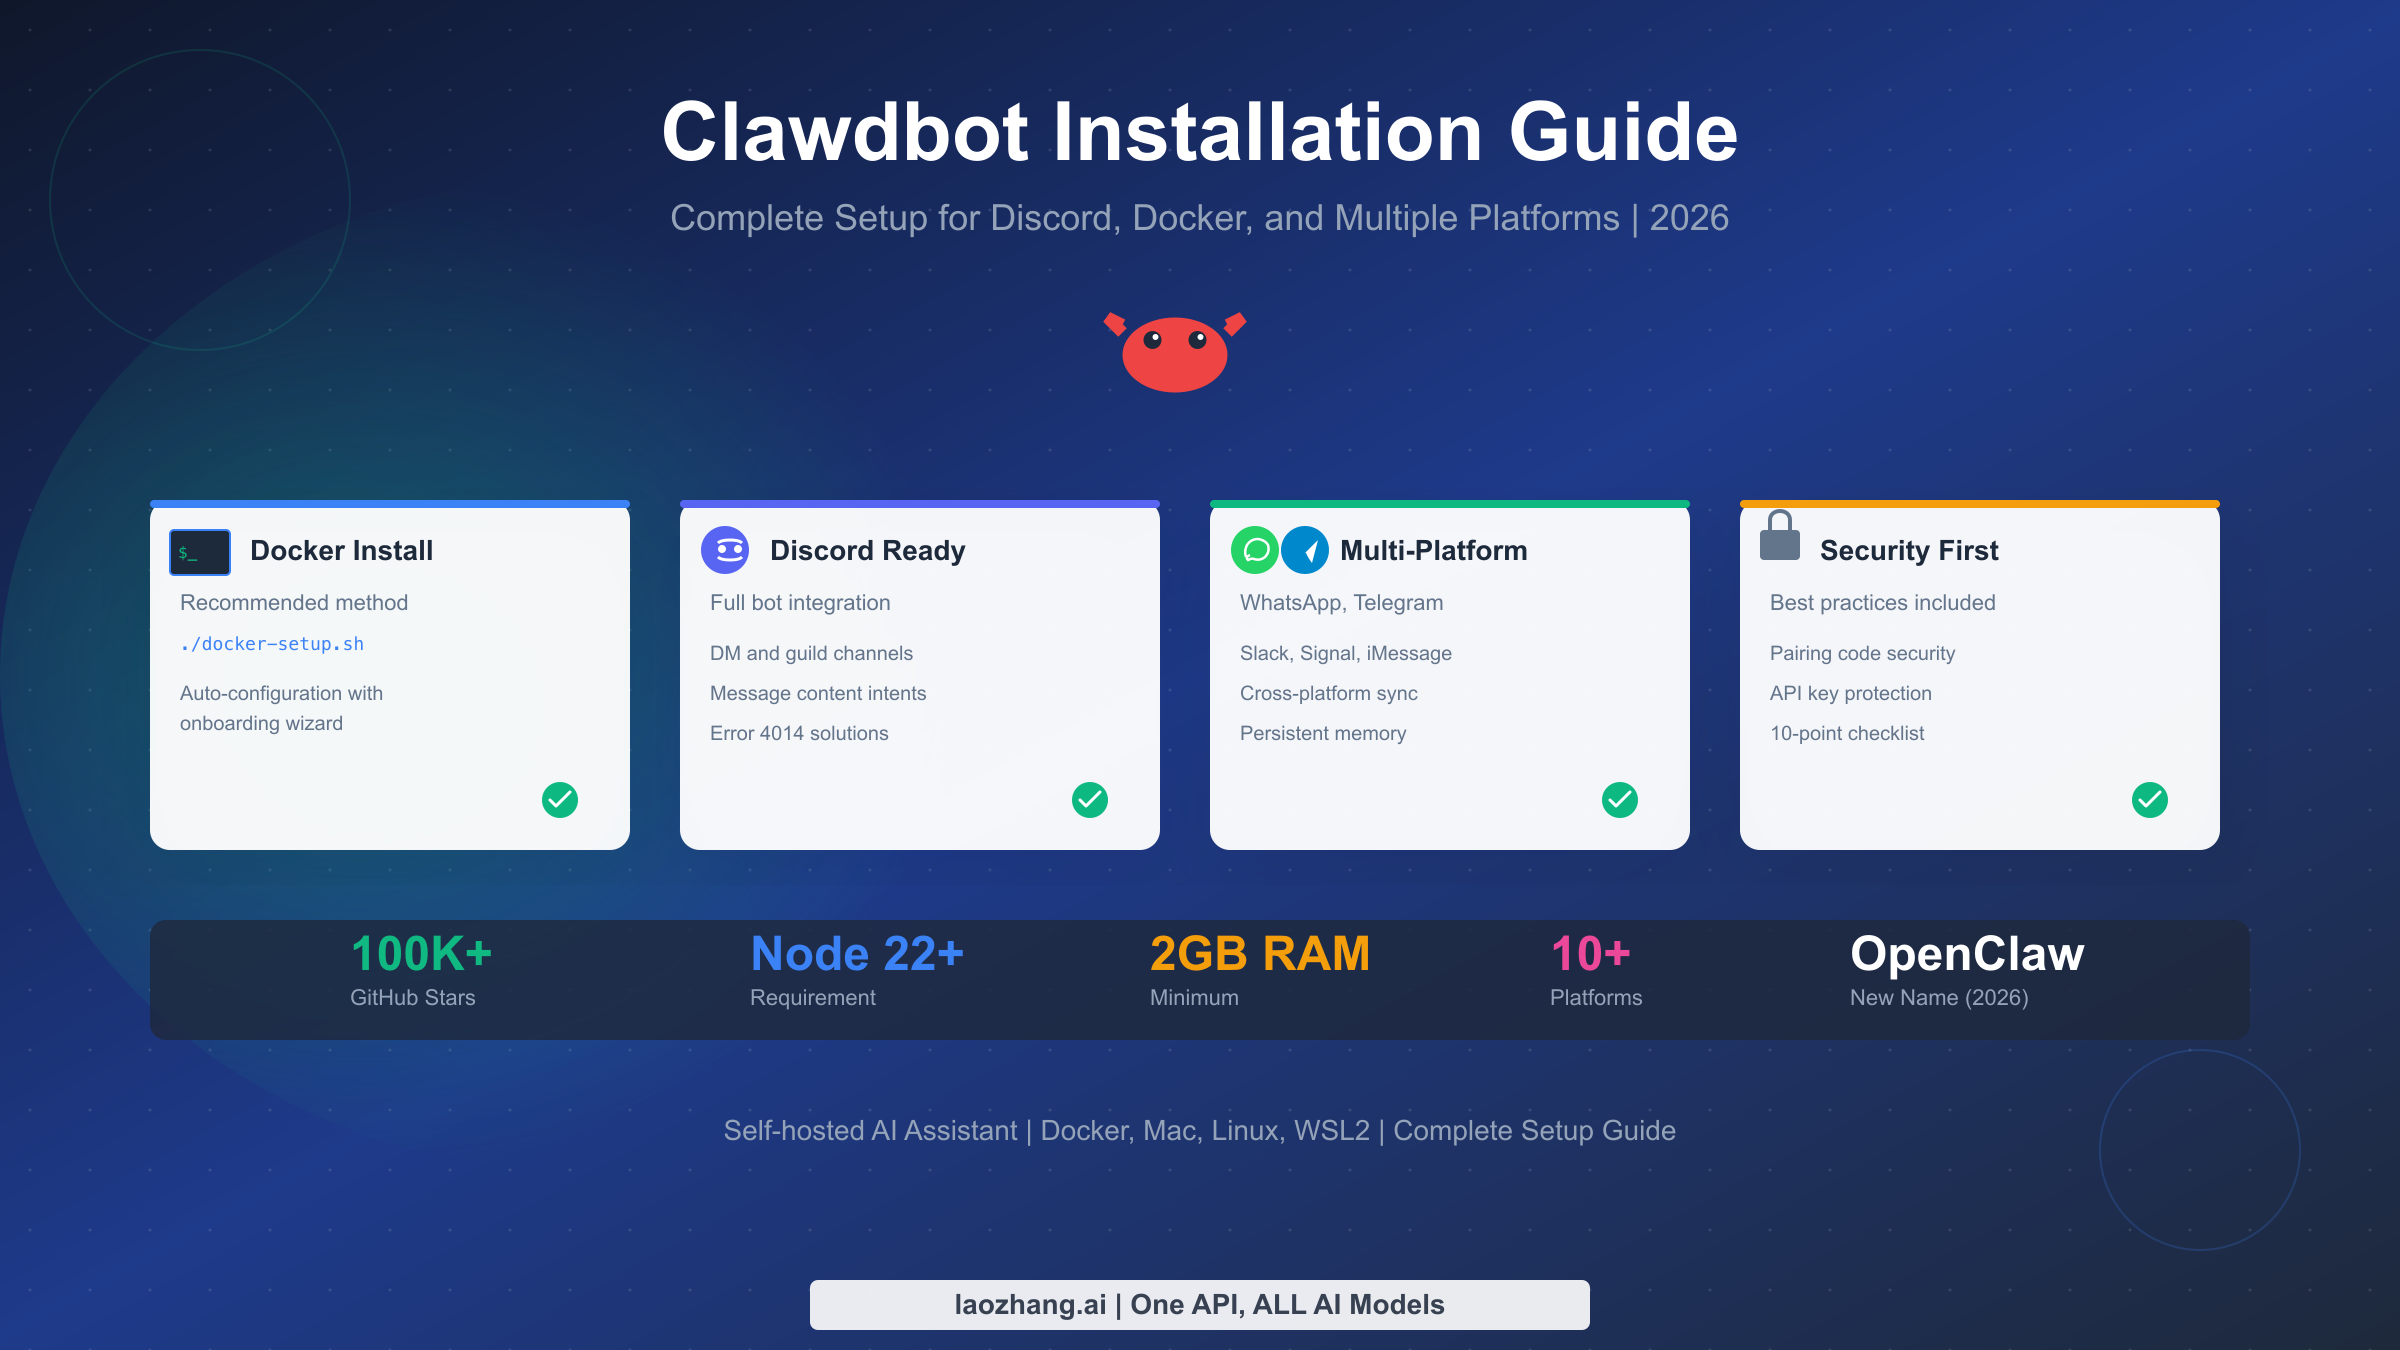
Clawdbot (now renamed OpenClaw after Anthropic's trademark request in January 2026) is a revolutionary self-hosted AI assistant that connects to messaging platforms you already use—Discord, WhatsApp, Telegram, Slack, and more. With over 100,000 GitHub stars in just weeks, it has become one of the fastest-growing open-source projects ever. This guide walks you through complete installation, from choosing the right method to securing your deployment and integrating with Discord.
TL;DR
OpenClaw (formerly Clawdbot/Moltbot) is a self-hosted AI assistant connecting LLMs to your messaging apps. The fastest installation method is Docker: clone the repository, run ./docker-setup.sh, and follow the onboarding wizard. Requires Node.js 22+ and 2GB RAM minimum. Windows users must use WSL2—native Windows is not supported. For Discord integration, enable MESSAGE CONTENT INTENT in the Developer Portal to avoid Error 4014. This guide covers all installation methods, complete Discord bot setup, 10-point security checklist, and comprehensive troubleshooting.
What is Clawdbot (Now OpenClaw)?
The story of Clawdbot begins with Peter Steinberger, founder of PSPDFKit, who wanted an AI assistant that could live where he already spent his time—in Discord, WhatsApp, and other messaging platforms. Rather than building yet another chat interface, he created an intelligent gateway that connects your favorite messaging apps to powerful language models like Claude and GPT.
On January 27, 2026, Anthropic issued a trademark request because "Clawd" sounded too similar to their flagship model "Claude." The project swiftly rebranded to Moltbot, keeping the beloved lobster mascot that had become iconic in the community. You may also see references to OpenClaw, which is the project's new official name, though the community still affectionately calls it by its original name. Regardless of what you call it, the core functionality remains unchanged: a powerful, privacy-respecting AI assistant that runs entirely on your own hardware.
What makes OpenClaw fundamentally different from cloud-based alternatives like ChatGPT or Gemini is its architecture. While those services require you to visit their websites and maintain session-based conversations, OpenClaw runs continuously on your computer or server, maintaining persistent memory across all your interactions. You can start a conversation on your phone via WhatsApp during your morning commute, then continue that same conversation from your desktop through Discord at work. The AI remembers everything—your preferences, ongoing projects, and the context of previous discussions—because all that data lives securely on your own infrastructure.
The project has exploded in popularity for good reason. In an era of increasing concern about data privacy and AI dependency on cloud services, OpenClaw offers a compelling alternative. Your conversations never leave your network. Your API keys stay on your machine. And you maintain complete control over what the AI can and cannot access. For developers, power users, and privacy-conscious individuals, this represents a paradigm shift in how we interact with AI assistants.
Prerequisites and System Requirements
Before diving into installation, you need to ensure your system meets the minimum requirements. OpenClaw is surprisingly lightweight—people have successfully run it on Raspberry Pis with Cloudflare tunnels—but having adequate resources ensures a smooth experience, especially during the initial setup process which involves npm installations that can be memory-intensive.
The fundamental requirement is Node.js version 22 or higher. This is non-negotiable, as the project relies on features introduced in recent Node.js releases. If you're unsure of your current version, run node --version in your terminal. For those needing to upgrade, Node Version Manager (nvm) provides the easiest path: nvm install 22 && nvm use 22. Package manager pnpm is recommended for building from source, though npm will work for the quick install script method.
Memory requirements deserve special attention because they often catch users off guard. While the running gateway is relatively lightweight at around 256MB, the installation process—particularly npm dependency installation—can spike to 2GB or more. Running the setup on a 1GB VPS will likely result in out-of-memory errors during npm install. If you're constrained to 1GB, you can use NODE_OPTIONS="--max-old-space-size=768" as a workaround, but 2GB is the safer recommendation for hassle-free setup.
Platform support varies significantly between operating systems. macOS and Linux are first-class citizens with native support. If you're building the desktop apps, macOS users should have Xcode or Command Line Tools installed, though for CLI and gateway usage only, Node.js suffices. Windows users must use WSL2 (Windows Subsystem for Linux) with Ubuntu or another Linux distribution—native Windows is explicitly unsupported, untested, and known to be problematic. This isn't a temporary limitation; the project's architecture relies on Unix-like system features that don't translate well to native Windows.
For API access, you'll need credentials from at least one LLM provider. Anthropic's Claude is the recommended default, and you can authenticate either through an API key (recommended for simplicity) or by reusing your Claude Code credentials via claude setup-token. OpenAI and other providers are also supported. Additionally, if you plan to use web search functionality, a Brave Search API key is recommended. For a detailed breakdown of Clawdbot pricing and operational costs, including monthly API expenses and hardware recommendations, see our comprehensive cost analysis.
Installation Methods Compared
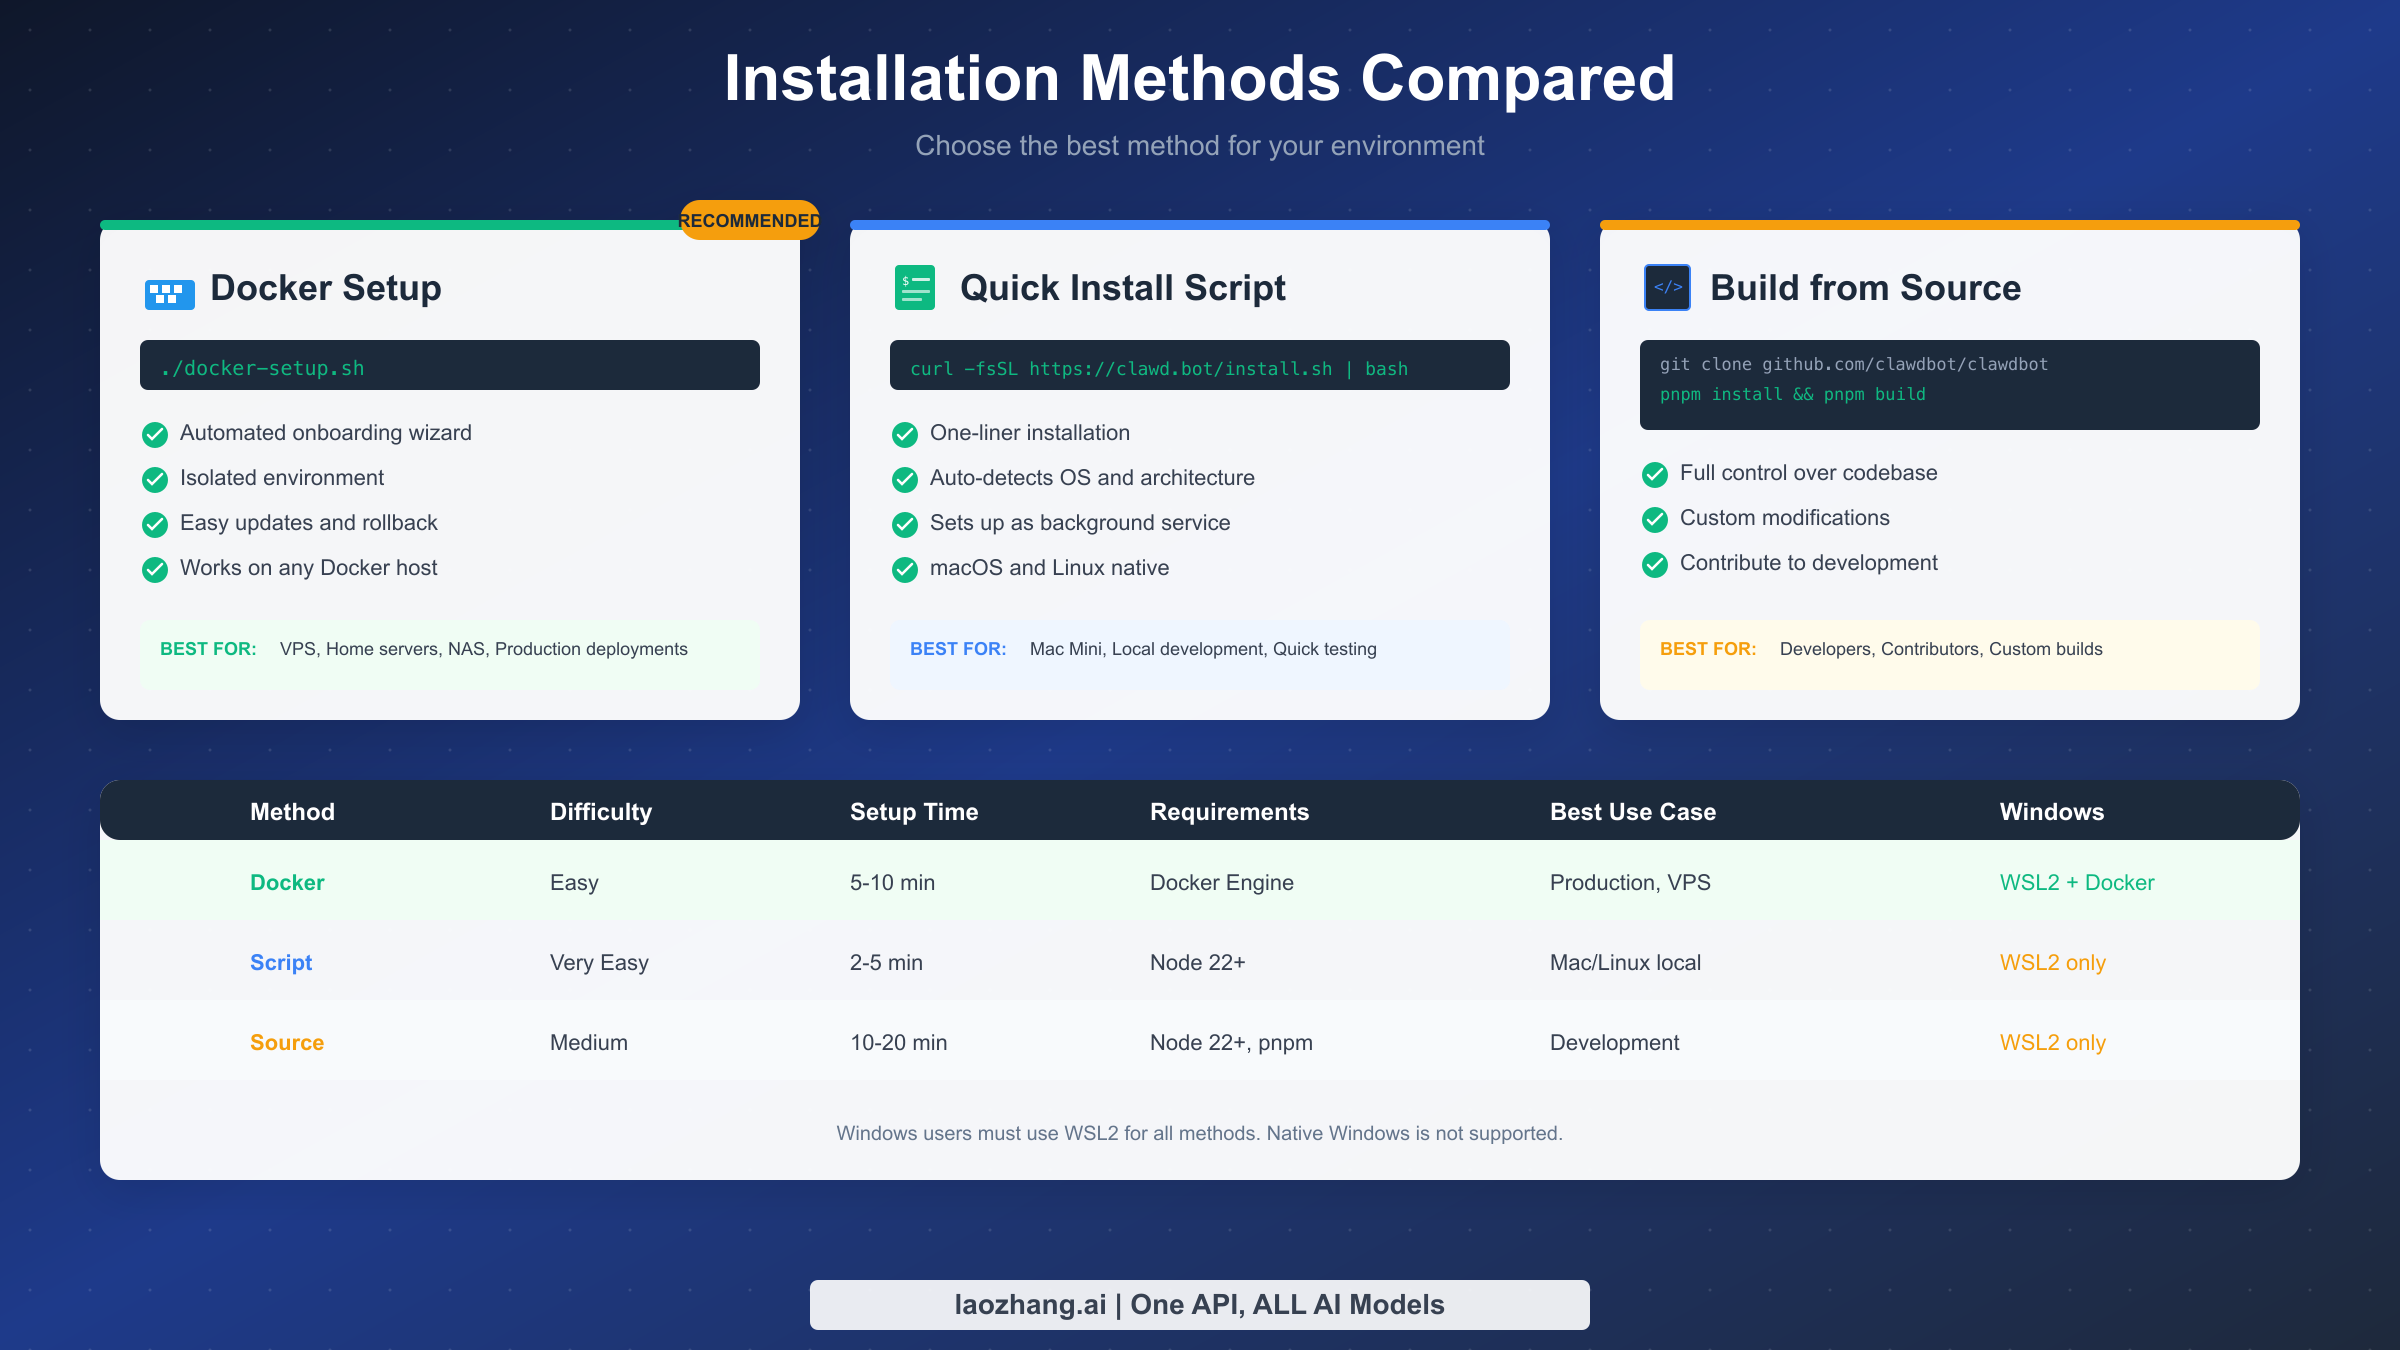
Choosing the right installation method depends on your environment, technical comfort level, and deployment goals. OpenClaw provides three primary installation paths, each optimized for different use cases. Understanding the trade-offs helps you make the right choice the first time, avoiding the frustration of starting over with a different approach.
Docker Installation stands as the recommended method for most users, particularly those deploying to VPS, home servers, NAS devices, or any production environment. The Docker approach wraps OpenClaw in an isolated container, ensuring consistent behavior regardless of your host system's configuration. This isolation means dependencies never conflict with other software on your machine, updates are as simple as pulling a new image, and rollbacks are trivial if something goes wrong. The setup script ./docker-setup.sh automates the entire process, building the image, running the onboarding wizard, and starting the gateway with sensible defaults.
The Quick Install Script offers the fastest path from zero to running for macOS and Linux users who prefer native installations. A single command—curl -fsSL https://clawd.bot/install.sh | bash—downloads and executes the installer, which automatically detects your operating system and architecture, installs the necessary binaries, and offers to set up OpenClaw as a background service via launchd (macOS) or systemd (Linux). This method shines for local development, quick testing, or Mac Mini deployments where you want the assistant running natively without container overhead.
Building from Source provides maximum control for developers, contributors, or anyone needing custom modifications. This approach involves cloning the GitHub repository, installing dependencies with pnpm, and building the project yourself. While it takes longer—typically 10-20 minutes compared to 5-10 for Docker—you gain the ability to modify source code, contribute patches, or run cutting-edge development builds. This method is essential if you're planning to extend OpenClaw with custom features or debug issues at the code level.
For Windows users, the path is more constrained but entirely workable. All three methods require WSL2, and within that Linux environment, Docker often proves easiest because Docker Desktop for Windows handles the WSL2 integration seamlessly. If you're coming from a Windows background and WSL2 is new to you, investing time in understanding the Windows Subsystem for Linux pays dividends beyond just this project—it's increasingly the recommended way to do any serious development work on Windows.
Docker Installation Step-by-Step
Docker installation provides the most reliable and reproducible setup experience, wrapping OpenClaw in an isolated container that behaves consistently across different host systems. This section walks through each step in detail, from initial clone to first conversation with your AI assistant.
Begin by cloning the official repository to your local machine. Open your terminal and navigate to where you keep project directories—your home folder or a dedicated development directory works well. Execute git clone https://github.com/clawdbot/clawdbot.git followed by cd clawdbot to enter the project directory. The repository is actively maintained with frequent releases, so you're getting the latest stable code.
Before running the setup script, consider which optional configurations you might need. Environment variables like OPENCLAW_DOCKER_APT_PACKAGES allow installing additional system packages into the container—useful if you need tools like ffmpeg for media processing or build-essential for compiling native extensions. The OPENCLAW_EXTRA_MOUNTS variable lets you bind additional host directories into the container, essential for accessing Claude Code credentials or custom skill directories. Export these before running setup if needed: export OPENCLAW_DOCKER_APT_PACKAGES="ffmpeg curl".
Now execute the main setup script with ./docker-setup.sh. This script orchestrates several operations: it builds the Docker image from the provided Dockerfile, runs the interactive onboarding wizard within a temporary container, configures your model providers and authentication, and finally starts the gateway as a persistent service via Docker Compose. The wizard walks you through each configuration step, asking which LLM providers you want to use, prompting for API keys, and helping you enable messaging channels.
For Anthropic Claude—the recommended model—the onboarding wizard offers two authentication paths. You can directly enter an API key, which is the most straightforward option and works everywhere. Alternatively, if you're already a Claude Code subscriber and want to avoid paying for separate API access, you can authenticate using your existing subscription. This involves ensuring the Claude Code CLI is available inside the container and mounting your ~/.claude credentials directory. For step-by-step instructions on this cost-saving approach, see our guide on Clawdbot API key and OpenRouter integration.
Once the setup completes, the gateway starts running and provides a URL—typically http://127.0.0.1:18789/. Open this in your browser to access the Control UI where you can paste your gateway token (displayed in the terminal) into Settings. This token authenticates the web interface with your running gateway. From here, you can test the assistant directly through the web chat before configuring external messaging channels.
Verification is crucial before proceeding to channel configuration. Run docker compose logs -f openclaw-gateway to monitor real-time logs and watch for any errors during startup. The openclaw doctor command (run via docker compose exec openclaw-cli openclaw doctor) performs comprehensive health checks, verifying your authentication, checking configuration validity, and testing connectivity to configured services. Any warnings or errors here should be addressed before enabling messaging channels.
Discord Integration Complete Guide
Discord integration transforms OpenClaw from a personal tool into a powerful assistant accessible from any device where you have Discord installed. The setup involves creating a Discord application, configuring bot permissions, and connecting everything to your OpenClaw gateway. This process takes about 10-15 minutes and includes solutions for the common Error 4014 that trips up many users.
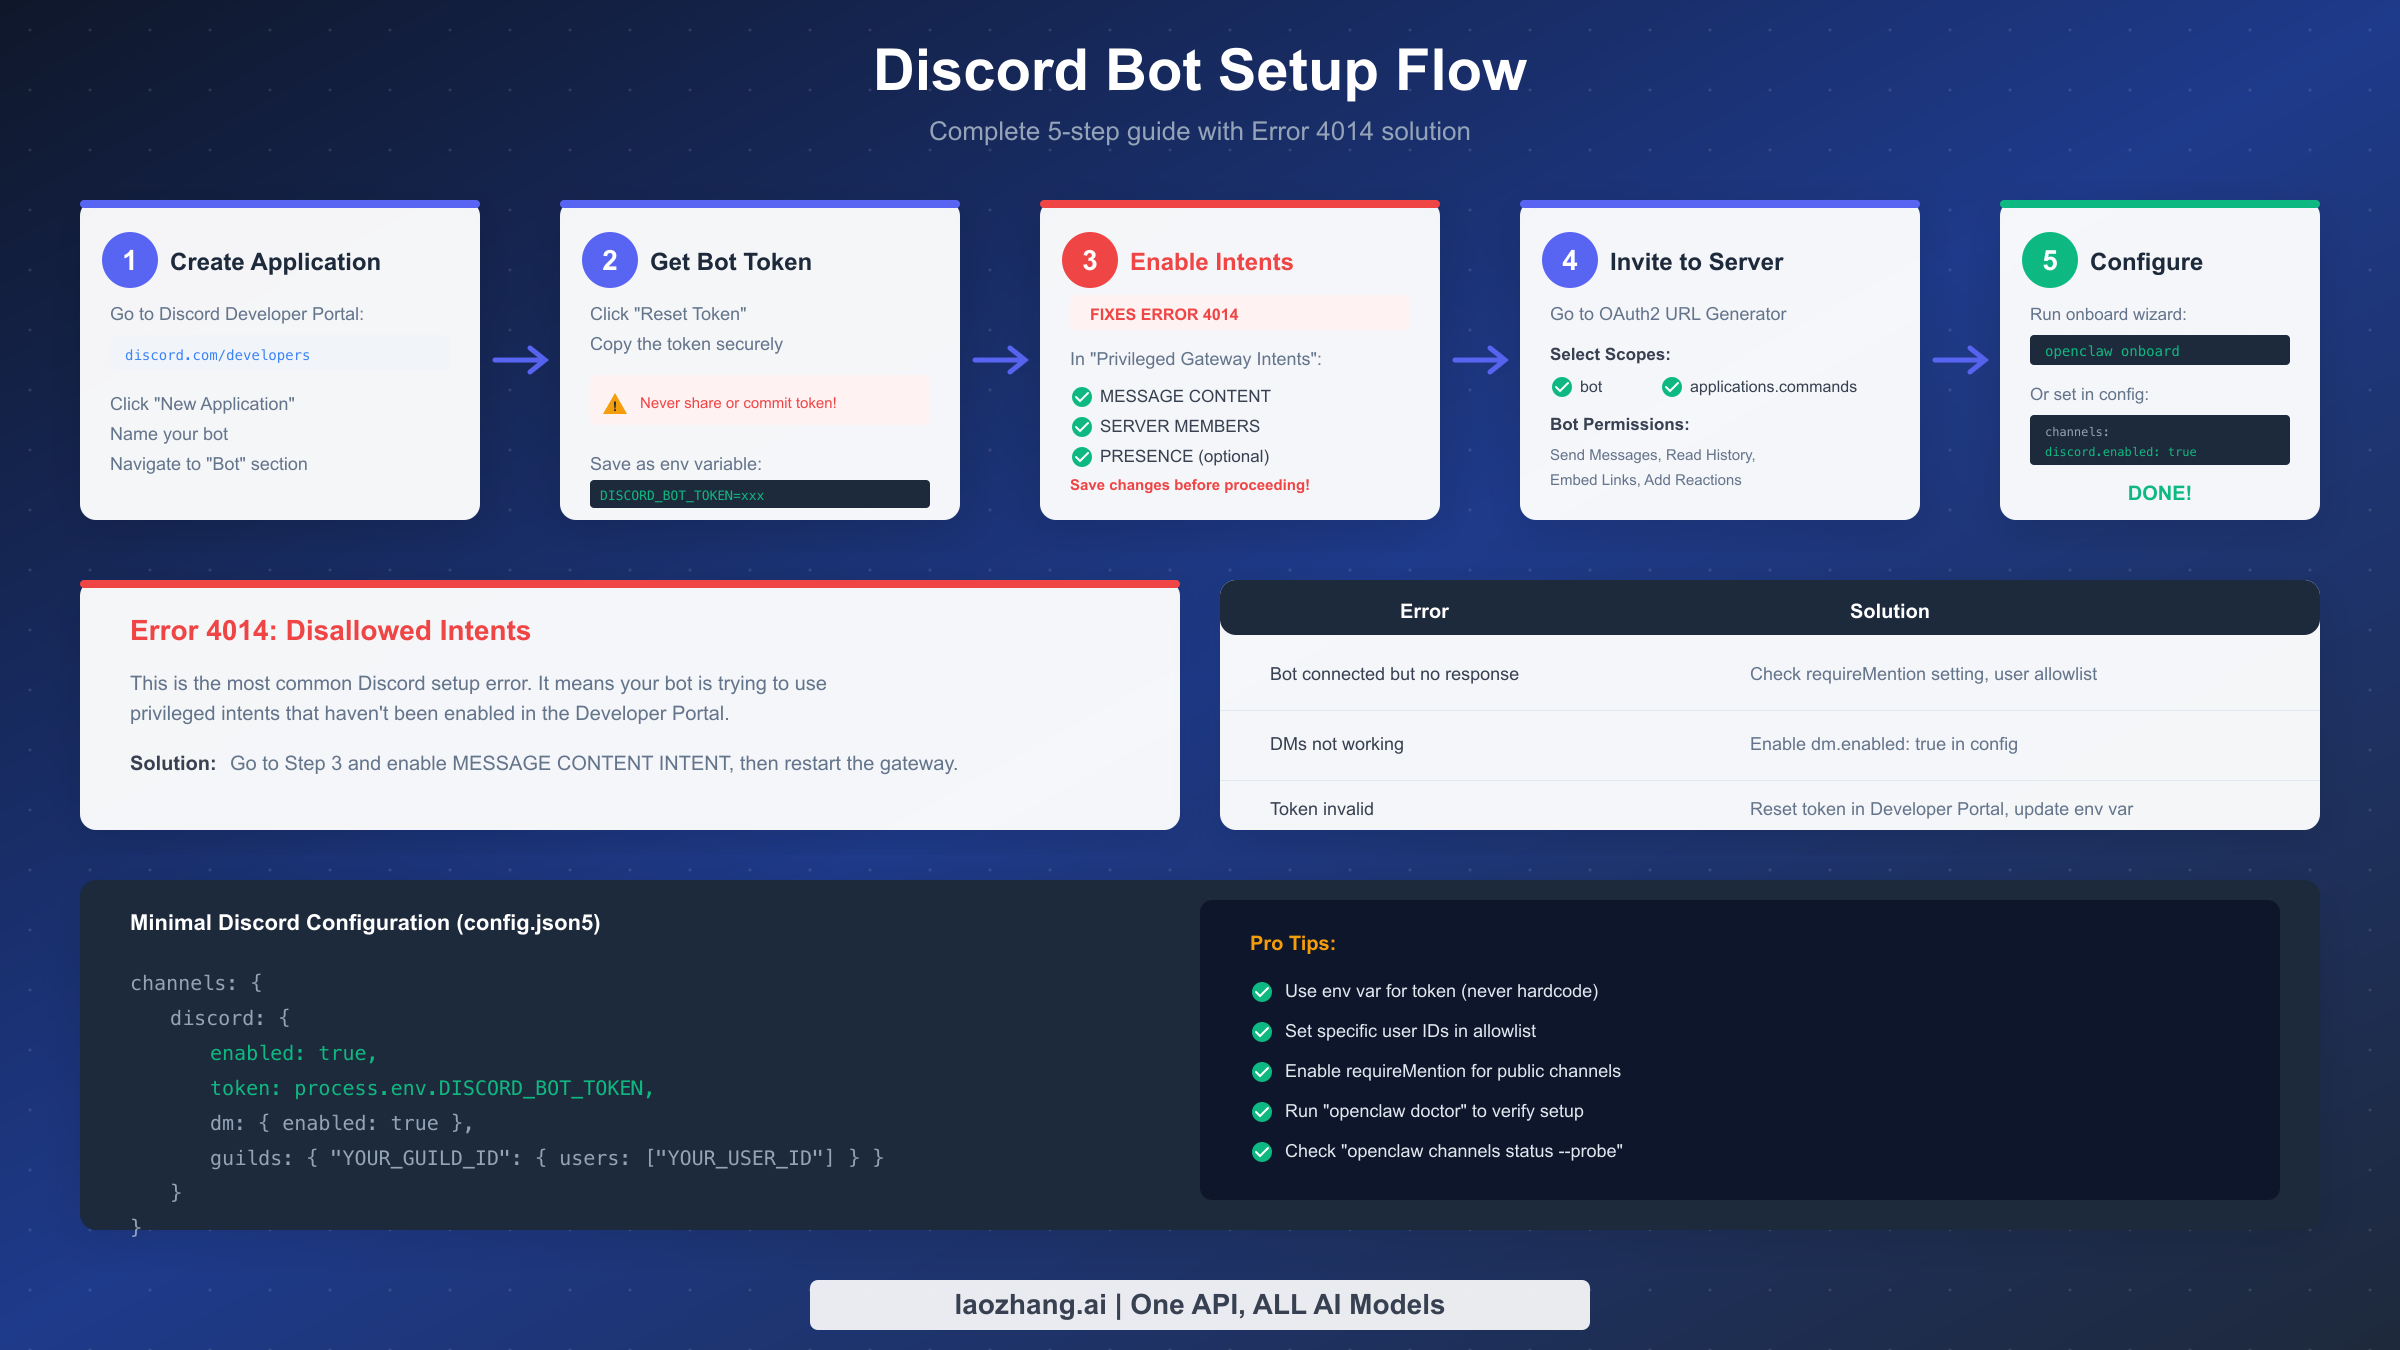
Creating Your Discord Application starts at the Discord Developer Portal at discord.com/developers/applications. Click "New Application," give your bot a memorable name, and accept the Developer Terms of Service. Navigate to the "Bot" section in the left sidebar—this is where you'll configure the actual bot user that will appear in your server. You can customize the bot's username and avatar here; many users upload the OpenClaw lobster mascot to make the bot instantly recognizable.
Obtaining Your Bot Token is the next critical step. In the Bot section, look for the "Token" area and click "Reset Token." Discord will display a long alphanumeric string—this is your bot's secret identity credential. Copy it immediately and store it securely, treating it exactly like a password. Never commit this token to version control, share it in screenshots, or include it in public configurations. The recommended practice is storing it as an environment variable: export DISCORD_BOT_TOKEN="your_token_here".
Enabling Privileged Gateway Intents is where many installations fail, resulting in the dreaded Error 4014. Discord requires explicit opt-in for certain sensitive capabilities. Still in the Bot section, scroll down to "Privileged Gateway Intents" and toggle ON three switches: MESSAGE CONTENT INTENT (mandatory—without this, your bot cannot read message text), SERVER MEMBERS INTENT (recommended for allowlist functionality), and PRESENCE INTENT (optional, for tracking user online status). After enabling these, scroll up and click "Save Changes"—this step is often overlooked and causes Error 4014 even after enabling the intents.
Generating the Invite URL uses Discord's OAuth2 URL Generator. Navigate to "OAuth2" → "URL Generator" in the left sidebar. Under "Scopes," check both bot and applications.commands. This reveals the "Bot Permissions" section below, where you select the minimum permissions your bot needs: View Channels, Send Messages, Read Message History, Embed Links, Attach Files, and Add Reactions. Copy the generated URL at the bottom and open it in your browser to invite the bot to your Discord server.
Configuring OpenClaw for Discord can happen through the onboarding wizard or by directly editing the configuration file. The minimal configuration enables Discord and specifies your bot token. For security, the configuration also defines which users and channels the bot will respond to—an open configuration without allowlists means anyone who can message the bot gains access to your AI assistant and, potentially, your system. A production-ready configuration restricts access to specific user IDs within specific guilds (Discord servers) and may require the bot to be mentioned before responding in busy channels.
If your bot connects but doesn't respond to messages, the troubleshooting steps follow a predictable pattern. First, verify the MESSAGE CONTENT INTENT is enabled and saved in the Developer Portal. Second, check your configuration's user allowlist matches your Discord user ID (enable Developer Mode in Discord settings to copy user IDs). Third, examine whether requireMention is enabled for the channel, requiring you to @mention the bot. Fourth, run openclaw doctor and openclaw channels status --probe to diagnose connectivity issues. For authentication-specific errors, our Clawdbot 401 authentication error guide provides detailed troubleshooting steps.
WhatsApp, Telegram, and Other Platforms
While Discord offers robust bot integration, OpenClaw's true power emerges when connected to multiple messaging platforms simultaneously. WhatsApp keeps you connected while mobile, Telegram provides rich bot features, Slack integrates into work contexts, and iMessage reaches Apple ecosystem users. Configuring additional platforms follows patterns similar to Discord but with platform-specific considerations.
WhatsApp Integration uses the WhatsApp Web protocol, requiring a QR code scan to authenticate. Run openclaw channels login or access the channel setup through the onboarding wizard, and a QR code appears in your terminal. Scan this with your phone's WhatsApp app (Settings → Linked Devices → Link a Device), and the gateway establishes a persistent connection. A critical recommendation: use a dedicated phone number for your OpenClaw WhatsApp rather than your personal number. This separation protects your personal messaging and prevents accidental exposure if the bot misbehaves.
Telegram Integration uses the official Bot API, providing a cleaner setup experience without QR codes. Create a new bot through Telegram's @BotFather, which provides you with an API token. Add this token to your configuration under channels.telegram.token. Telegram bots offer additional features like inline keyboards and custom commands that advanced users can leverage through OpenClaw skills.
Slack Integration typically involves creating a Slack App in your workspace's administration panel, configuring OAuth scopes for message reading and writing, and installing the app to your workspace. The resulting bot token and signing secret go into OpenClaw's configuration. For enterprise deployments, Slack often makes the most sense due to its integration with work tools and existing access controls.
Each platform implements a pairing security system to prevent unauthorized access. When someone messages your bot for the first time, they receive a pairing code that must be approved via openclaw pairing approve [channel] [code]. This security measure ensures that even if someone discovers your bot's presence, they cannot interact with it without your explicit approval. You can configure pairing behavior globally or per-channel, with options ranging from "always require pairing" to "auto-approve trusted domains."
The beauty of multi-platform deployment is conversation continuity. Start discussing a coding problem on WhatsApp during your commute, continue the conversation on Slack when you reach the office, and resume from Discord on your home computer—the AI maintains complete context throughout. This seamless experience is possible because OpenClaw stores conversation history locally, indexed by user identity across platforms rather than by session.
Security Best Practices
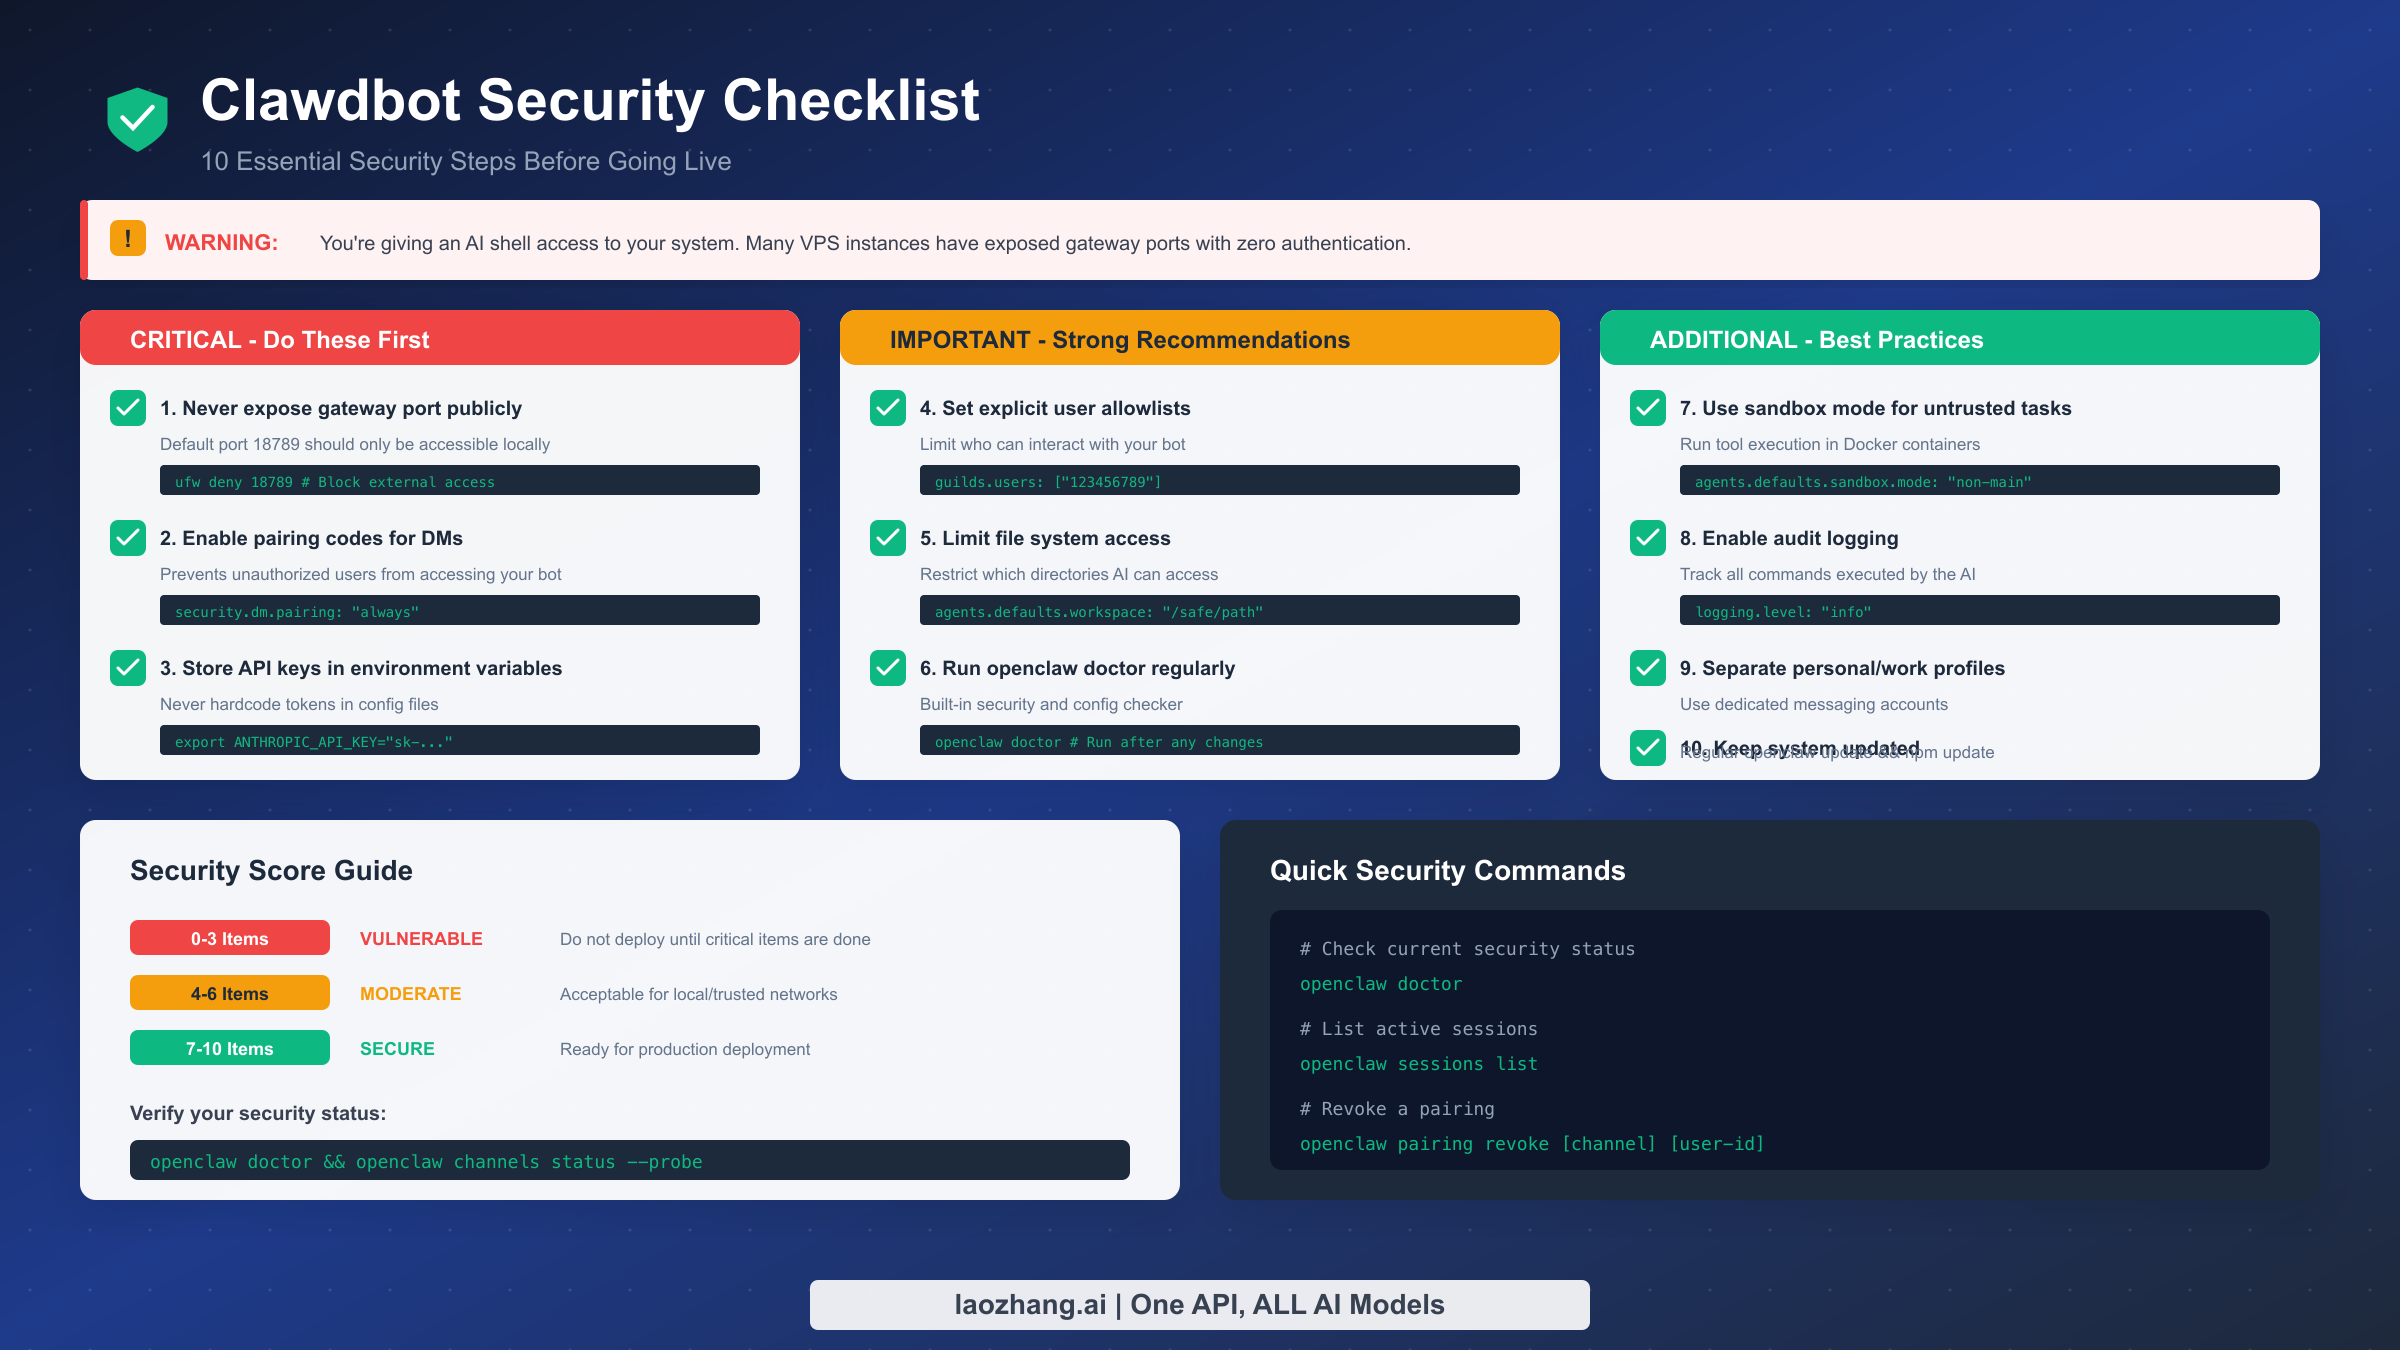
Installing OpenClaw means giving an AI shell access to your system, API tokens to potentially sensitive services, and an interface that anyone could theoretically message. This section isn't meant to alarm you—OpenClaw is designed with security in mind—but rather to ensure you deploy responsibly. A security scan of OpenClaw instances running on public VPS providers revealed many with gateway ports open without authentication, API keys exposed, and file permissions misconfigured. Don't be one of those deployments.
The gateway port should never be publicly accessible. The default port 18789 hosts the Control UI and API endpoints that manage your assistant. Exposing this to the internet without authentication is equivalent to leaving your front door open with a sign saying "sensitive files inside." On Linux with ufw, run ufw deny 18789 to block external access. If you need remote access, use SSH tunneling or a properly secured reverse proxy with authentication rather than opening the port directly.
Pairing codes provide the first line of defense against unauthorized messaging access. Configure security.dm.pairing: "always" to require approval for every new user who attempts to message your bot. This means even if someone discovers your bot's Discord ID or WhatsApp number, they cannot interact with it without you explicitly running the pairing approval command. For guild channels, combine this with strict allowlists specifying exactly which user IDs may interact with the bot.
API keys and tokens demand secure storage. Never hardcode sensitive credentials in configuration files that might be committed to version control or backed up to cloud services. Instead, store them as environment variables: export ANTHROPIC_API_KEY="sk-...". For Docker deployments, use Docker secrets or a .env file excluded from version control. The configuration system supports environment variable interpolation, so you can reference process.env.ANTHROPIC_API_KEY directly in config files.
File system access boundaries protect your sensitive data. By default, OpenClaw has access to whatever the running user can access. Configure agents.defaults.workspace to restrict the AI's file operations to a specific directory tree, preventing it from reading system files, browsing your home directory, or accessing credentials stores. For maximum isolation, enable sandbox mode with agents.defaults.sandbox.mode: "non-main", which runs tool execution inside Docker containers separate from your host system.
Audit logging creates accountability trails. Enable comprehensive logging with logging.level: "info" to record all commands the AI executes, all files it accesses, and all external requests it makes. Review these logs periodically, especially in the first weeks of deployment when you're still understanding how you use the assistant. Unexpected file access patterns or command executions may indicate either a security issue or an opportunity to refine your sandbox configuration.
Regular updates close security vulnerabilities. The project maintainers actively address security issues, but those fixes only help if you actually update. Run git pull && pnpm install && pnpm build for source installations, or rebuild your Docker image periodically. Subscribe to the project's security advisory notifications and join the Discord community where security-relevant announcements are shared.
Troubleshooting Common Issues
Even with careful installation, you may encounter issues that prevent OpenClaw from functioning correctly. This section addresses the most frequently reported problems with systematic diagnostic approaches, saving you hours of forum searching and trial-and-error debugging.
Error 4014 (Disallowed Intents) remains the single most common Discord setup failure. This error means your bot is attempting to use privileged intents—specifically MESSAGE CONTENT INTENT—that haven't been enabled in the Discord Developer Portal. The solution requires navigating to your application's Bot settings, scrolling to "Privileged Gateway Intents," enabling MESSAGE CONTENT INTENT (and optionally SERVER MEMBERS INTENT), then critically clicking "Save Changes" before restarting your gateway. Many users enable the intents but forget to save, leading to confusion when the error persists.
Gateway starts but bot doesn't respond typically indicates a configuration mismatch rather than a connection failure. Start diagnosis with openclaw channels status --probe, which actively tests each configured channel. Check that the user attempting to interact is included in the allowlist—Discord user IDs are numeric strings like "123456789012345678" that you can obtain by enabling Developer Mode in Discord settings and right-clicking your username. Verify whether requireMention is configured for the channel, which would require @mentioning the bot to trigger responses.
Authentication failures manifest as 401 errors and indicate issues with your LLM provider credentials. Run openclaw doctor to verify authentication status. For Anthropic, ensure your API key is valid and not expired by testing it with a curl request directly: curl https://api.anthropic.com/v1/messages -H "x-api-key: $ANTHROPIC_API_KEY" -H "content-type: application/json" -d '{"model":"claude-3-opus-20240229","max_tokens":10,"messages":[{"role":"user","content":"Hi"}]}'. If this fails, regenerate your API key from the Anthropic console.
Memory errors during installation plague users on resource-constrained VPS instances. The npm dependency installation phase is memory-intensive, often exceeding 1.5GB. For 1GB instances, add NODE_OPTIONS="--max-old-space-size=768" before running npm install. Alternatively, perform the build on a more powerful local machine and deploy the built artifacts to your VPS. Docker users can enable swap space on the host during the build phase.
WhatsApp QR code expiration forces users to repeatedly scan. If the QR code expires before you can scan it, the session authentication fails silently. Run the login command again to generate a fresh code, and have your phone ready before executing the command. Some users report that extremely slow terminal emulators render the QR code too slowly; switching to a faster terminal or using the web-based QR display often helps.
Bot responds but with errors mentioning rate limits indicates you've exceeded your LLM provider's request quotas. Check your API dashboard for current usage. For high-volume usage scenarios, consider configuring OpenClaw to use cheaper models for routine queries and reserving expensive models for complex tasks. The configuration supports per-skill model overrides for precisely this purpose.
Next Steps and Resources
With OpenClaw installed and running, you've taken the first step into a new paradigm of AI interaction. The assistant now lives where you do—in your messaging apps, available 24/7, maintaining context across all your conversations. But installation is just the beginning; the real power emerges as you customize the assistant to your specific needs.
Skills extend OpenClaw's capabilities beyond basic conversation. The ClawdHub marketplace offers community-contributed skills for tasks ranging from calendar management to code review to email drafting. Installing a skill is as simple as openclaw skills install [skill-name]. For developers, creating custom skills lets you teach your assistant company-specific workflows or integrate with internal tools. Our guide on how to create Clawdbot skills walks through the skill development process from initial concept to deployment.
The official documentation at docs.openclaw.ai provides comprehensive reference material for advanced configuration options, including detailed schema documentation for the config file, API references for building integrations, and architecture guides explaining how the various components interact. When the onboarding wizard's defaults no longer suffice, the documentation helps you unlock full customization.
The Discord community represents the most active support channel, with over 8,900 members sharing configurations, troubleshooting issues, and showcasing creative use cases. New features often surface in community discussions before appearing in official documentation, making the Discord invaluable for staying current with the rapidly evolving project.
API access through unified platforms like laozhang.ai can simplify your LLM provider setup. Rather than managing separate API keys for Claude, GPT, and other models, a unified API endpoint lets you access multiple providers through a single integration, often at competitive pricing. This approach proves particularly valuable when experimenting with different models for various skills or when rate limits on one provider necessitate failover options.
As OpenClaw continues its rapid development, expect the project to grow more capable while maintaining its core promise: a private, powerful AI assistant that lives where you already spend your digital life. Whether you're using it for code assistance, daily planning, communication management, or creative projects, the investment in self-hosting pays dividends in privacy, customization, and true ownership of your AI experience.