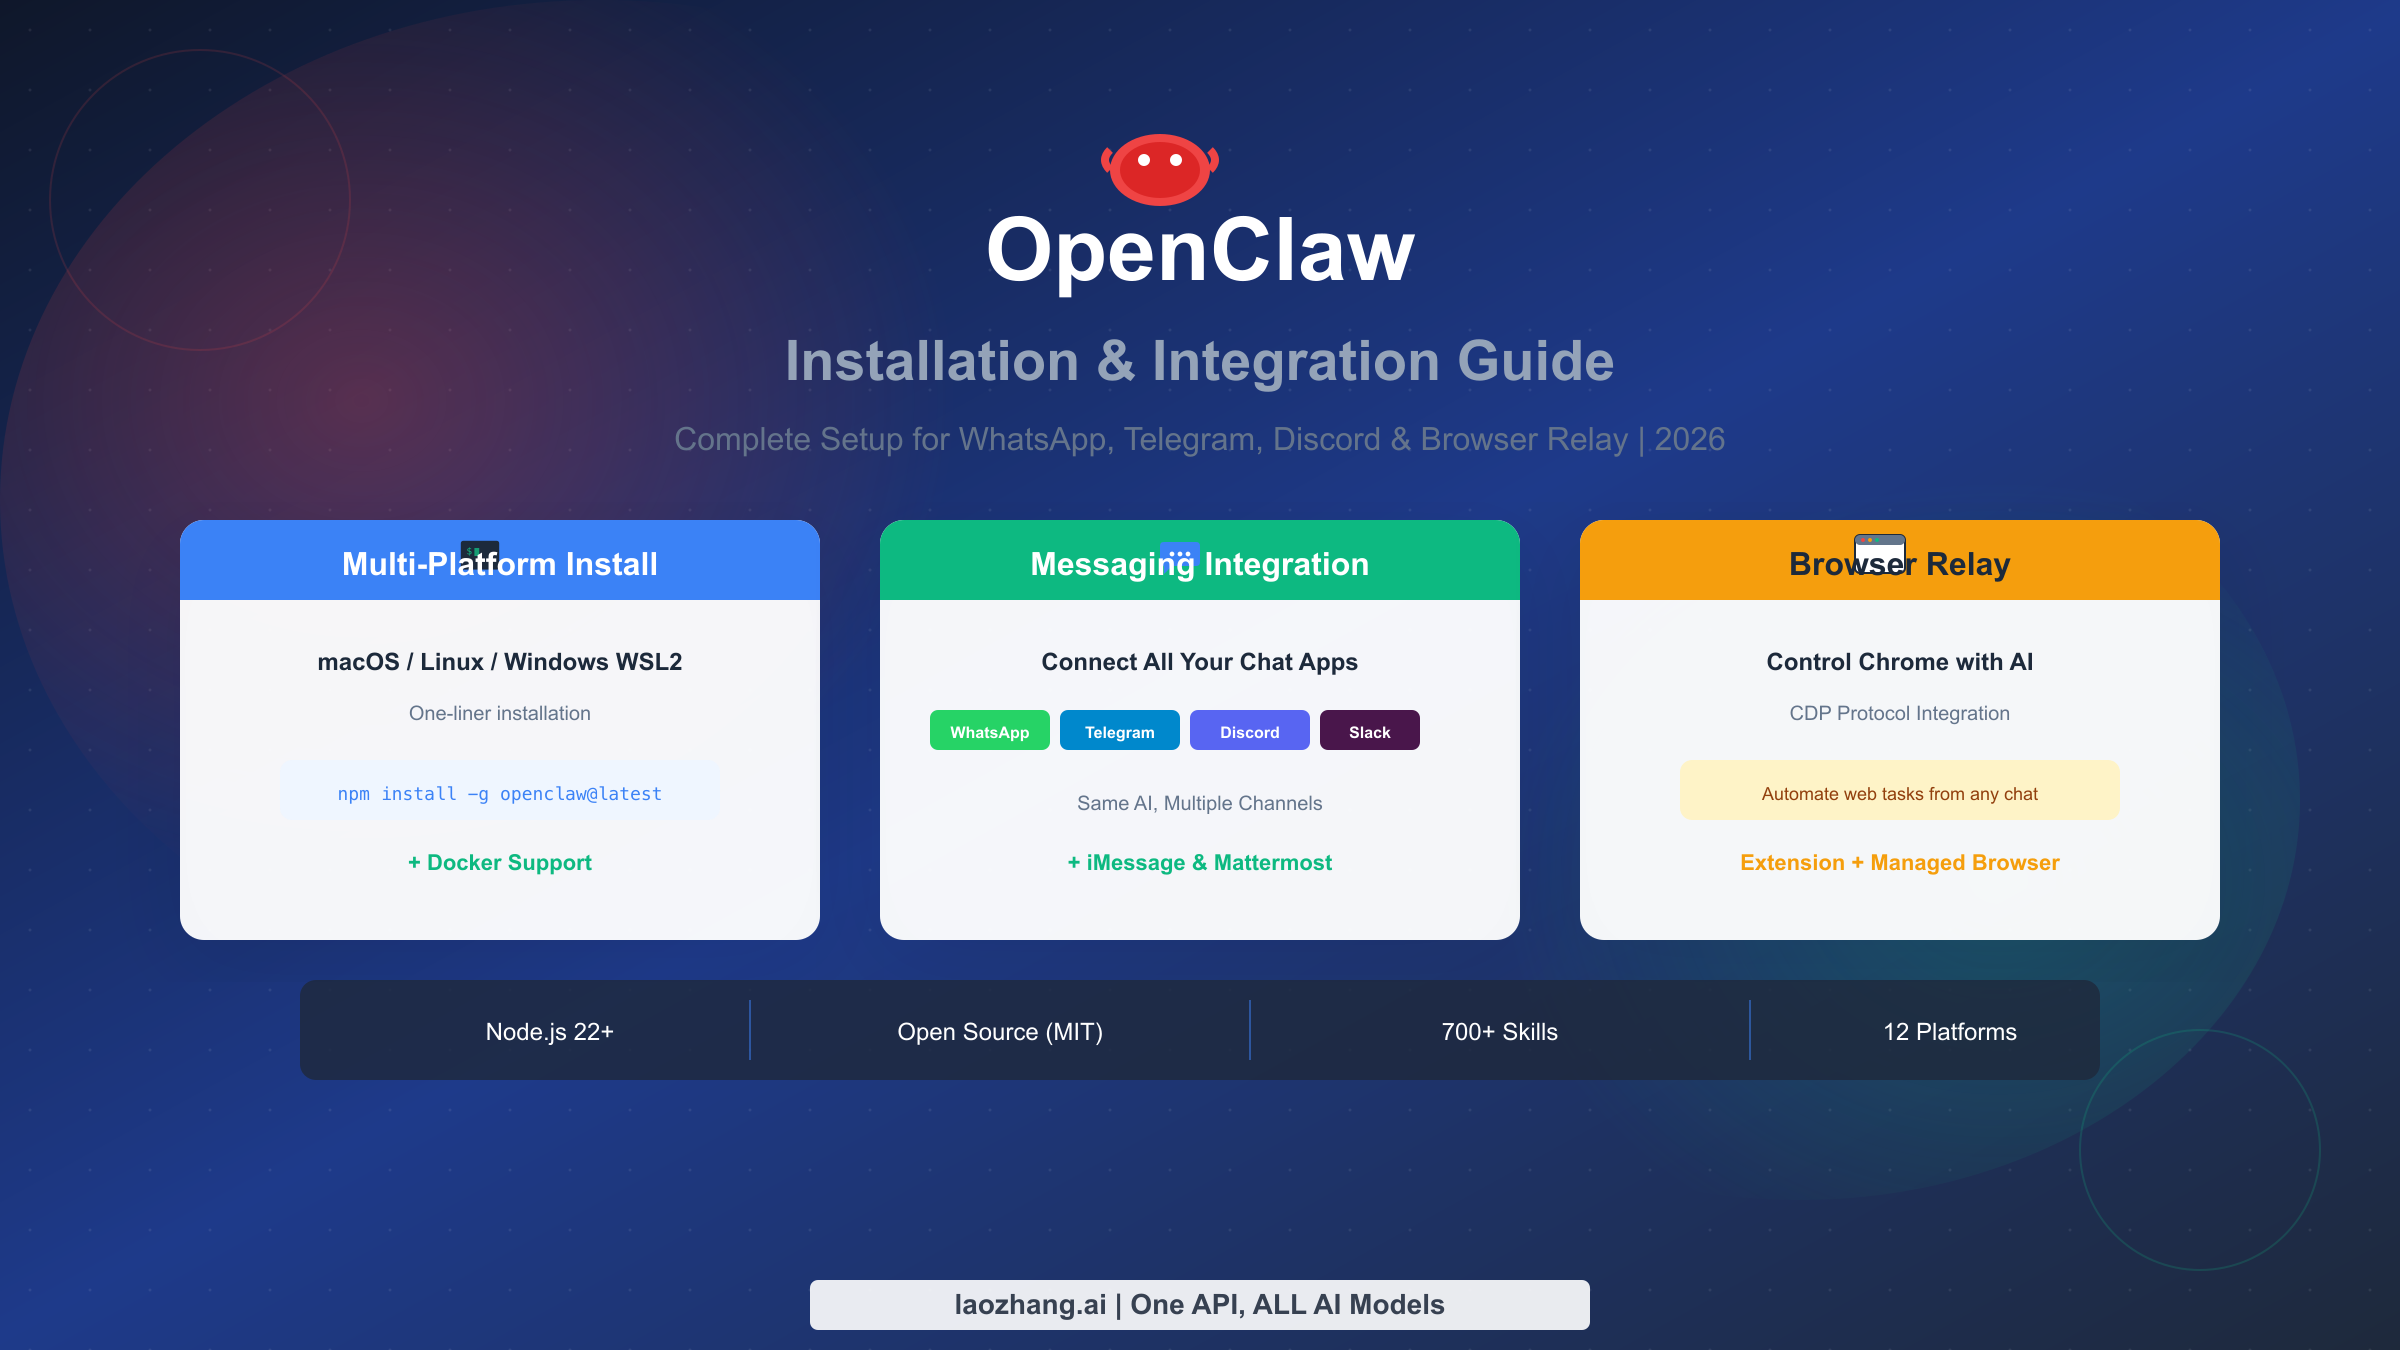
TL;DR
OpenClaw is an open-source AI assistant gateway that runs on your machine and connects to WhatsApp, Telegram, Discord, and Slack. Install with a single command (npm install -g openclaw@latest), run the onboarding wizard (openclaw onboard), and start chatting with AI from any messaging platform. This guide covers multi-platform installation, Docker deployment, messaging integration, Browser Relay setup, and troubleshooting—everything you need to go from zero to a fully functional personal AI assistant in under an hour.
Prerequisites & Choosing Your Installation Method
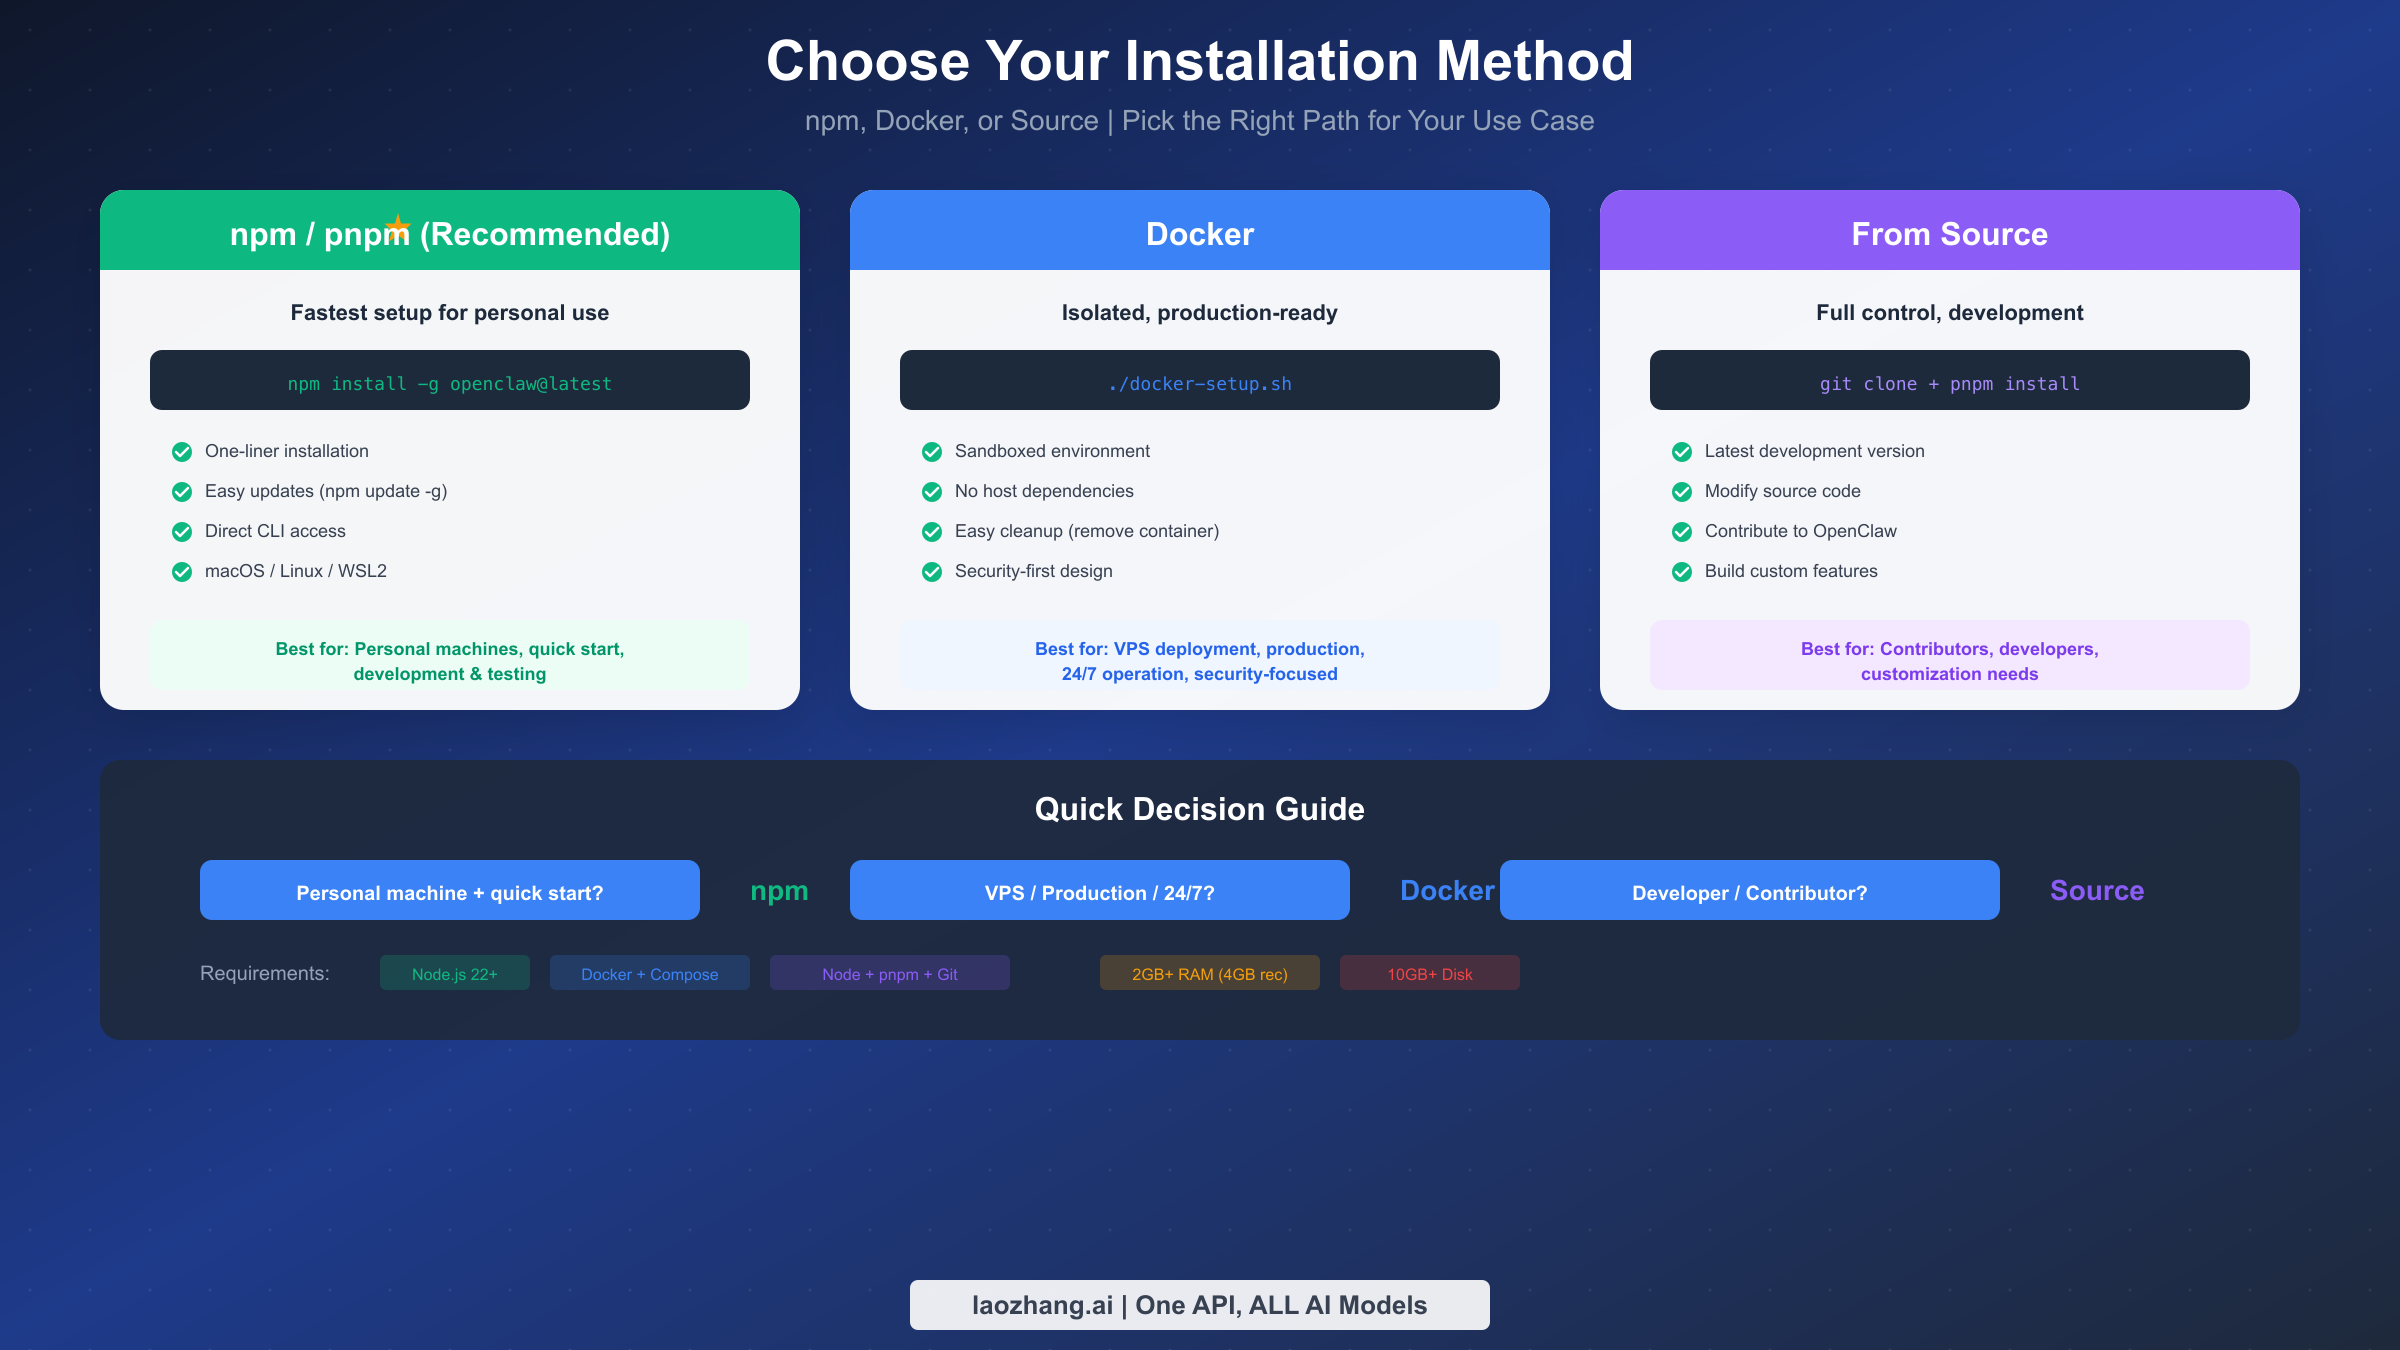
Before diving into installation, you need to understand the available options and choose the path that best fits your use case. OpenClaw (formerly known as Clawdbot and Moltbot) offers three primary installation methods, each with distinct advantages depending on your technical requirements and deployment environment. If you've used OpenClaw's predecessors, you might find our previous Clawdbot installation guide helpful for understanding the evolution of the platform.
The most common approach is the npm/pnpm global installation, which provides the fastest path from zero to a working AI assistant. This method requires Node.js version 22 or higher installed on your system, and it works seamlessly on macOS, Linux, and Windows through WSL2. The npm installation is ideal for personal machines where you want quick access to OpenClaw's CLI commands and easy updates through the standard package manager workflow.
For production environments or VPS deployments, Docker installation offers significant advantages. The containerized approach provides complete isolation from your host system, enhanced security through sandboxed execution, and simplified cleanup when needed. Docker deployment requires Docker Engine and Docker Compose v2, along with at least 2GB of RAM (4GB recommended) and 10GB of disk space for container images and logs.
Source installation caters to developers who want to contribute to OpenClaw or need to customize the codebase. This path requires Git, Node.js, and pnpm, giving you access to the latest development features and the ability to modify OpenClaw's behavior. While more complex to maintain, source installation provides the deepest level of control over your AI assistant.
System Requirements at a Glance
Before starting installation, ensure your system meets these minimum requirements. The requirements vary slightly depending on your chosen installation method, but all paths share certain baseline needs that ensure stable operation.
| Requirement | npm Installation | Docker Installation | Source Installation |
|---|---|---|---|
| RAM | 2GB minimum, 4GB recommended | 4GB minimum, 8GB recommended | 2GB minimum |
| Disk Space | 500MB for packages | 10GB for images | 1GB for source |
| Node.js | v22.0.0 or higher | Not required on host | v22.0.0 or higher |
| Docker | Not required | Docker Engine 24.0+ | Not required |
| OS | macOS, Linux, WSL2 | Any Docker-supported OS | macOS, Linux, WSL2 |
The RAM recommendation accounts for the Gateway process, active channel connections, and the AI agent's working memory during complex tasks. If you plan to run Browser Relay with multiple tabs or process large documents, allocate additional memory—8GB provides comfortable headroom for most workflows.
Platform-Specific Considerations
For macOS users, the installation process is straightforward—Node.js installs easily via Homebrew or the official installer, and all features work out of the box. If you plan to build the companion apps (macOS menu bar app, iOS node), you'll need Xcode or Command Line Tools installed. macOS users benefit from native ARM64 support on Apple Silicon, delivering excellent performance on M1/M2/M3 machines. The launchd integration ensures your Gateway starts automatically after system boot, running as a background user service without requiring manual intervention.
For Homebrew users, the Node.js installation is simple:
bashbrew install node@22
Linux users (Ubuntu 22.04 or 24.04 recommended) enjoy native support with excellent performance. The systemd user service integration means your Gateway can run as a background service that starts automatically on boot. Debian, Fedora, and Arch Linux work well too, though Ubuntu provides the most tested experience. Ensure your system has the required development libraries—most distributions include these by default, but you may need to install build-essential on Debian-based systems for any native module compilation.
For Ubuntu/Debian systems, prepare your environment with:
bashsudo apt update && sudo apt install -y curl build-essential
curl -fsSL https://deb.nodesource.com/setup_22.x | sudo -E bash -
sudo apt install -y nodejs
Windows users must use WSL2 (Windows Subsystem for Linux) rather than native Windows. Native Windows is untested and known to have compatibility issues with OpenClaw's dependencies—particularly around Unix domain sockets and file system watching. Install WSL2 with Ubuntu first, then follow the Linux installation steps within your WSL environment. The WSL2 architecture provides near-native Linux performance while maintaining access to Windows applications. Note that the Gateway runs inside WSL2, but you access its Dashboard from your regular Windows browser, creating a seamless cross-environment experience.
Quick Installation (macOS, Linux, Windows WSL2)
The fastest way to get OpenClaw running is through the one-liner installation, which handles Node.js verification and package installation automatically. Open your terminal and run the following command to install OpenClaw globally via npm.
bashnpm install -g openclaw@latest
Alternatively, if you prefer pnpm for package management, you can use pnpm add -g openclaw@latest instead. Both approaches produce identical results—the choice depends on your existing toolchain preference.
After the package installation completes, you need to run the onboarding wizard. This interactive process configures your Gateway settings, sets up authentication with AI providers, and prepares the background service. The --install-daemon flag ensures that OpenClaw installs a user-level service (launchd on macOS, systemd on Linux) that keeps your Gateway running.
bashopenclaw onboard --install-daemon
The onboarding wizard walks you through several configuration steps. First, it asks about your Gateway setup—for most users, selecting "Local gateway (this machine)" is the correct choice. Next, you'll configure authentication with your preferred AI provider. OpenClaw supports Anthropic (Claude), OpenAI (GPT models), and local models through Ollama. For Anthropic, you can use either an API key or Claude Pro/Max subscription credentials via OAuth.
Verifying Your Installation
Once onboarding completes, verify that the Gateway is running properly by checking its status:
bashopenclaw gateway status
You should see output indicating the Gateway is running and listening on the default port (18789). If the status shows the Gateway isn't running, you can start it manually with openclaw gateway for debugging purposes, or check the logs with openclaw gateway logs.
The fastest way to test your installation is to open the Dashboard in your browser. Navigate to http://127.0.0.1:18789/ (or http://localhost:18789/ ) to access the Control UI. This web interface lets you chat with your AI assistant immediately, without needing to configure any messaging platforms. If the page doesn't load, ensure the Gateway is running first with openclaw gateway.
The Dashboard provides more than just a chat interface—it's a comprehensive control panel for your entire OpenClaw installation. From here you can monitor active sessions, review conversation history, manage connected channels, and adjust configuration settings. The sidebar displays real-time connection status for each platform, helping you quickly identify any connectivity issues.
Understanding the Gateway Architecture
When you run openclaw gateway, you're starting a persistent WebSocket server that acts as the central hub for all communications. The Gateway maintains long-lived connections to each messaging platform, buffers incoming messages, routes requests to the appropriate AI agent, and delivers responses back to users. This architecture means your AI assistant remains available 24/7 as long as the Gateway process runs, even when you close terminal windows or log out of the system.
The Gateway listens on several ports by default:
| Port | Purpose | Access |
|---|---|---|
| 18789 | Gateway WebSocket & Dashboard | Primary control interface |
| 18792 | Browser CDP Relay | Browser automation |
| 18793 | Canvas Host | WebView rendering |
| 18800-18899 | Managed Browser CDP | Isolated browser instances |
All ports bind to loopback (127.0.0.1) by default for security. Remote access requires explicit configuration and authentication tokens.
Windows WSL2 Specific Steps
For Windows users, the installation requires an additional preliminary step. First, ensure WSL2 is installed and configured with Ubuntu. Open PowerShell as Administrator and run:
powershellwsl --install -d Ubuntu
After Ubuntu installation completes and you've created your user account, open the Ubuntu terminal and proceed with the standard Linux installation. Note that you should run all OpenClaw commands from within WSL2, not from Windows PowerShell or Command Prompt. The Gateway runs inside the WSL2 environment, and you can access its Dashboard from your Windows browser at http://localhost:18789/.
Docker Deployment for Production
Docker deployment provides the most robust option for production environments, VPS hosting, or situations where you need enhanced isolation and security. The containerized approach ensures that OpenClaw runs in a controlled environment with explicit resource boundaries and simplified backup/restore procedures.
Begin by cloning the OpenClaw repository to get the Docker configuration files:
bashgit clone https://github.com/openclaw/openclaw.git
cd openclaw
The repository includes a docker-setup.sh script that automates the entire Docker configuration process. This script builds the Gateway image locally, runs the onboarding wizard in a container context, generates security tokens, and starts the service via Docker Compose.
bash./docker-setup.sh
During the setup process, you'll answer the same configuration questions as the npm installation—Gateway mode, AI provider credentials, and optional channel configurations. The script creates two important volume mounts: ~/.openclaw for configuration and API keys, and ~/openclaw/workspace for agent-accessible files.
Environment Variables and Customization
Docker deployment supports several environment variables for customization. OPENCLAW_DOCKER_APT_PACKAGES allows you to add system packages during image construction if your Skills require additional dependencies. OPENCLAW_EXTRA_MOUNTS binds additional host directories to the container. OPENCLAW_HOME_VOLUME creates a named Docker volume for persisting the container's home directory.
bashexport OPENCLAW_HOME_VOLUME="openclaw_home"
export OPENCLAW_EXTRA_MOUNTS="$HOME/.codex:/home/node/.codex:ro"
./docker-setup.sh
Container Management Commands
After deployment, use standard Docker Compose commands to manage your OpenClaw instance. Check container status with docker compose ps—the Gateway container should show status "Running" or "Up." View logs with docker compose logs -f openclaw-gateway to monitor for any issues.
For administrative tasks that require CLI access, use the helper container:
bashdocker compose run --rm openclaw-cli status
docker compose run --rm openclaw-cli dashboard --no-open
Updating and Maintaining Your Docker Installation
Docker deployments require periodic maintenance to stay current with security patches and new features. The update process involves pulling the latest image and recreating containers while preserving your data volumes.
bashdocker compose pull docker compose down docker compose up -d # Verify the update succeeded docker compose exec openclaw-gateway openclaw version
For production environments, consider implementing a staged update process. Test new versions in a development environment before deploying to production, and maintain backups of your ~/.openclaw configuration directory. The Docker volumes persist data independently of container lifecycles, so your API keys, channel configurations, and conversation history survive container updates.
Resource Monitoring and Optimization
Monitor your Docker container's resource usage to ensure optimal performance:
bash# Real-time resource statistics
docker stats openclaw-gateway

# Memory and CPU limits (add to docker-compose.yml)
services:
  openclaw-gateway:
    deploy:
      resources:
        limits:
          cpus: '2'
          memory: 4G
        reservations:
          memory: 1G
If you notice high memory consumption, review your active sessions—Browser Relay tabs and long conversation histories consume memory over time. Periodic Gateway restarts during low-activity periods can help maintain optimal performance.
Security Best Practices for Docker
The Docker deployment implements security-first defaults. The container runs as a non-root user (node, UID 1000), drops all Linux capabilities, and enables read-only root filesystem by default. Agent sessions execute in isolated containers, preventing any potential damage to your host system. These measures create defense-in-depth protection, limiting the blast radius if any component is compromised.
When configuring volume mounts, follow the principle of least privilege. Only map directories that the agent absolutely needs access to. Never map your home directory, SSH keys, or credentials files directly. Create a dedicated workspace folder with limited scope. Here's an example of a secure volume configuration:
yamlvolumes:
  # Configuration only - read-only except credentials
  - ~/.openclaw:/home/node/.openclaw:rw
  # Workspace with explicit scope
  - ~/projects/ai-workspace:/workspace:rw
  # Temporary outputs
  - /tmp/openclaw-output:/output:rw
The sandbox mode adds another layer of protection by executing agent commands in throwaway containers. Each command runs in isolation, and the container is destroyed immediately after execution—even if an agent attempts malicious actions, the damage is contained and automatically cleaned up.
Messaging Platform Integration
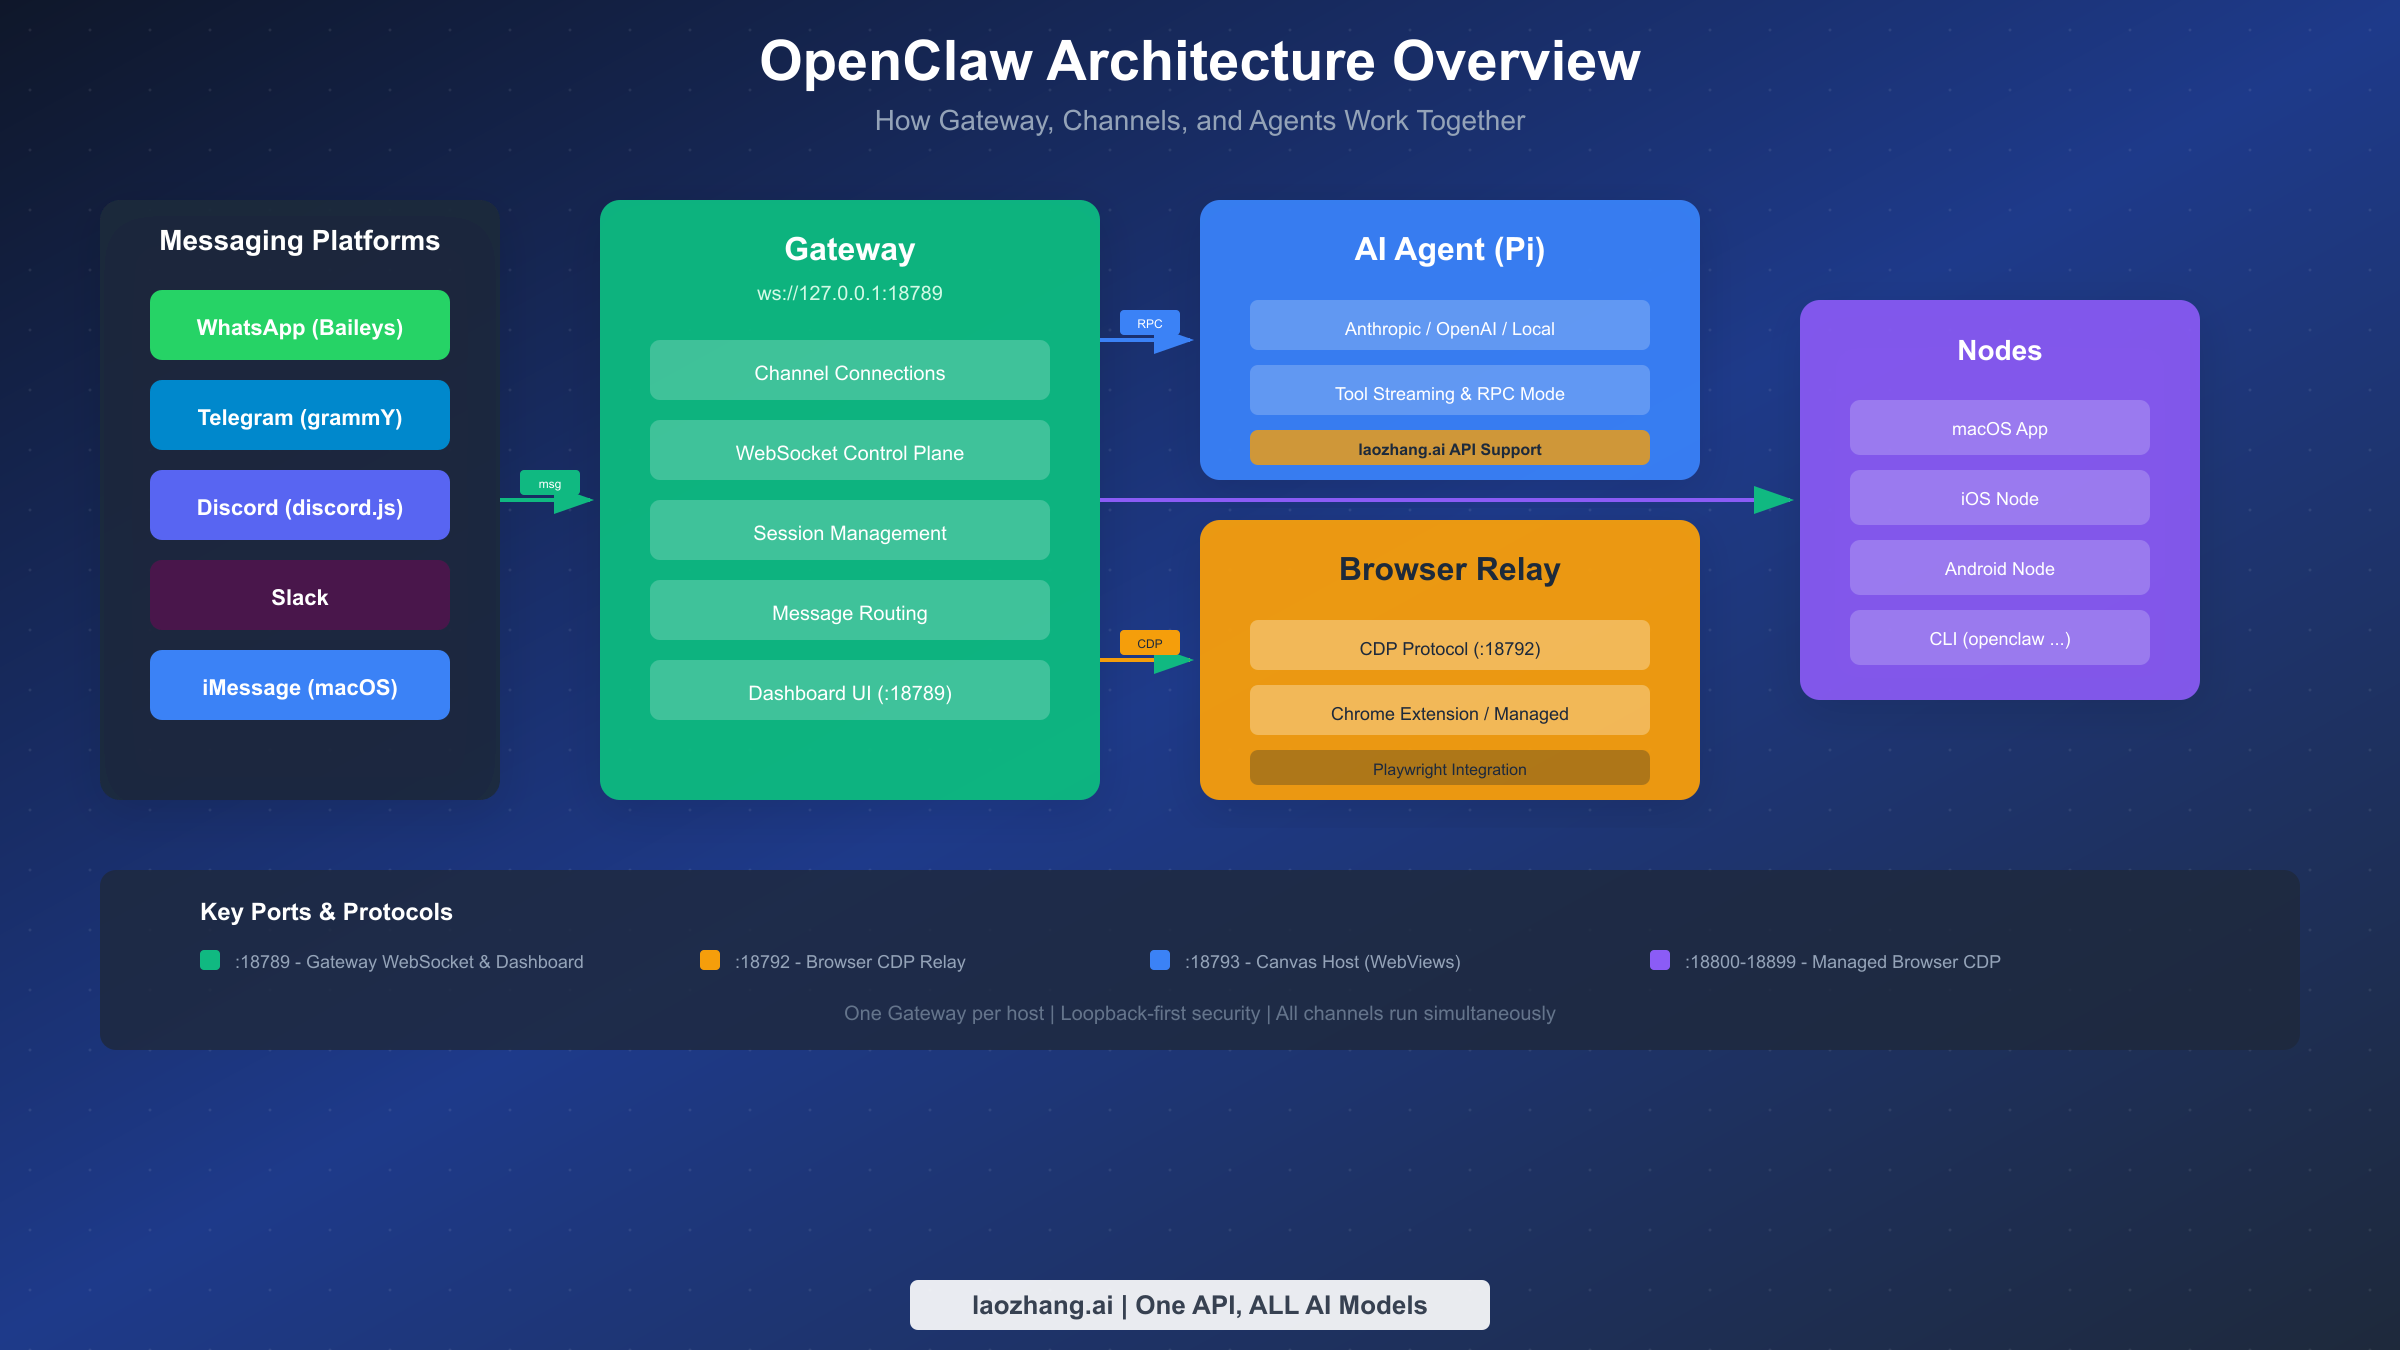
OpenClaw's core value lies in its ability to bridge multiple messaging platforms to a unified AI assistant. Once your Gateway is running, you can connect WhatsApp, Telegram, Discord, Slack, and other platforms—all channels run simultaneously, and you interact with the same AI brain regardless of which app you're using.
WhatsApp Integration (Baileys)
WhatsApp integration uses the Baileys library to communicate through WhatsApp Web's protocol. To connect your WhatsApp account, run the channels login command:
bashopenclaw channels login
The CLI displays a QR code in your terminal. Open WhatsApp on your phone, navigate to Settings > Linked Devices > Link a Device, and scan the QR code. Within seconds, your WhatsApp account connects to the Gateway, and you can start messaging your AI assistant through any WhatsApp chat.
For group chats, OpenClaw defaults to mention-based activation—the bot only responds when you @mention it. This prevents the AI from replying to every message in busy groups. You can adjust this behavior in the configuration file at ~/.openclaw/openclaw.json:
json{
  "channels": {
    "whatsapp": {
      "allowFrom": ["+15555550123"],
      "groups": { "*": { "requireMention": true } }
    }
  },
  "messages": { "groupChat": { "mentionPatterns": ["@openclaw"] } }
}
Telegram Bot Integration (grammY)
Telegram integration is often called "easy mode" because Telegram was built with bots in mind. First, create a new bot through Telegram's @BotFather. Send /newbot to BotFather, follow the prompts to name your bot, and receive your bot token.
Add the Telegram channel to OpenClaw:
bashdocker compose run --rm openclaw-cli providers add --provider telegram --token YOUR_BOT_TOKEN
Or if using npm installation:
bashopenclaw channels add telegram --token YOUR_BOT_TOKEN
After adding the token, you need to approve the initial pairing. Send a message to your new bot in Telegram, then approve the pairing request:
bashopenclaw pairing approve telegram [PAIRING_CODE]
Telegram bots support both direct messages and group chats. In groups, configure mention patterns to control when the bot responds.
Discord Bot Integration (discord.js)
Discord integration supports direct messages, guild channels, and advanced features like slash commands. Create a Discord application at the Discord Developer Portal, add a bot to your application, and copy the bot token.
Enable the necessary intents in the Discord developer portal—you'll need "Message Content Intent" for the bot to read message content in servers.
bashopenclaw channels add discord --token YOUR_DISCORD_BOT_TOKEN
Invite your bot to your Discord server using the OAuth2 URL generator in the developer portal. Select "bot" scope and appropriate permissions (Send Messages, Read Message History, etc.).
Slack Integration
Slack integration works through Slack's Bot API. Create a new Slack app at api.slack.com/apps, add bot token scopes (chat:write, channels:history, etc.), and install the app to your workspace.
bashopenclaw channels add slack --token xoxb-YOUR-SLACK-BOT-TOKEN
iMessage Integration (macOS Only)
For macOS users, OpenClaw offers native iMessage integration through the Messages app. This integration requires the macOS menu bar app and proper permissions configuration.
bash# Install the macOS app
openclaw desktop install
After installation, grant the OpenClaw app access to Messages in System Settings > Privacy & Security > Automation. The iMessage channel works similarly to other platforms—messages from your configured contacts route to the AI assistant, and responses appear directly in your Messages conversations.
Running Multiple Channels Simultaneously
A key advantage of OpenClaw is that all channels operate concurrently. You can message from your phone via WhatsApp, switch to Telegram on your laptop, and check in through Discord with your team—the same AI assistant handles everything with shared context and memory. Sessions collapse into a shared "main" session by default for direct messages, while group chats maintain isolation.
This multi-channel architecture opens powerful workflows. Imagine starting a conversation on WhatsApp while commuting, continuing it on your desktop via Discord when you reach the office, and checking results through Telegram later. The AI maintains complete context throughout, remembering earlier instructions and building on previous work.
Channel prioritization allows you to define which platforms take precedence for notifications and responses. Configure this in your openclaw.json:
json{
  "channels": {
    "priority": ["telegram", "discord", "whatsapp", "slack"],
    "notifications": {
      "preferPrimary": true,
      "crossPost": false
    }
  }
}
Message Routing and Filtering
OpenClaw supports sophisticated message routing rules that control how different types of messages get processed. You can route specific topics to specialized agents, filter messages based on sender, or implement approval workflows for sensitive operations.
json{
  "routing": {
    "rules": [
      {
        "match": { "content": "/code" },
        "agent": "coding-assistant"
      },
      {
        "match": { "channel": "discord", "server": "work" },
        "agent": "work-assistant"
      }
    ]
  }
}
These routing rules enable advanced use cases like maintaining separate AI personalities for different contexts—a professional assistant for work channels and a casual helper for personal chats.
AI Provider Configuration
OpenClaw supports multiple AI providers, giving you flexibility in choosing your preferred model and managing costs. The agent layer (Pi) handles the actual AI reasoning, and you can configure it to use Anthropic, OpenAI, local models, or API aggregation services.
Anthropic (Claude) Configuration
For Anthropic's Claude models, you have two authentication options. The recommended approach is using an API key directly. Generate a key at console.anthropic.com, then configure OpenClaw:
bashopenclaw configure --section auth
Select Anthropic as your provider and paste your API key when prompted. The key is stored securely in ~/.openclaw/credentials/.
Alternatively, if you have a Claude Pro or Max subscription, you can authenticate via OAuth to use your subscription's included usage. This option caps your token spending at your subscription level.
OpenAI Configuration
OpenAI configuration follows a similar pattern. Generate an API key at platform.openai.com, then add it through the configuration wizard. OpenAI supports a wide range of models from GPT-4o to o3.
laozhang.ai as an Alternative API Provider
For users seeking cost-effective API access or simplified billing, laozhang.ai offers a unified API gateway that supports multiple AI models. The service provides access to Claude, GPT, Gemini, and other models through a single API endpoint, often at reduced prices compared to direct provider access. Check the laozhang.ai documentation for detailed integration instructions.
For detailed API key management and third-party integrations, see our OpenRouter integration guide.
Local Models via Ollama
For privacy-conscious users or those wanting to run AI locally without API costs, OpenClaw supports local models through Ollama. This setup keeps all your data on your machine—no API calls, no usage tracking, complete privacy.
First, install Ollama and download a capable model:
bash# Install Ollama (macOS/Linux)
curl -fsSL https://ollama.com/install.sh | sh

# Pull a capable model (Llama 3 70B recommended for complex tasks)
ollama pull llama3:70b

# Or use a smaller model for faster responses
ollama pull llama3:8b
Configure OpenClaw to use your local Ollama instance:
bashopenclaw configure --section auth
# Select "Ollama (local)" as provider
# Enter endpoint: http://localhost:11434
# Select your preferred model
Local models trade response quality for privacy and cost savings. For complex coding tasks or nuanced conversations, cloud models like Claude or GPT-4 generally outperform local alternatives. However, for routine tasks, quick questions, or situations where data sensitivity is paramount, local models provide an excellent option.
Model Selection Guidelines
Choosing the right AI model depends on your use case, budget, and quality requirements. Here's a practical comparison to guide your decision:
| Model | Best For | Cost | Speed | Quality |
|---|---|---|---|---|
| Claude 3.5 Sonnet | Complex reasoning, coding | $3/1M input | Medium | Excellent |
| Claude 3.5 Haiku | Quick tasks, high volume | $0.25/1M input | Fast | Good |
| GPT-4o | General purpose, vision | $2.50/1M input | Fast | Excellent |
| GPT-4o mini | Budget-conscious, simple tasks | $0.15/1M input | Very Fast | Good |
| Llama 3 70B (local) | Privacy-first, no API cost | Free (compute) | Varies | Good |
For most users, starting with Claude 3.5 Sonnet or GPT-4o provides the best balance of quality and capability. As you understand your usage patterns, you can optimize costs by routing simpler tasks to faster, cheaper models.
Cost Management and Usage Monitoring
OpenClaw provides built-in tools for monitoring API usage and managing costs. The Dashboard displays real-time token consumption, and you can set usage limits to prevent unexpected charges:
json{
  "agents": {
    "limits": {
      "maxTokensPerDay": 100000,
      "maxTokensPerSession": 50000,
      "warningThreshold": 0.8
    }
  }
}
When usage approaches your limits, OpenClaw sends notifications through your configured channels. This proactive alerting helps you avoid surprise bills and adjust your usage patterns accordingly.
Security Best Practices
Running an AI assistant that can execute commands and browse the web requires careful attention to security. OpenClaw implements multiple security layers, but understanding and properly configuring them is essential for safe operation.
API Key Protection
Your AI provider API keys represent significant financial risk if exposed. OpenClaw stores credentials in ~/.openclaw/credentials/ with restricted file permissions. Never commit these files to version control, and avoid sharing configuration directories. For production deployments, consider using environment variables or secrets management services like HashiCorp Vault.
Docker Sandbox Isolation
When using Docker deployment, agent sessions execute in isolated containers by default. This means any file operations, command executions, or potentially destructive actions occur inside a throwaway container rather than on your host system. The Gateway itself runs on the host to maintain channel connections, but the execution environment remains sandboxed.
Configure sandbox behavior in your openclaw.json:
json{
  "agents": {
    "defaults": {
      "sandbox": {
        "enabled": true,
        "scope": "session",
        "workspace": { "access": "rw", "path": "~/openclaw/workspace" }
      }
    }
  }
}
Network Security
The Gateway binds to loopback (127.0.0.1) by default, meaning it's only accessible from your local machine. For remote access, use SSH tunneling or a VPN rather than exposing the Gateway port directly. If you must bind to a network interface, always use the --token flag to require authentication.
Principle of Least Privilege
When configuring volume mounts or workspace access, apply the principle of least privilege. Give the agent access only to specific project directories rather than broad filesystem access. Use read-only mounts (ro) when write access isn't necessary.
Browser Relay: Control Your Chrome Tabs with AI
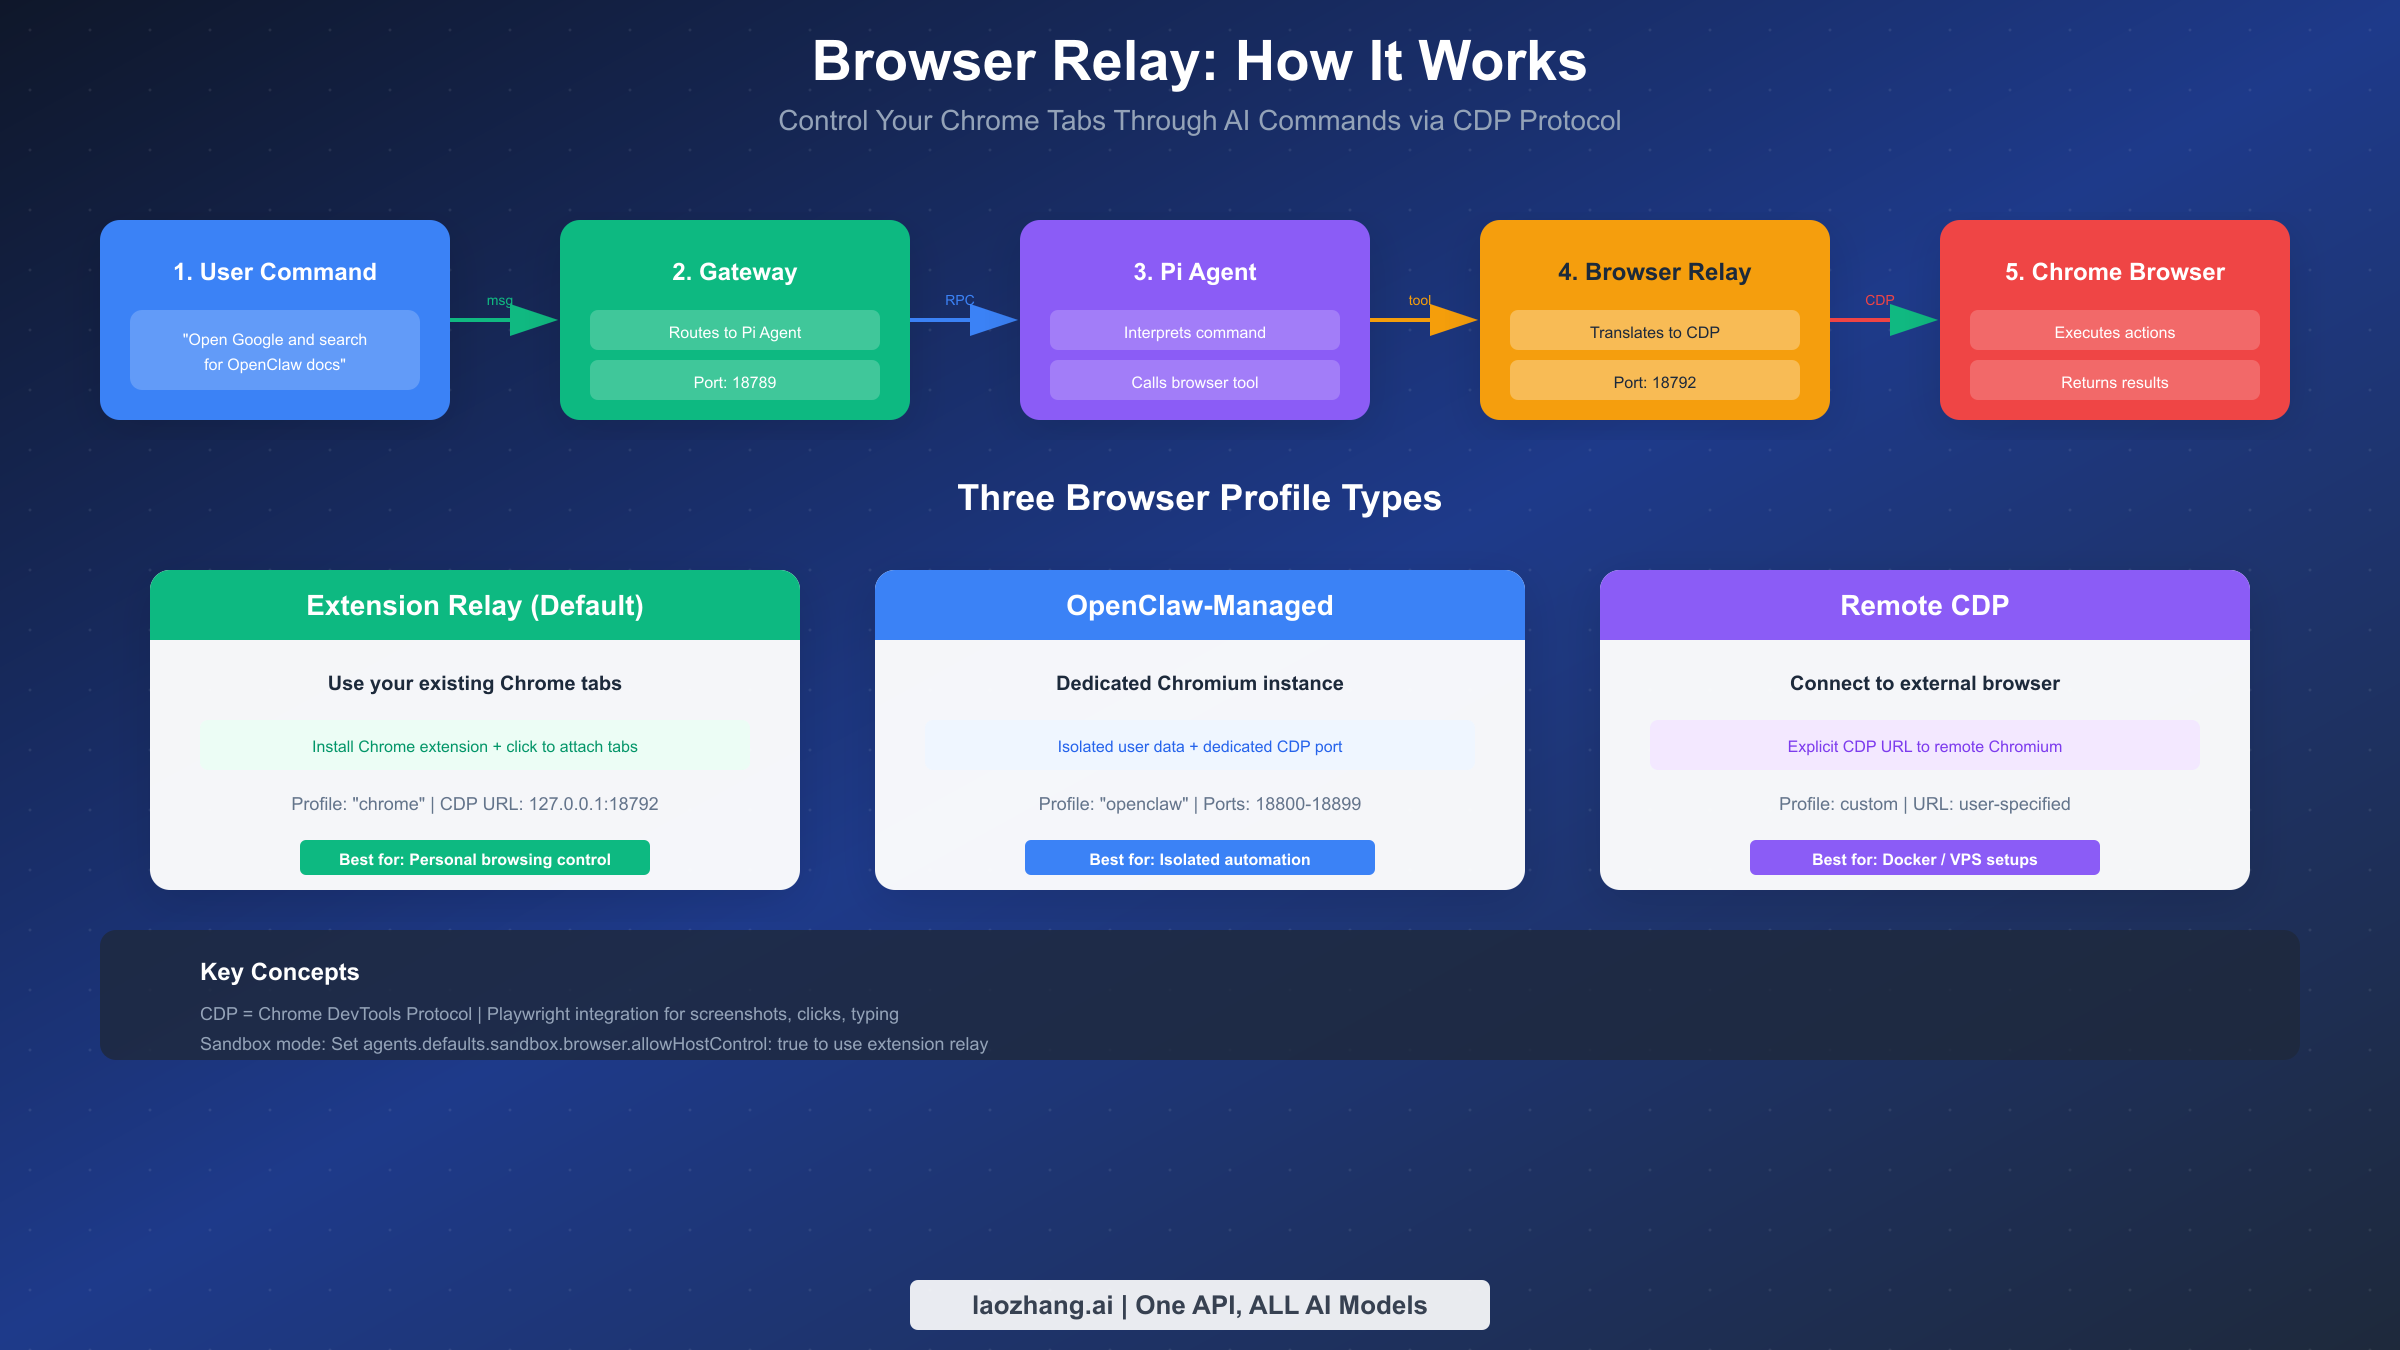
Browser Relay is one of OpenClaw's most powerful features, enabling your AI assistant to control web browsers directly. Through the Chrome DevTools Protocol (CDP), OpenClaw can navigate pages, click elements, fill forms, extract data, and take screenshots—all triggered by natural language commands from any messaging platform.
Understanding the Architecture
Browser Relay operates through a chain of components. When you send a message like "Open Google and search for OpenClaw documentation," the message travels from your chat app to the Gateway, which routes it to the Pi agent. The agent interprets your intent and calls the browser tool, which communicates with the Browser Relay server. The Relay translates high-level commands into CDP messages that control the actual browser.
The Relay server listens on port 18792 by default (http://127.0.0.1:18792 ). It accepts requests from the Gateway and maintains CDP connections to Chromium-based browsers.
Three Browser Profile Types
OpenClaw supports three distinct approaches to browser control, each suited to different use cases:
Extension Relay is the default profile and uses your existing Chrome installation. Install the OpenClaw Browser Relay extension, then manually attach it to tabs you want the agent to control. This approach lets you leverage your logged-in sessions, bookmarks, and browsing context.
bashopenclaw browser extension install
After installation, enable the extension in Chrome (you'll need Developer mode enabled to load unpacked extensions). To attach a tab, click the extension icon while viewing the page you want to control—the badge shows "ON" when attached.
OpenClaw-managed profile runs a dedicated Chromium instance with its own user data directory. This isolated browser has no connection to your personal browsing data, making it ideal for automated tasks that shouldn't affect your main browser.
Configure the managed browser in your settings:
json{
  "browser": {
    "enabled": true,
    "defaultProfile": "openclaw"
  }
}
Remote CDP connects to a Chromium browser running elsewhere—useful for Docker deployments or connecting to browsers on remote servers. Specify the CDP URL in your profile configuration.
Debugging Browser Issues
If browser actions fail, use the debugging tools to identify the problem:
bashopenclaw browser status
openclaw browser highlight <ref>
The highlight command visually identifies the element that Playwright is targeting, helping you understand why a selector might not match. For Playwright-dependent features (navigate, act, screenshots), ensure you have the full Playwright package installed, not just playwright-core.
Common issues include stale element references after page navigation (re-run snapshots after page changes), incorrect selectors, and sandbox restrictions. In sandboxed sessions, enable host browser control with agents.defaults.sandbox.browser.allowHostControl: true to use the extension relay.
Practical Browser Relay Examples
Understanding Browser Relay through examples helps clarify its capabilities. Here are common workflows that showcase the feature's power:
Web Research Automation: Ask your AI to research a topic, and it can navigate to search engines, visit multiple sources, extract relevant information, and synthesize findings—all automatically.
User: "Research the current pricing for AWS Lambda and summarize the costs"
AI: [Opens browser, navigates to AWS pricing page, extracts data, returns summary]
Form Filling: Browser Relay can complete web forms using natural language instructions, useful for repetitive data entry tasks.
User: "Fill out the contact form on example.com with my details"
AI: [Navigates to page, identifies form fields, enters information, submits]
Screenshot Documentation: Generate visual documentation by capturing screenshots of specific elements or entire pages.
User: "Take a screenshot of our dashboard's main metrics section"
AI: [Opens dashboard, waits for load, captures targeted screenshot]
Performance Considerations for Browser Relay
Browser Relay operations consume more resources than text-only interactions. Each attached tab maintains a CDP connection that requires memory, and complex page interactions involve multiple round-trips between the agent and browser.
For optimal performance:
- Limit concurrent attached tabs to 3-5 for typical workloads
- Close tabs when no longer needed using browser commands
- Prefer OpenClaw-managed profile for automation-heavy tasks
- Use headless mode for background operations where visual feedback isn't needed
Configure headless mode in your browser profile:
json{
  "browser": {
    "profiles": {
      "automation": {
        "headless": true,
        "viewport": { "width": 1920, "height": 1080 }
      }
    }
  }
}
For more information about protocol integrations, see our MCP protocol guide.
Troubleshooting & FAQ
Even with careful setup, you may encounter issues. This section covers the most common problems and their solutions, organized by category for quick reference. For authentication-specific issues, our authentication troubleshooting guide provides deeper coverage.
Installation Problems
| Issue | Solution |
|---|---|
| "Node version too old" | Install Node.js 22+ via nvm or official installer |
| Permission denied (npm) | Use npm install -g with sudo or fix npm permissions |
| WSL2 not available | Run wsl --install in PowerShell as Administrator |
| Docker not found | Install Docker Desktop (macOS/Windows) or Docker Engine (Linux) |
Gateway Connection Issues
| Issue | Solution |
|---|---|
| "Port 18789 already in use" | Stop existing Gateway or change port with --port flag |
| Dashboard won't load | Verify Gateway is running with openclaw gateway status |
| "Gateway token required" | Generate token with openclaw gateway token and add to URL |
| Service won't start | Check logs with openclaw gateway logs for specific errors |
Channel/Platform Issues
| Issue | Solution |
|---|---|
| WhatsApp QR won't scan | Ensure phone and computer are on same network; regenerate QR |
| Telegram bot not responding | Verify bot token; check @BotFather for disabled bots |
| Discord permissions error | Add required intents in developer portal; reinvite bot |
| "Device pairing failed" | Approve pairing with openclaw pairing approve <channel> <code> |
AI Provider Issues
| Issue | Solution |
|---|---|
| "Invalid API key" | Regenerate key in provider console; verify no whitespace |
| "Rate limit exceeded" | Upgrade plan or wait; consider laozhang.ai for higher limits |
| "Model not found" | Check model name spelling; verify model access on your account |
| High latency | Switch to faster model (Flash vs Pro); check network connection |
Browser Relay Issues
| Issue | Solution |
|---|---|
| "Browser disabled" | Enable in config: browser.enabled: true; restart Gateway |
| "Playwright not available" | Install full Playwright package, not playwright-core |
| Extension shows red icon | Check relay connection; verify port 18792 is accessible |
| "Selector not found" | Take fresh snapshot; use browser highlight to debug |
Useful Debug Commands
bash# Check overall system health
openclaw doctor

# View detailed Gateway logs
openclaw gateway logs --tail 100

# List connected devices and channels
openclaw devices list

# Test AI provider connection
openclaw chat "Hello, are you working?"

# Browser debugging
openclaw browser status
openclaw browser screenshot
Logs and Diagnostics Deep Dive
The openclaw doctor command performs a comprehensive health check, testing each component of your installation. It verifies Node.js version, checks for required dependencies, tests channel connections, validates API credentials, and confirms Browser Relay functionality. Run this command first when troubleshooting—it quickly identifies the most common issues.
For deeper investigation, the log files contain detailed information about Gateway operations. On macOS, logs typically reside in ~/.openclaw/logs/. On Linux with systemd, you can also access logs via journalctl:
bash# View systemd service logs
journalctl --user -u openclaw-gateway -f

# Export logs for sharing/analysis
openclaw gateway logs --export ~/desktop/openclaw-debug.log
When reporting issues on GitHub, include the output of openclaw doctor and relevant log excerpts. Sanitize any API keys or personal information before sharing.
Recovery and Reset Procedures
If your OpenClaw installation enters an unrecoverable state, several reset options can help restore functionality without losing all configuration:
bash# Soft reset - restarts Gateway and reconnects channels
openclaw gateway restart

# Channel reset - clears channel sessions, requires re-authentication
openclaw channels reset --channel whatsapp

# Full reset - removes all configuration (use with caution)
openclaw reset --confirm
Before performing a full reset, backup your ~/.openclaw directory. This preserves your API keys, channel configurations, and conversation history, allowing you to restore your setup if needed.
Performance Optimization Tips
If you experience slow response times or high resource usage, consider these optimization strategies:
- Reduce conversation history retention - Long histories consume memory and increase context processing time
- Use appropriate models - Route simple queries to faster, lighter models
- Limit Browser Relay scope - Close unused tabs, prefer headless mode for automation
- Schedule maintenance restarts - Periodic Gateway restarts prevent memory accumulation
- Monitor with built-in tools - Use
openclaw metricsto identify bottlenecks
json{
  "performance": {
    "historyRetention": 50,
    "sessionTimeout": 3600,
    "gcInterval": 1800
  }
}
Next Steps & Resources
With OpenClaw installed and configured, you're ready to explore its full potential. The platform extends far beyond basic chat—through Skills, automation, and integrations, OpenClaw can become a powerful productivity tool.
Creating Custom Skills
Skills are modular functions that extend OpenClaw's capabilities. The ClawHub marketplace offers 700+ community-created Skills for everything from smart home control to development automation. To explore available Skills or create your own, check our guide on creating custom Skills.
Official Resources
- OpenClaw Documentation — Comprehensive reference for all features
- GitHub Repository — Source code, issues, and discussions
- ClawHub Marketplace — Skills and extensions
- Discord Community — Support and discussion
Advanced Topics to Explore
As you become comfortable with basic operation, consider exploring multi-agent routing for different use cases, cron job automation for scheduled tasks, webhook integrations for event-driven workflows, and remote Gateway access via Tailscale or SSH tunneling.
OpenClaw transforms your messaging apps into powerful AI interfaces. Whether you're automating tedious tasks, building a 24/7 AI assistant, or experimenting with AI-driven web automation, the platform provides the foundation for countless possibilities. Start with the basics, explore the documentation, and gradually expand your setup as your needs grow.
Getting Help and Community Support
The OpenClaw community actively helps newcomers and experienced users alike. When you encounter issues not covered in this guide or the official documentation:
- Search existing issues on GitHub—your problem may already have a solution
- Join the Discord community for real-time discussion and support
- Create detailed bug reports with logs, configuration snippets, and reproduction steps
- Share your solutions when you solve problems that others might encounter
The open-source nature of OpenClaw means the community continuously improves the platform. Your feedback, bug reports, and contributions help make the project better for everyone. Whether you're fixing typos in documentation or implementing new features, contributions of all sizes are welcome.
Future-Proofing Your Installation
As AI capabilities evolve rapidly, OpenClaw is designed to adapt. The modular architecture allows you to swap AI providers without reconfiguring channels, add new platforms as they become available, and integrate emerging tools through the Skills system. By establishing a solid foundation now, you position yourself to leverage future advancements without starting from scratch.
Keep your installation updated to benefit from security patches, new features, and improved model support. Subscribe to the OpenClaw releases on GitHub or follow the project's announcement channels to stay informed about important updates.