Getting a Gemini API key is straightforward for free access, but the path from Free to Tier 1, Tier 2, and Tier 3 involves specific billing requirements that confuse many developers. Free tier gives you 15 requests per minute with no credit card required. Tier 1 activates the moment you enable billing on your Google Cloud project. Tier 2 requires $250 in cumulative real API charges — importantly, Google Cloud free trial credits do not count. Tier 3 requires $1,000 in spending and often involves contacting Google's sales team for the highest-throughput models. This guide walks through every step of each tier with verified rate limits, exact upgrade paths, and a security configuration section that most guides skip entirely.
TL;DR
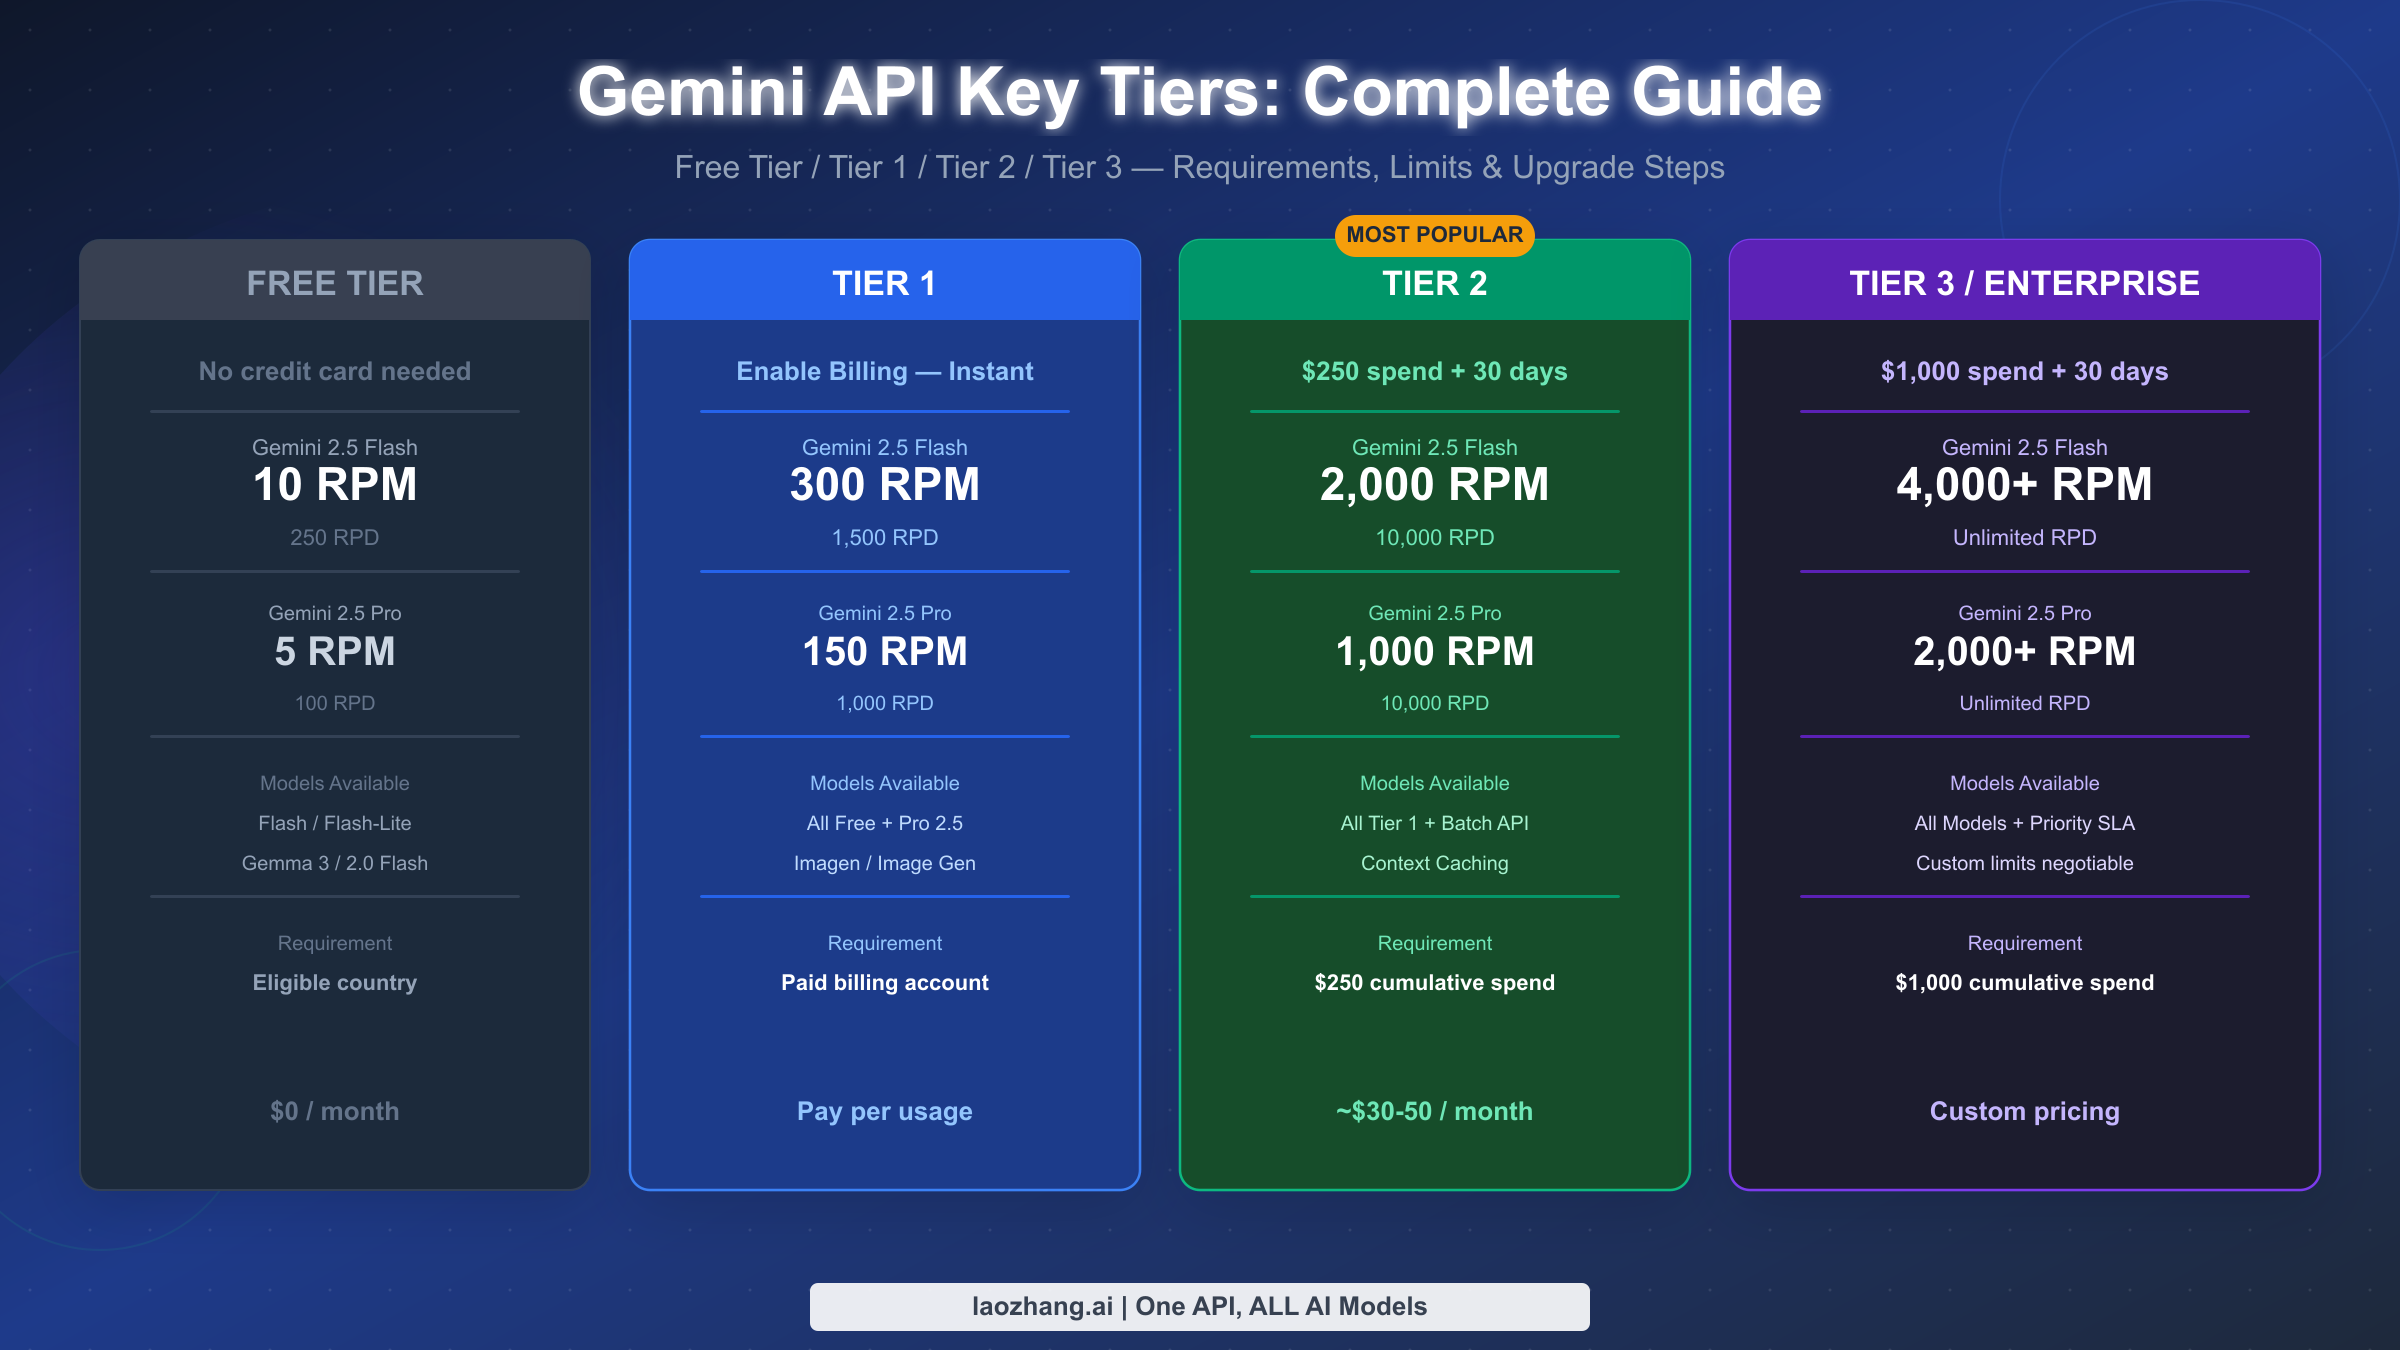
- Free tier: No credit card needed, 15 RPM / 1,500 RPD for Gemini 2.0 Flash (verified March 2026)
- Tier 1: Enable billing on Google Cloud project — rate limits increase immediately to 150–2,000 RPM
- Tier 2: Requires $250 in actual API spend (credits excluded) + 30 days after billing enabled
- Tier 3: Requires $1,000 in actual API spend — some models require contacting Google Sales
- Security: Always set IP, HTTP referrer, or API service restrictions on your keys
Understanding Gemini API's 4-Tier Permission System
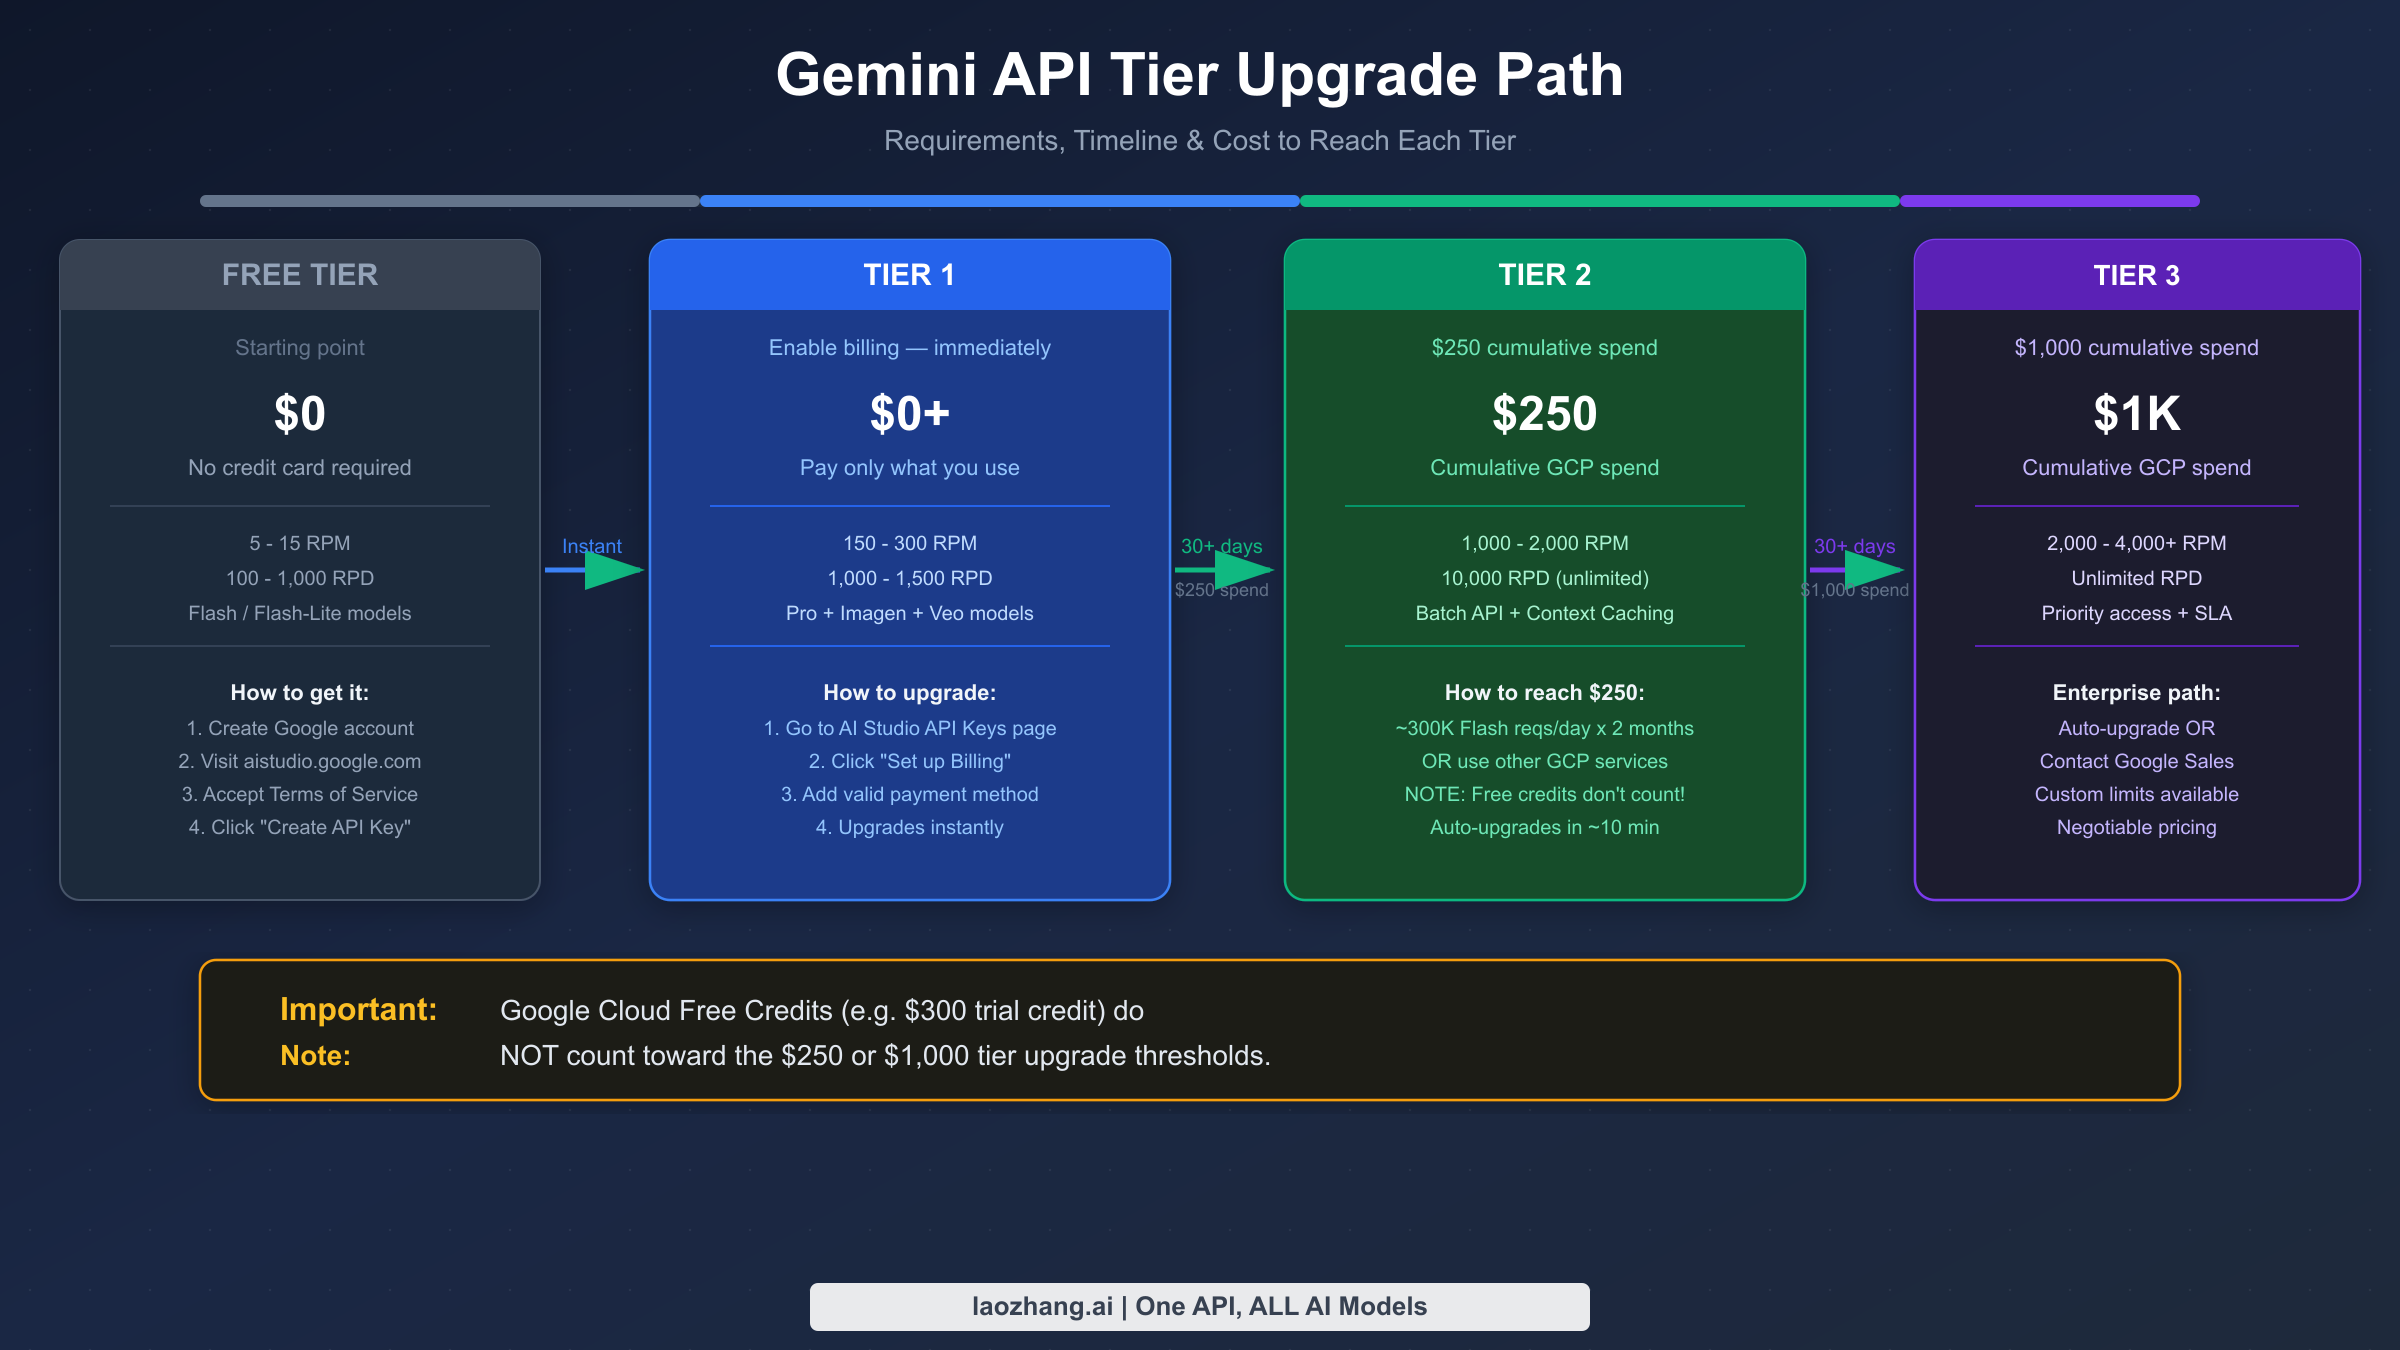
The Gemini API uses a four-tier system that determines your rate limits, available models, and access to advanced features. Each tier is tied to your Google Cloud project's billing history, not to your personal account. Understanding this distinction matters because many developers mistakenly assume that Google Cloud's $300 free trial credit counts toward tier upgrades — it does not. Tier progression is tracked separately based on actual charges processed to your payment method.
The tier system in numbers: Free tier gives you 15 requests per minute and 1,500 requests per day for Gemini 2.0 Flash (verified via Google AI Studio documentation, March 2026). Once you enable billing, you jump immediately to Tier 1 with 150 RPM for Gemini 2.0 Flash and up to 2,000 RPM for some Flash variants. Tier 2 activates after $250 in cumulative real charges with your billing account active for 30+ days. Tier 3 activates after $1,000 in spending, unlocking the highest available quotas. For more details on free tier limits, see our guide to Gemini API free tier rate limits.
The four tiers also differ in which models are available. Free tier restricts you to a subset of Gemini models and excludes some experimental or preview models. Tier 1 opens access to the full production model catalog. Tier 2 and Tier 3 increase quotas for computationally intensive models like Gemini 2.0 Flash Thinking and Gemini 1.5 Pro, which carry higher per-token costs. If you are building a production application where latency and throughput matter, knowing which tier you need before you start development will save considerable time.
| Tier | Requirement | Gemini 2.0 Flash RPM | Gemini 2.0 Flash RPD | Key Benefit |
|---|---|---|---|---|
| Free | None | 15 | 1,500 | No credit card |
| Tier 1 | Billing enabled | 150–2,000 | Unlimited* | Full model catalog |
| Tier 2 | $250 real spend + 30 days | 1,000–4,000 | Unlimited* | High throughput |
| Tier 3 | $1,000 real spend | 2,000–4,000+ | Unlimited* | Enterprise quotas |
*Unlimited RPD refers to the absence of a daily request cap; per-minute limits still apply.
One important architectural detail: your API key is tied to a specific Google Cloud project, and the project's billing account determines your tier. If you have multiple projects, each project is assessed independently. A project with billing enabled and $300 in spending sits at Tier 2, while a different project on the same Google account with no spending remains at Free tier. This means team environments often need dedicated projects per environment (development, staging, production) with separate billing tracking.
How to Create Your First Gemini API Key in Google AI Studio
Creating a Gemini API key takes under five minutes and requires only a Google account. The process runs entirely through Google AI Studio, Google's developer-facing interface for the Gemini API. You do not need to navigate Google Cloud Console to get your first key — that only becomes necessary if you want to apply security restrictions or manage billing thresholds.
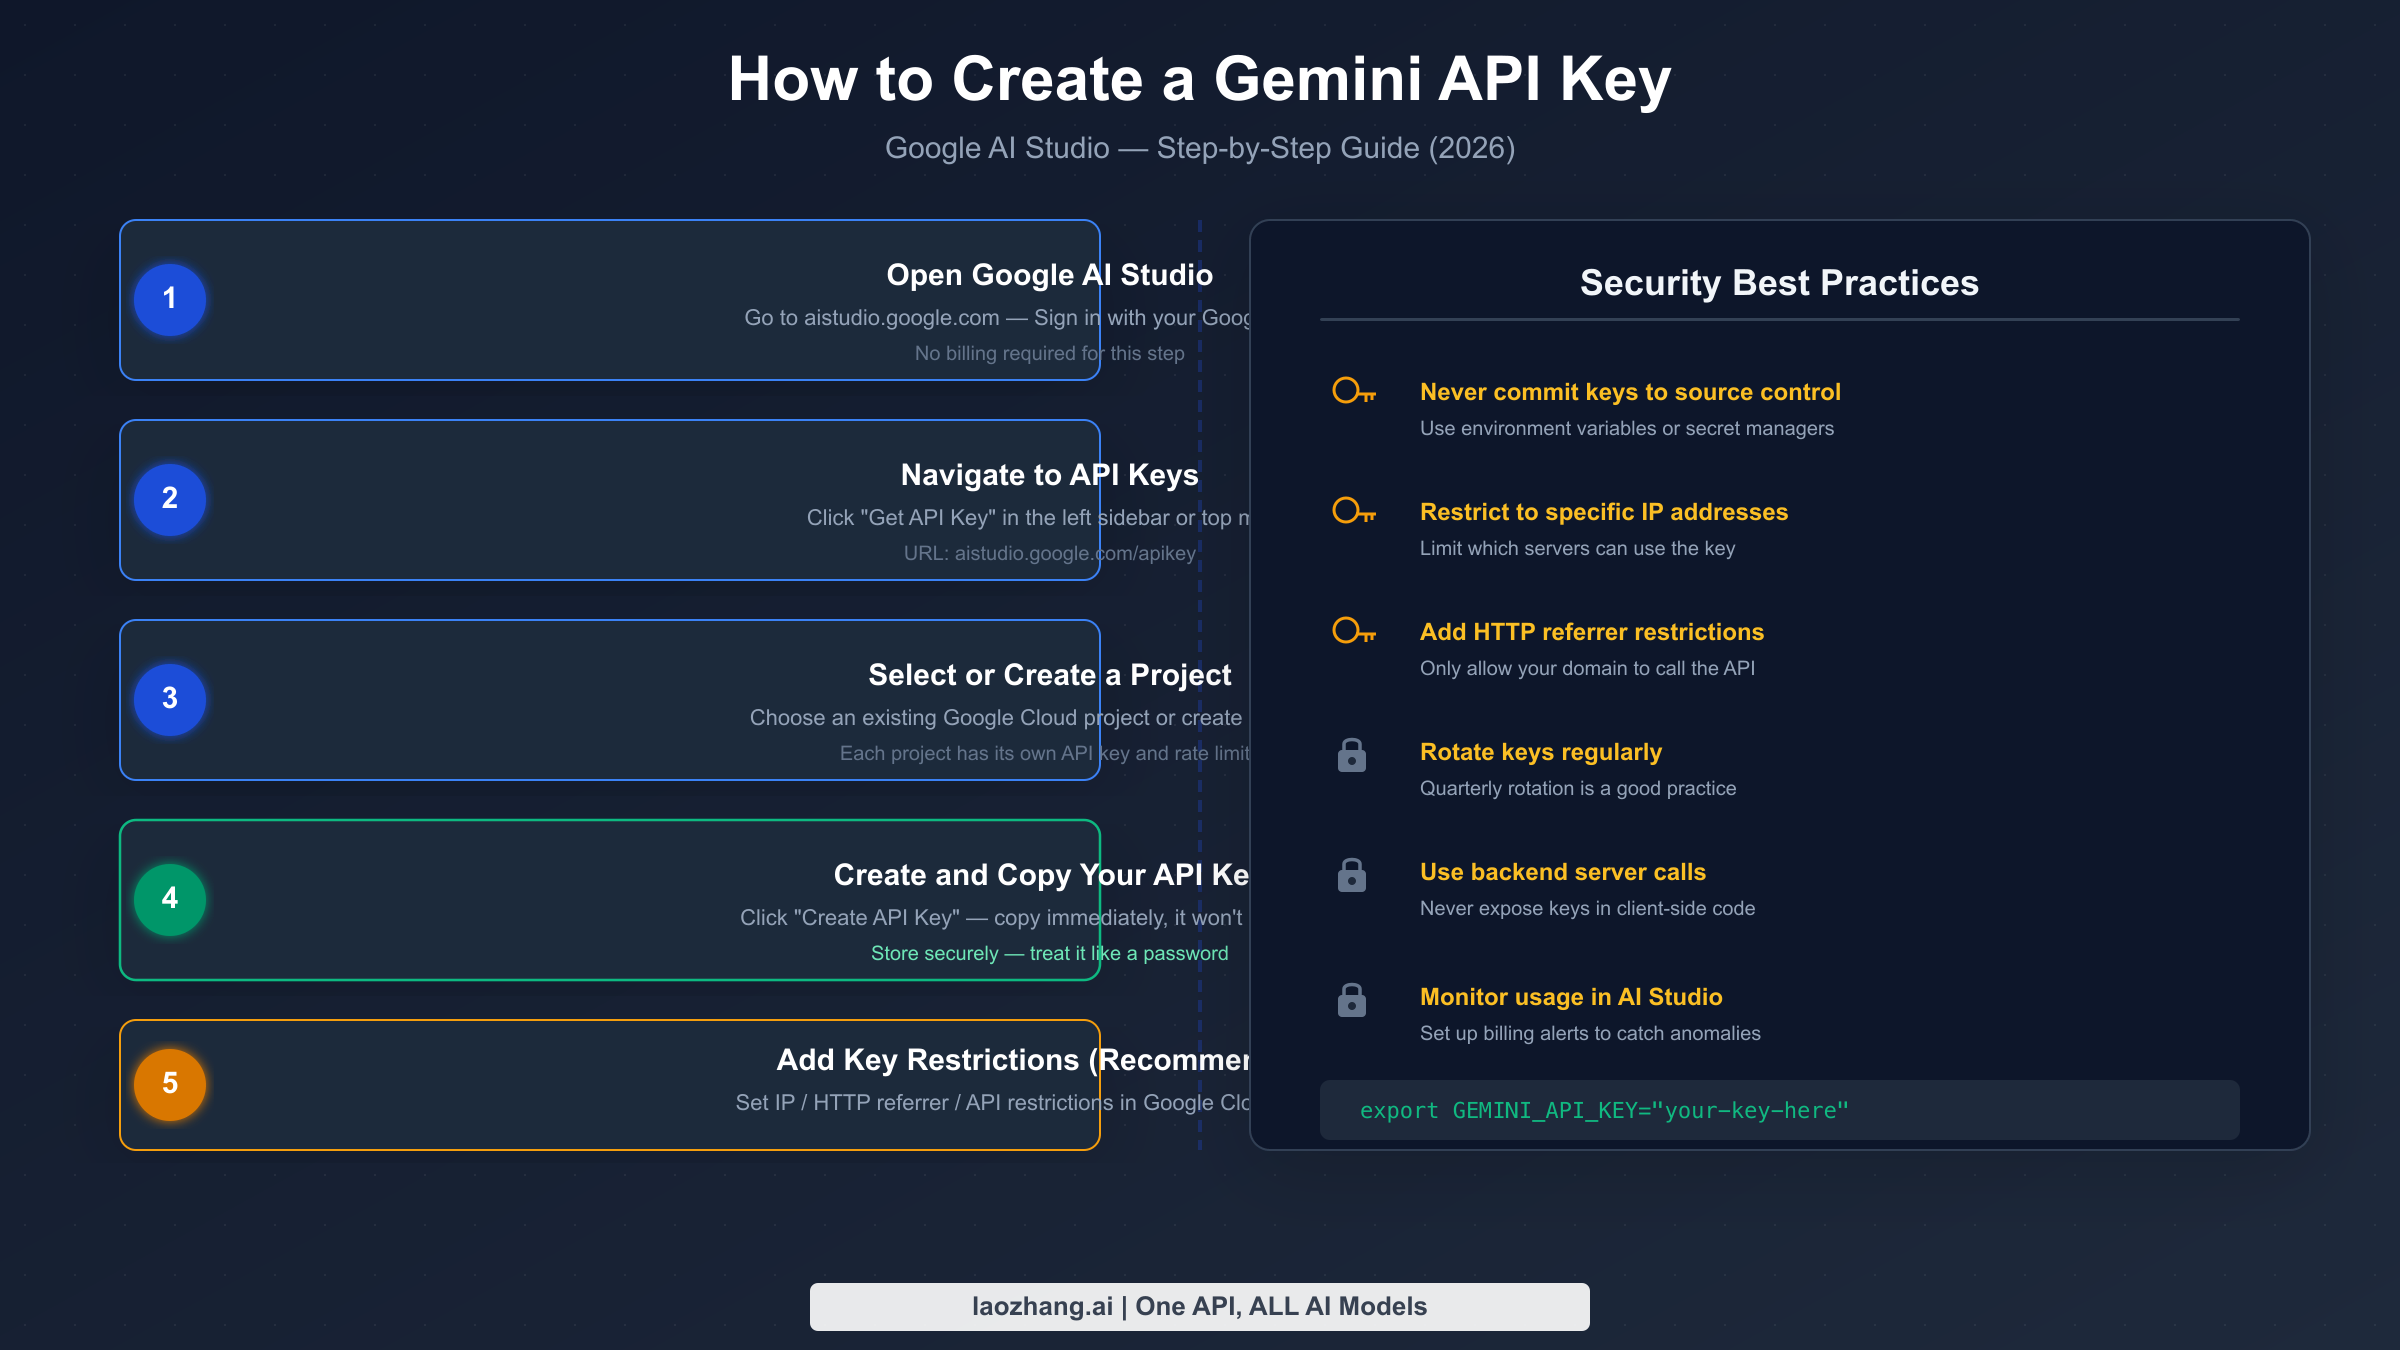
Start by navigating to Google AI Studio at aistudio.google.com. Sign in with your Google account. You will land on the AI Studio home screen, which shows recent prompts and a model playground. On the left sidebar, you will find a "Get API Key" link near the top — click it. If you do not see the sidebar, look for the menu icon in the top-left corner or navigate directly to aistudio.google.com/apikey.
On the API Keys page, you will see any keys you have previously created, along with the Google Cloud projects they belong to. Click the "Create API Key" button in the upper right. A dialog box will appear asking you to select a Google Cloud project. If you already have a project, select it from the dropdown. If you are starting fresh, choose "Create API key in new project" — Google will automatically create a project named something like "My First Project."
Once you confirm, Google generates your API key and displays it in a dialog box. Copy this key immediately and store it securely — Google will never show the full key again after you close this dialog. If you lose it, you will need to delete the old key and create a new one. Common storage approaches include environment variables (the safest for local development), a secrets manager like AWS Secrets Manager or HashiCorp Vault for production, or a .env file that is added to your .gitignore. Never hardcode an API key in source code or commit it to version control.
After copying your key, you can test it immediately using a simple curl request or the Python SDK. The quickest verification is via curl:
bashcurl "https://generativelanguage.googleapis.com/v1beta/models/gemini-2.0-flash:generateContent?key=YOUR_API_KEY" \
  -H 'Content-Type: application/json' \
  -X POST \
  -d '{"contents": [{"parts": [{"text": "Hello"}]}]}'
A successful response returns a JSON object with the model's reply. If you see a 400 API key not valid error, double-check that you copied the key completely — API keys are case-sensitive and include both letters and numbers. A 429 RESOURCE_EXHAUSTED error at this stage typically means your free tier quota was already used up, which you can verify in the Google AI Studio quota dashboard.
Your new key starts at Free tier automatically. You can use it right away for development, experimentation, and applications where the 15 RPM limit is sufficient. For most individual developers building personal projects or prototypes, Free tier handles moderate workloads without any cost.
Upgrading to Tier 1 — Enable Billing for Instant Access
Tier 1 is the first paid tier, and upgrading to it is simpler than most developers expect. The only requirement is enabling billing on the Google Cloud project that your API key belongs to. There is no spending threshold, no waiting period, and no application process. The moment your project has a valid payment method attached, your API key's rate limits increase immediately.
The billing setup happens in Google Cloud Console, not in AI Studio. Navigate to console.cloud.google.com and make sure you are viewing the correct project — the project selector dropdown is in the top navigation bar. Go to "Billing" in the left sidebar, then click "Link a billing account." If you already have a Google Cloud billing account from other Google services, you can link that existing account. Otherwise, you will be prompted to create a new billing account by entering a credit card or bank account.
After linking the billing account, navigate back to AI Studio at aistudio.google.com/apikey. Your existing API keys do not change — the same key now operates under Tier 1 quotas. You can verify the upgrade worked by checking the quota page or by running a high-volume test: if you can send more than 15 requests per minute without hitting 429 errors, the tier upgrade succeeded.
The cost difference between using Gemini at Free tier versus Tier 1 is not in a subscription fee — Google charges per token consumed. For Gemini 2.0 Flash, input tokens cost $0.075 per million and output tokens cost $0.30 per million (Google AI Studio pricing page, March 2026). For light usage, the monthly bill will be a few dollars or less. You only pay for what you use, and there is no baseline charge for having billing enabled. Setting up billing alerts in Google Cloud Console is a good practice: go to Billing > Budgets & Alerts and create an alert at a threshold you are comfortable with, such as $10 or $50.
One common question is whether existing free trial credit from Google Cloud counts as "billing enabled" for Tier 1 purposes. The answer is yes — if your project has a billing account attached (even if that account still has free trial credit remaining), your API key operates at Tier 1. The distinction becomes relevant for Tier 2 and Tier 3, where the $250 and $1,000 thresholds are based on actual charges to your payment method, not credit consumption.
After enabling billing and confirming Tier 1 access, you should also review the quota increase request process. Google Cloud Console allows you to request higher quotas than the default Tier 1 limits for specific models. Navigate to APIs & Services > Quotas in Google Cloud Console, filter by "Generative Language API," and you can submit increase requests for specific quota dimensions. For our full guide on increasing your quotas, see how to increase your Gemini API quota.
Reaching Tier 2 — The $250 Cumulative Spending Requirement
Tier 2 is the tier that surprises developers the most, because the upgrade path involves a specific dollar amount of actual API spending that is not immediately obvious from Google's documentation. To reach Tier 2, your Google Cloud project must have $250 or more in cumulative real API charges, and your billing account must have been active for at least 30 days. Both conditions must be met simultaneously.
The most critical caveat is about what counts toward the $250 threshold. Google Cloud free trial credits ($300 given to new accounts) do not count. Promotional credits, earned credits from referral programs, and any form of complimentary credit do not count. Only real charges — amounts billed against your actual payment method after credits are exhausted — accumulate toward the tier upgrade. This distinction causes significant confusion because the $300 free trial makes it easy to spend hundreds of "dollars" in the Cloud Console interface without any real money changing hands.
Calculating a realistic path to $250: At Gemini 2.0 Flash pricing ($0.075/million input tokens, $0.30/million output tokens), you need substantial usage to reach $250. A typical chatbot application that processes 1,000 conversations per day, each with 500 input tokens and 200 output tokens, generates roughly $0.20/day in API costs — meaning it would take over three years to organically reach $250. For most developers, the practical path to Tier 2 involves either a genuinely high-volume production workload, or intentionally running usage-intensive tasks to accelerate spending.
Some developers use Gemini 2.5 Pro or other higher-cost models to reach the threshold faster. Gemini 2.5 Pro costs significantly more per token than Flash, so processing large amounts of text through Pro models accumulates spending much more quickly. However, this only makes sense if you genuinely need those capabilities for your application. Running artificial load tests purely to reach Tier 2 is inefficient; if you need Tier 2 immediately for a production deployment, contacting Google Cloud sales to discuss your use case is often more practical.
The 30-day requirement runs from the date you first enable billing on the project, regardless of spending. This means you cannot enable billing today and expect Tier 2 access tomorrow even if you somehow spent $250 in one day. Both conditions — $250 in real spending AND 30+ days of billing history — must be satisfied. Google's system typically evaluates tier upgrades automatically; there is no manual approval process or application to submit. Your rate limits update automatically once both thresholds are crossed.
For developers who need Tier 2 throughput without the spending requirements, some third-party API aggregation services offer higher rate limits on Gemini models. For instance, laozhang.ai aggregates multiple AI models including Gemini variants at competitive per-token pricing without the tier restriction system — a useful option for teams that need higher throughput during the period before they organically reach Tier 2 spending.
Tier 3 and Enterprise-Grade Access
Tier 3 represents the highest self-service tier available through the standard Google Cloud billing system. The requirement is $1,000 in cumulative real API spending on your Google Cloud project, with the same caveat about credits not counting that applies to Tier 2. At Tier 3, you get the highest default quotas available for all Gemini models, including the most computationally expensive ones.
The rate limits at Tier 3 depend on the specific model. For Gemini 2.0 Flash, Tier 3 provides 2,000 RPM or higher. For Gemini 1.5 Pro and Gemini 2.5 Pro, Tier 3 unlocks significantly increased throughput compared to Tier 2. The exact numbers vary by model version and can change as Google updates its infrastructure, so always verify current limits in your Google Cloud Console quota page rather than relying on static documentation.
For workloads that exceed even Tier 3 quotas, Google offers additional quota increase requests that can push beyond standard limits. Submit these through Google Cloud Console's quota increase request system with business justification. For very high-volume use cases — applications processing millions of requests per day — Google recommends engaging with their enterprise sales team. Enterprise agreements can include custom rate limits, dedicated infrastructure options, SLA guarantees, and pricing negotiations that are not available through the standard billing path.
If you are building an enterprise application and need to evaluate total cost at Tier 3 scale, the math works out to roughly $75 per million input tokens for Flash and $300 per million output tokens. A production application processing 100 million tokens per month generates approximately $7,500-$30,000/month depending on the ratio of input to output tokens and the models used. At this scale, enterprise pricing negotiation with Google becomes worthwhile.
API Key Security — Setting Permissions and Restrictions
Security configuration for Gemini API keys happens in Google Cloud Console, and it is one of the most under-documented aspects of the Gemini developer experience. An unrestricted API key can be used by anyone who obtains it, from any IP address, to call any Google API your project has enabled. Setting restrictions transforms a general-purpose credential into a narrowly scoped token that is much harder to misuse.
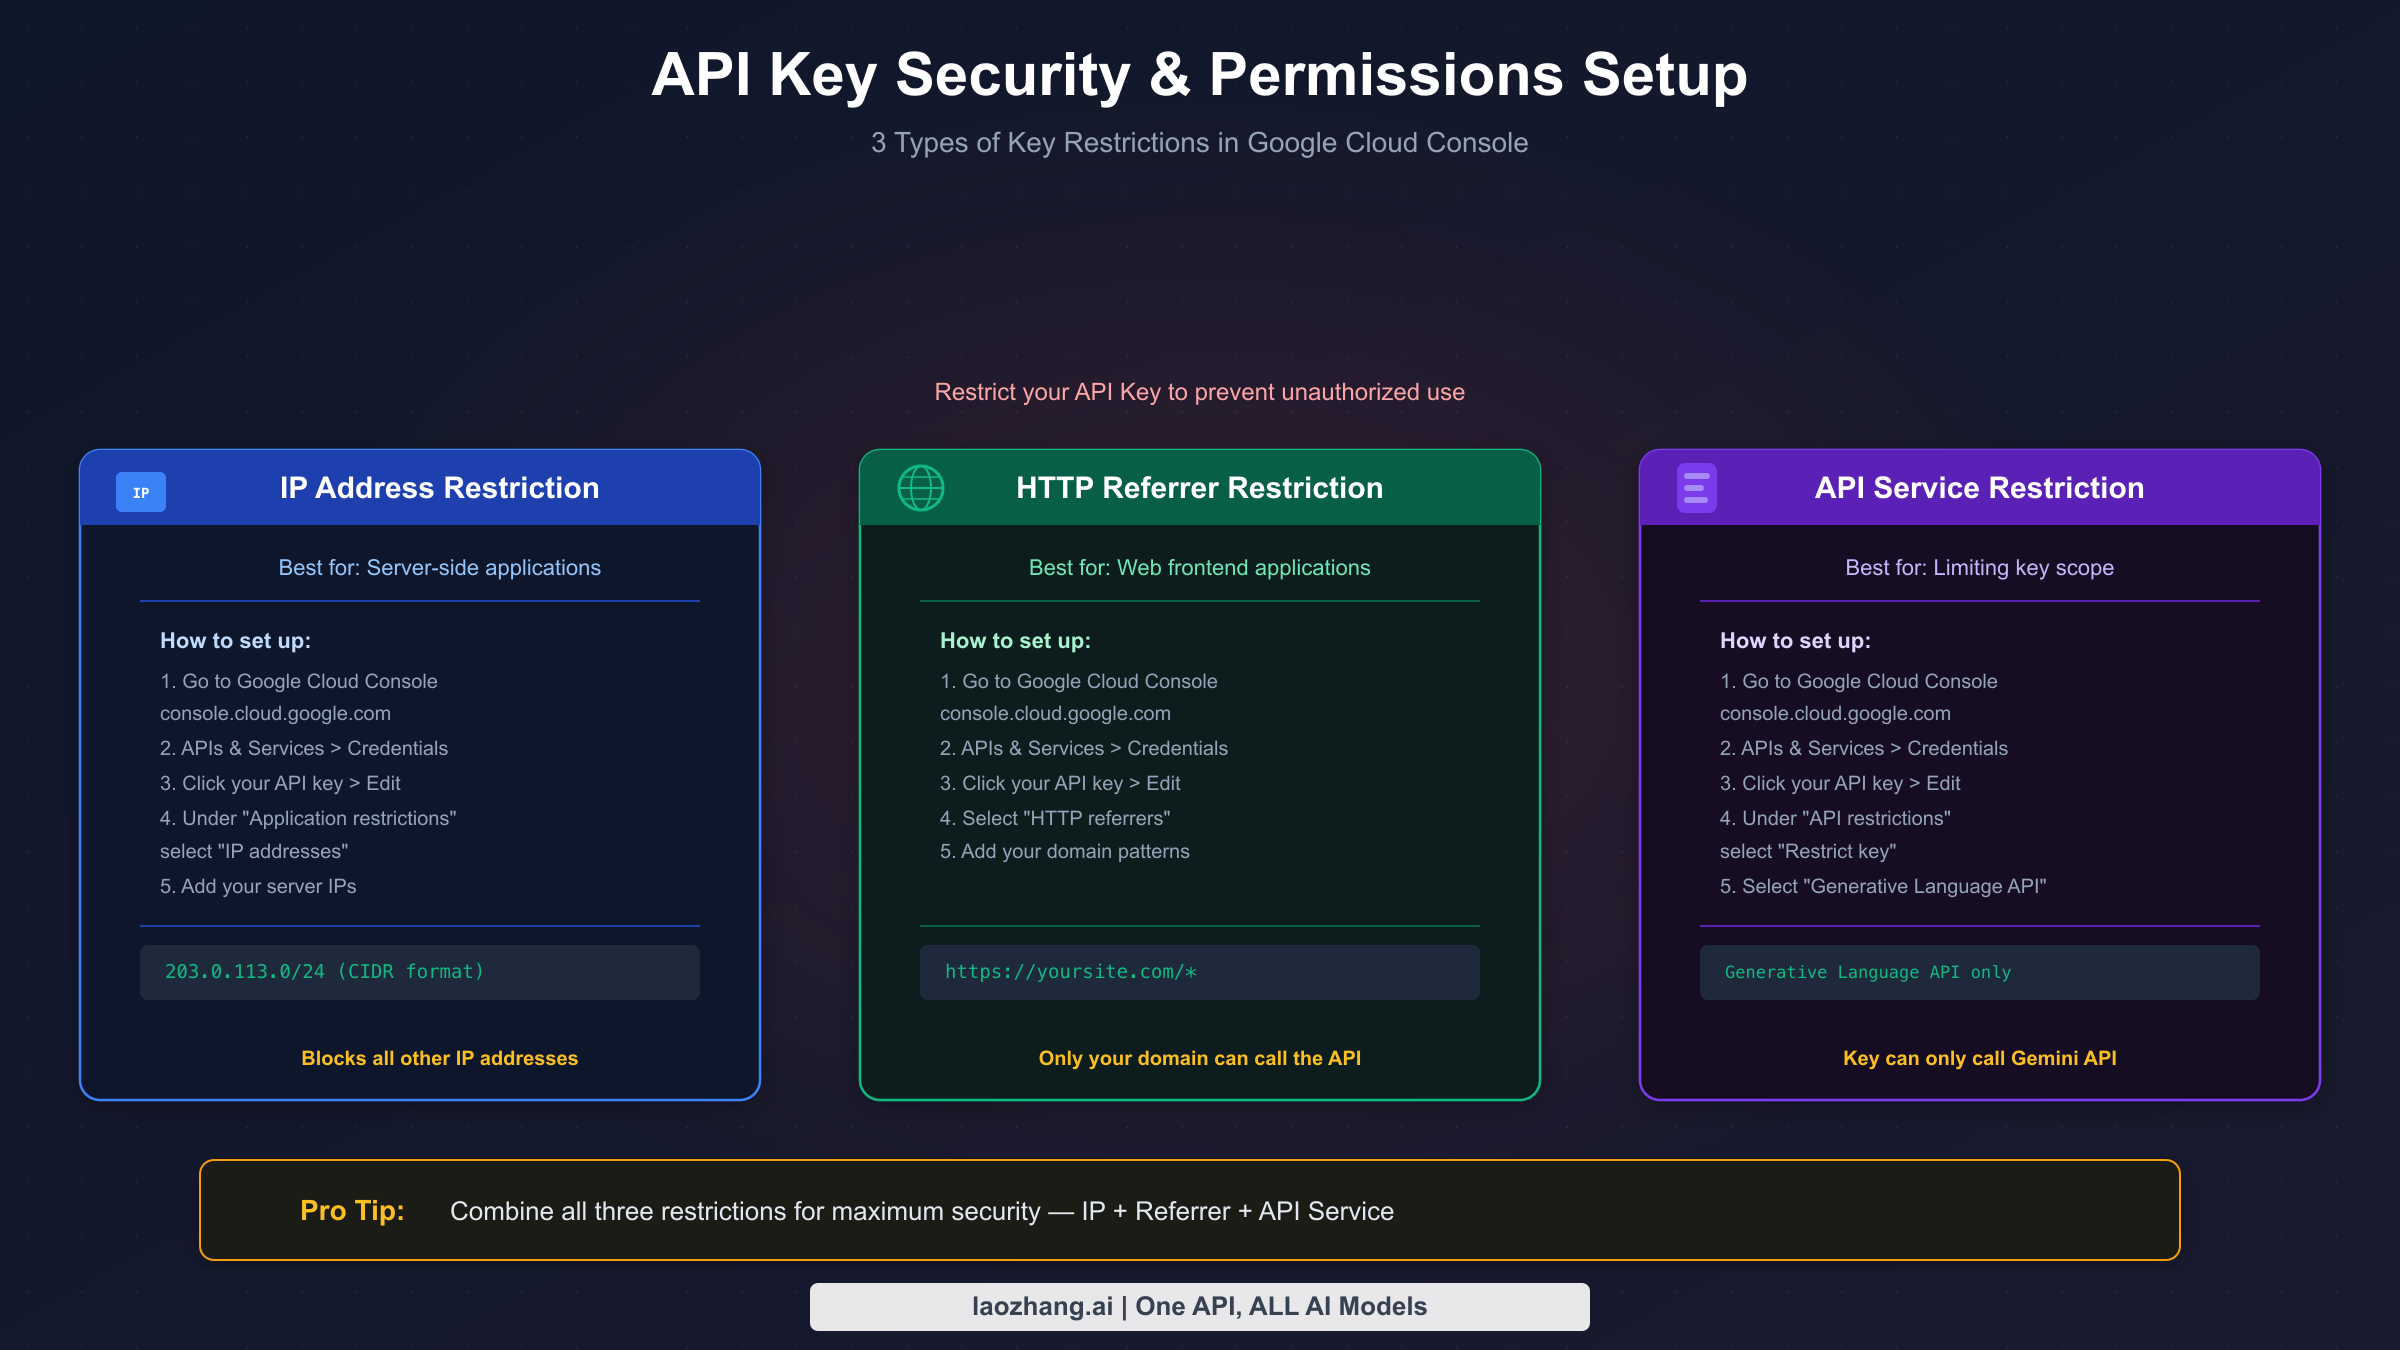
Google Cloud Console offers three types of API key restrictions, and you can apply multiple restrictions simultaneously. Navigate to console.cloud.google.com, select your project, go to APIs & Services > Credentials, click on your API key, and then click "Edit API key" to access the restriction settings.
IP address restrictions allow you to specify one or more IPv4 or IPv6 addresses or CIDR ranges from which the API key will accept requests. This is ideal for server-side applications running on known infrastructure — if your application server always makes Gemini API calls from a fixed IP address (common in cloud VMs, Kubernetes clusters with static egress IPs, or corporate networks), you can restrict the key to that IP. Enter the IP in standard notation or CIDR format (e.g., 203.0.113.42 for a single IP, or 10.0.0.0/24 for a subnet). Any request arriving from an IP not on the list receives a 403 IP_ADDRESS_NOT_IN_WHITELIST error.
HTTP referrer restrictions let you specify which website domains can use the API key. This is designed for client-side JavaScript code that calls the API directly from a browser. Specify your domain as https://yourdomain.com/* to allow all pages, or https://yourdomain.com/specific-path/* for a subset. The restriction checks the Referer HTTP header — note that this is a weaker security control than IP restrictions because the Referer header can be manipulated, but it still provides a meaningful barrier against casual misuse.
API restrictions limit which Google APIs your key can call. By default, a newly created key can call any Google API that your project has enabled. If your application only uses the Gemini API, you should restrict the key to "Generative Language API" specifically. This means that even if someone obtains your key, they cannot use it to access Google Maps, Google Drive, or any other API you may have enabled on the same project. To configure this, under "API restrictions," select "Restrict key," then choose "Generative Language API" from the dropdown list of available APIs.
The most secure configuration combines all three restriction types: restrict to your application's IP range (or specific IPs), set the referrer to your domain if you have a web frontend, and restrict the API scope to Generative Language API only. For production applications, this three-layer approach means an exposed key provides minimal value to an attacker. They would need to be on your IP range, send requests with the correct Referer header, and can only call one specific API.
A few practical notes on implementation: if your application runs on auto-scaling cloud infrastructure with dynamic IP addresses, IP restrictions may cause operational complexity when new instances come online. In these cases, either configure egress through a NAT gateway with a fixed IP, or rely on the combination of HTTP referrer and API restrictions instead. For local development, you can create a separate API key without IP restrictions, keep it in a local environment variable file, and use the restricted production key only in your deployment pipeline.
Rotating API keys periodically is also good practice, particularly for long-running applications. Google makes rotation straightforward: create a new restricted key, update your application's environment variables to use the new key, verify the new key works in production, then delete the old key. The process takes about ten minutes and significantly reduces the risk window if an old key was ever inadvertently exposed.
Regional Availability and Geographic Restrictions
The Gemini API is globally available for most users, but developers in certain regions face access restrictions that affect both free and paid tiers. Google's Gemini API is not accessible from mainland China, and users in some other markets may find that certain model features are unavailable or that latency is significantly higher due to routing paths.
For developers in mainland China, direct access to aistudio.google.com and the Gemini API endpoint at generativelanguage.googleapis.com is blocked by network-level restrictions. The typical workaround involves either deploying your application on cloud infrastructure outside China (such as AWS Singapore, Azure Japan East, or Google Cloud Hong Kong), or using an API proxy service that routes requests through unrestricted networks.
Beyond China, developers in some European jurisdictions face data residency requirements that affect how they can use the standard Gemini API endpoint. Google Vertex AI, Google's enterprise AI platform, offers Gemini models with configurable data residency options (EU, US, etc.) and is often the correct choice for businesses with strict data governance requirements. The Vertex AI version of Gemini uses OAuth-based authentication via service accounts rather than API keys, involves a different pricing structure, and requires a different integration approach — but provides the regional control that some organizations require.
Latency is another practical consideration. The standard Gemini API endpoint is US-hosted. Developers in Southeast Asia, Australia, or Europe may see latency of 300-800ms for simple requests, which is acceptable for asynchronous processing but noticeable for real-time chat applications. Google has been expanding regional endpoints, so checking current regional availability in the Google AI Studio documentation is worth doing if latency matters for your application.
For developers who need access to Gemini capabilities without navigating regional restrictions, API aggregation services like laozhang.ai offer Gemini model access through their own proxy infrastructure, which can be accessed from regions where the Google API is blocked or where direct latency is prohibitive. These services typically mirror the OpenAI API format, making integration straightforward for developers already familiar with that interface. For a broader comparison of options when direct Google API access is limited, see our guide to Gemini API alternatives with no rate limits.
Google is actively expanding both regional availability and model capabilities, so restrictions that exist today may change. Following the Google AI Blog and the AI Studio release notes is the most reliable way to stay current on regional expansion announcements.
Troubleshooting Common Issues
Developers working with the Gemini API tier system encounter a predictable set of issues that range from billing configuration problems to rate limiting errors. Most of these have straightforward solutions once you understand the underlying cause.
Billing rejected or credit card declined: If you try to enable billing and your payment method is rejected, verify that your card supports international charges and that the billing address matches your card's records. Google Cloud bills in USD, and some non-US cards have foreign transaction restrictions that trigger declines. Google Pay and PayPal are supported as billing alternatives in many regions. If your card is declined repeatedly, contacting your card issuer to whitelist Google LLC as a merchant often resolves the issue.
Tier 1 not activating after billing is enabled: After you link a billing account to your project, the tier upgrade typically takes effect within a few minutes. If you are still seeing Free tier rate limits after 10-15 minutes, verify in Google Cloud Console that the billing account is actually linked to the correct project — not just to your account. Go to Console > Billing > My Projects and confirm your target project appears with billing enabled. Also check that your API key is associated with that project (visible in AI Studio's API Keys page where it shows the project name for each key).
Rate limit errors (429 RESOURCE_EXHAUSTED): This is the most common error developers encounter during development. At Free tier, hitting 429 means you exceeded either 15 RPM or 1,500 RPD. At Tier 1, 429 errors usually indicate burst traffic exceeding the per-minute limit rather than a daily cap issue. The standard mitigation is exponential backoff: wait 1 second, retry; if it fails again, wait 2 seconds, then 4, then 8, up to a maximum. For persistent 429 errors on Tier 1, check if you are using the most restrictive quota dimension — some model variants have lower limits than others within the same tier. Our detailed guide on fixing Gemini API 429 rate limit errors covers advanced mitigation strategies including request queuing and multi-key setups.
API key returning 403 errors after adding restrictions: If you recently added IP or HTTP referrer restrictions and now see 403 errors, the most common cause is a mismatch between the restriction you configured and the actual request source. For IP restrictions, verify your application's outbound IP using a service like ifconfig.io or checkip.amazonaws.com — cloud infrastructure often has different internal and external IPs, and what you think your IP is may not match what Google sees. For HTTP referrer restrictions, check that the Referer header your application sends exactly matches the pattern you configured, including the protocol (http vs https) and trailing wildcard.
Slow tier upgrade to Tier 2 or Tier 3: If you believe you have crossed the $250 or $1,000 spending threshold but have not seen a tier upgrade, first verify your spending in Google Cloud Console > Billing > Reports. Filter by "Generative Language API" to see only Gemini-related charges. Remember that credits reduce your effective charges — if your billing report shows $300 in total usage but $200 was covered by promotional credit, only $100 counts toward the tier threshold. Also verify that the billing account has been active for 30+ days. Tier upgrades are automatic but may take up to 24 hours to reflect after thresholds are crossed.
Project quota vs. account quota confusion: Google Cloud quotas are per-project, not per-account. If you have five projects and one is at Tier 2 while four are at Free tier, you cannot "transfer" the Tier 2 status to another project. Each project's tier is determined independently by that project's billing history. If you need Tier 2 access in a new project, that project needs to independently accrue $250 in spending, which is why long-running production projects should avoid being recreated from scratch.
Frequently Asked Questions
Q: Can I use Google Cloud's $300 free trial credit to reach Tier 2?
No. The $300 free trial credit that Google provides to new Google Cloud accounts does not count toward the $250 or $1,000 tier upgrade thresholds. Google tracks tier eligibility based on actual charges processed to your payment method after credits are exhausted. This is one of the most common misconceptions about the Gemini API tier system. If you spend all $300 in free trial credits on Gemini API usage, your project billing report will show $300 in usage, but the tier upgrade tracker will show $0 in qualifying spend.
Q: If I create a new API key, does it start at Free tier even if my project is at Tier 2?
No. API keys inherit the tier of the project they belong to. If your project qualifies for Tier 2 (meaning the project's billing account has crossed the $250 real-spend threshold with 30+ days of billing history), then any API key you create within that project — whether it is a new key or an existing one — operates at Tier 2. The tier is a property of the project, not of individual keys.
Q: Can I have multiple API keys on the same project and do they share the rate limit budget?
Yes, rate limits are pooled at the project level across all API keys. If your project has a 150 RPM limit for Gemini 2.0 Flash and you have three API keys making requests simultaneously, the combined total across all three keys cannot exceed 150 RPM. This architecture is intentional — it prevents tier bypass through key proliferation. For higher throughput, you need higher tier (more spending) or a quota increase request, not additional keys.
Q: How long does it take for Tier 2 or Tier 3 to activate after I cross the threshold?
Google's system automatically monitors tier thresholds and typically upgrades your project's tier within a few hours of crossing the spending requirement. In some cases it can take up to 24 hours. There is no manual trigger or request you need to submit. You can monitor your current tier by checking your quota limits in Google Cloud Console > APIs & Services > Quotas > Generative Language API.
Q: Is there a way to verify my current tier without testing the rate limits?
Yes. In Google Cloud Console, navigate to APIs & Services > Quotas and filter by "Generative Language API." The quota values shown correspond to your current tier. For example, if "Generate content requests per minute per project" shows 15 for Gemini 2.0 Flash, you are on Free tier. If it shows 150 or higher, you are on Tier 1 or above. This is more reliable than inferring your tier from rate limit behavior during testing.
Getting Started: Your Next Steps
Understanding the Gemini API tier system positions you to make informed decisions about your application architecture and cost planning from the start. Free tier is genuinely useful for learning, prototyping, and low-volume applications — 15 RPM and 1,500 daily requests handle more workloads than many developers expect. Tier 1 requires only a billing account and delivers a 10x rate limit increase with pay-per-use pricing that stays affordable at moderate scale.
For teams planning production deployments, the practical recommendation is to enable billing immediately (even before you have significant traffic) to start the 30-day clock toward Tier 2 eligibility. Configure your API keys with appropriate restrictions from day one — IP restrictions for server-side applications, HTTP referrer restrictions for any frontend components, and API scope restriction to Generative Language API for all keys. These practices take 10 minutes to set up and significantly reduce security risk as your application scales.
The tier upgrade path requires genuine usage rather than credits, which means sustainable, organic growth of your API usage is the natural progression. Teams that plan for this in their cost models rather than being surprised by it are better positioned to scale confidently through each tier as their application grows.