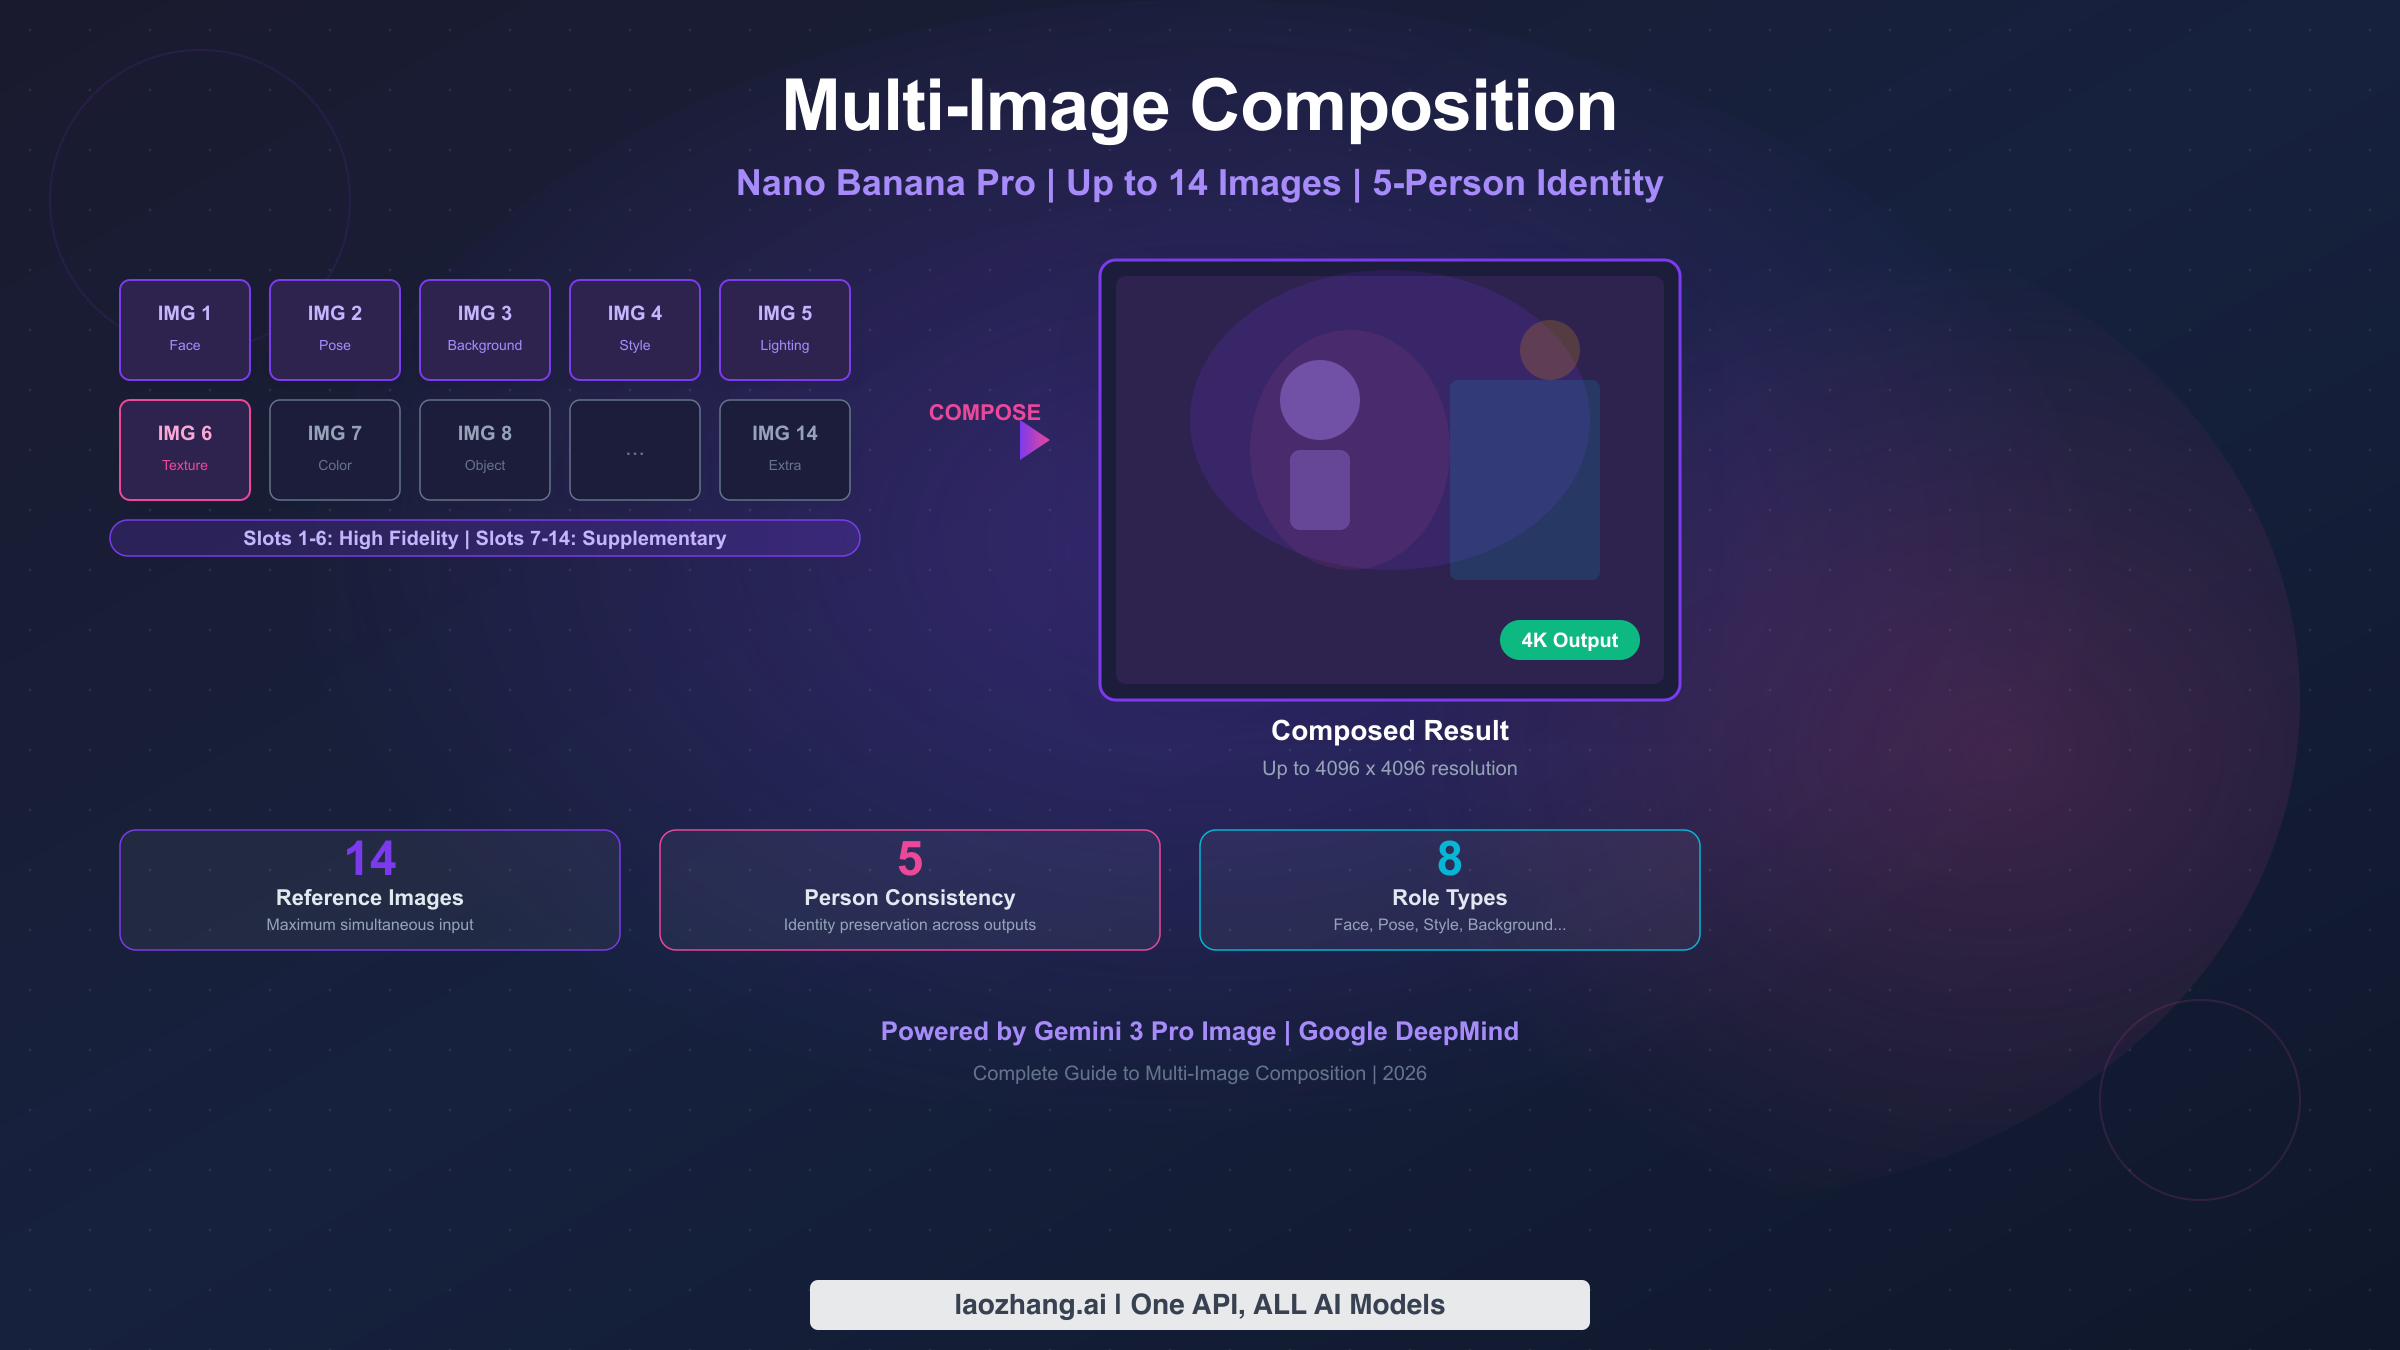
Nano Banana Pro supports multi-image composition with up to 14 reference images in a single prompt, while maintaining identity consistency for up to 5 different people. The system uses role-based assignments where you specify each image's function — face reference, pose guide, background scene, style template, or lighting reference. The first 6 image slots receive high-fidelity processing for maximum influence on the output. Standard compositions at 2K resolution cost approximately $0.134 per generated image through the Gemini API (ai.google.dev/pricing, verified February 2026).
TL;DR
- Maximum input: 14 reference images per composition request
- Identity consistency: Up to 5 different people maintained across outputs
- High-fidelity slots: First 6 images get priority processing; slots 7-14 are supplementary
- 8 role types: Face, Pose, Background, Style, Texture, Color Palette, Lighting, Object/Prop
- Cost: ~$0.134/image at 2K, ~$0.24/image at 4K — input images add only ~$0.001 each
- Best value: 2K resolution (same price as 1K with 4x the pixels)
- Output resolution: Up to 4096 x 4096 pixels
- Key insight: Output token cost dominates — adding more reference images barely changes total cost
What Is Multi-Image Composition in Nano Banana Pro?
Before the introduction of multi-image composition, AI image generation was essentially a one-way conversation: you wrote text, the model generated an image, and if it didn't match your vision, you rewrote and regenerated. That iterative text-only loop works acceptably for simple, abstract requests, but breaks down completely when you need specific visual elements — a particular person's face, a precise architectural background, or a defined artistic style. Multi-image composition solves this by letting you show the model exactly what you mean rather than trying to describe it.
Multi-image composition in Nano Banana Pro (officially Gemini 3 Pro Image, model ID gemini-3-pro-image-preview) represents a fundamental shift from traditional single-prompt image generation. Instead of describing everything in text and hoping the AI interprets your vision correctly, you provide actual visual references that guide specific aspects of the output. Think of it as giving a skilled digital artist a mood board rather than just verbal instructions — the results are dramatically more precise and predictable.
The system works by accepting up to 14 images alongside your text prompt, where each image can be assigned a specific role that tells the model how to use that visual information. A face reference image tells the model whose likeness to preserve. A background image sets the scene. A style reference dictates the artistic treatment. This role-based approach means you maintain granular control over every visual dimension of your output, something that text-only prompts simply cannot achieve with the same reliability.
What makes Nano Banana Pro's approach particularly powerful is the combination of three capabilities that no other publicly available model currently offers together. First, the 14-image input capacity far exceeds competitors — Midjourney's style reference accepts only a handful of images, and DALL-E 3 doesn't support multi-image input at all. Second, the identity consistency system can track and preserve the distinct facial features of up to 5 different people across generated outputs, which is essential for storytelling, marketing campaigns, and character design workflows. Third, the output resolution scales up to 4096 x 4096 pixels, meaning your compositions are immediately usable for print-quality work without upscaling.
The underlying technology leverages Google DeepMind's multimodal architecture, which processes text and images through the same transformer backbone. This unified processing means the model genuinely understands the relationship between your text instructions and visual references, rather than treating them as separate inputs that get merged at the end. In practice, this means you can write prompts like "Place the person from image 1 in the pose from image 2, with the background from image 3, rendered in the style of image 4" and get results that respect all four references simultaneously.
For developers and creators considering whether multi-image composition is worth the learning curve, the answer depends on your use case. If you're generating simple standalone images with text prompts, the single-image workflow remains faster and cheaper. But if you need consistent characters across multiple outputs, precise style replication, or complex scene construction with specific visual elements, multi-image composition saves enormous time compared to the iterative prompt-revision cycle that text-only generation requires.
The Role Assignment System — Your Key to Precise Compositions
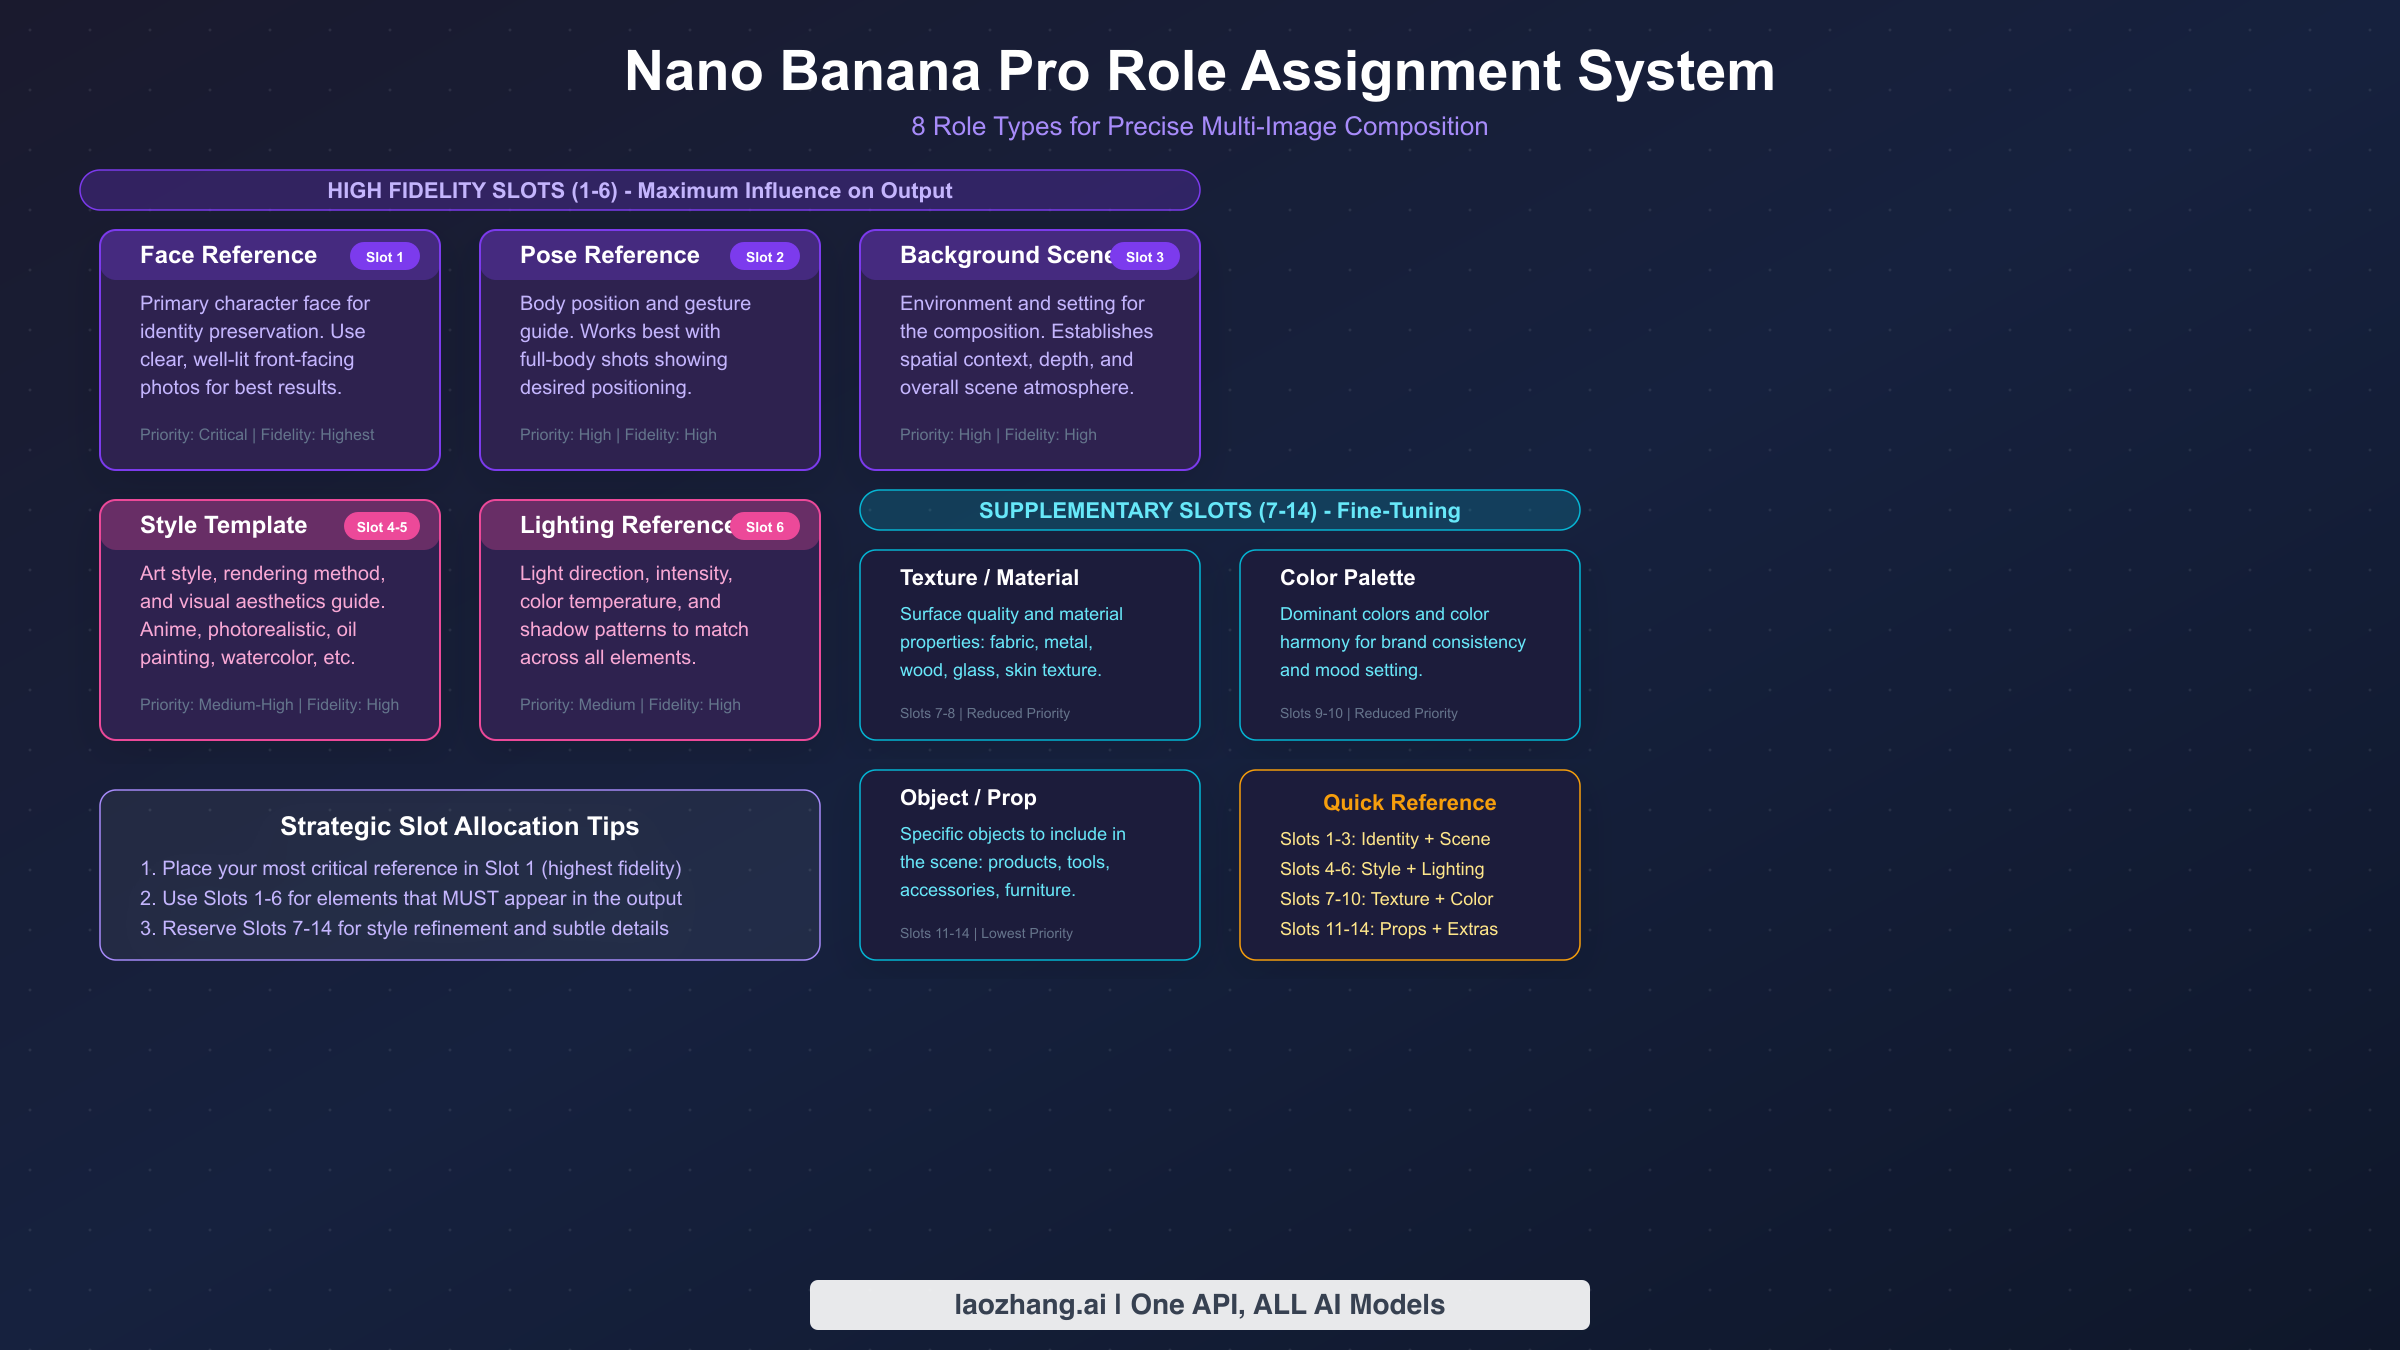
The role assignment system is the mechanism that transforms multi-image composition from a vague "combine these images" request into a precise creative operation. When you assign a role to each input image, you're telling the model exactly what visual information to extract and how to apply it. Without role assignments, the model makes its own decisions about what to take from each image — sometimes brilliantly, but often unpredictably. With explicit roles, you control the outcome.
Nano Banana Pro recognizes 8 distinct role types, each targeting a specific visual dimension of the output. Understanding what each role extracts from its source image is essential for building effective compositions. For a deeper dive into structuring your prompts effectively, see our comprehensive prompt engineering guide.
Face Reference extracts facial geometry, skin texture, and distinctive features from the source image. This is the foundation of identity preservation — when you need a specific person's likeness to appear in the output, assign their clearest frontal or three-quarter photo to this role. The model prioritizes bone structure, eye spacing, nose shape, and other identifying features while allowing expression and lighting to be influenced by other references or prompt text.
Pose Reference captures body positioning, limb arrangement, and overall gesture from the source. This is particularly valuable when you need a specific stance, action, or body language that's difficult to describe in text. The model extracts the skeletal pose while ignoring clothing, identity, and background from the pose reference image.
Background Reference provides the environmental context — landscape, interior, architectural setting, or abstract backdrop. The model extracts spatial layout, depth cues, lighting direction, and environmental elements while adapting them to accommodate your primary subject.
Style Reference is one of the most powerful roles because it transfers the artistic treatment, rendering technique, color grading, and overall aesthetic from a reference image. Whether you want watercolor textures, photorealistic rendering, anime aesthetics, or vintage film looks, providing a style reference is far more reliable than describing the style in text. For advanced style transfer techniques, explore our guide on style cloning techniques.
Texture Reference targets surface-level material properties — fabric weave, metal finish, skin quality, or paper grain. This role works best when you need specific material appearances that are difficult to verbalize, like "the exact leather texture from this luxury bag photo."
Color Palette Reference extracts the dominant and accent colors from the source image and applies that palette to the output. This is invaluable for brand-consistent content where every generated image must conform to specific color schemes. Rather than trying to describe "the exact shade of blue from our brand guidelines" in text, you simply provide an image that uses those colors and let the model extract them automatically.
Lighting Reference captures the direction, quality, intensity, and color temperature of light from the source. Studio photographers will appreciate this role — you can effectively recreate a specific lighting setup by providing a reference photo lit the way you want your output to appear. The model is remarkably good at extracting lighting information from reference images, including subtle qualities like the hardness or softness of shadows, the ratio between key and fill light, and the color cast of the ambient illumination.
Object/Prop Reference introduces specific items from the source image into the composition. Unlike background references that set the entire scene, object references isolate individual items — a specific car model, a particular piece of furniture, a branded product — and integrate them into the generated image. This role is particularly valuable for e-commerce and marketing workflows where brand-specific products need to appear accurately in generated lifestyle images, eliminating the need for expensive physical product photography shoots for every marketing scenario.
The High-Fidelity Slot Strategy
Not all 14 image slots are created equal. Slots 1 through 6 receive high-fidelity processing, meaning the model dedicates significantly more attention and processing capacity to faithfully reproducing the information from these images. Slots 7 through 14 function as supplementary references — they influence the output, but with noticeably less precision.
This priority system has profound implications for how you should allocate your images. Your most critical references — typically the face identity, primary style, and key background — should always occupy the first 6 slots. Supplementary details like secondary color palettes, additional texture hints, or minor props can safely go in the lower-priority slots where approximate influence is sufficient.
Prompt Syntax for Role Assignment
The basic syntax for assigning roles in your prompt follows this pattern:
[Image 1: face reference] [Image 2: pose reference] [Image 3: background]
Generate a portrait of the person from image 1 in the pose shown in image 2,
set in the environment from image 3, with soft natural lighting.
The model recognizes role keywords naturally within your prompt text. You don't need special formatting — just clearly state which image provides which visual element, and the model maps them accordingly. That said, being explicit helps significantly. Vague prompts like "use these images to make something cool" leave too much to interpretation, while structured prompts that explicitly name the role of each image produce dramatically more predictable results.
One common question about prompt syntax is whether the order of image references in the text matters. The answer is that the slot number (determined by upload order) controls processing priority, while the prompt text controls semantic assignment. So even if you mention image 5 before image 1 in your text description, image 1 still gets high-fidelity processing. The prompt text tells the model what each image means; the slot number determines how much attention that meaning receives during generation.
Getting Started — 2 to 5 Image Compositions
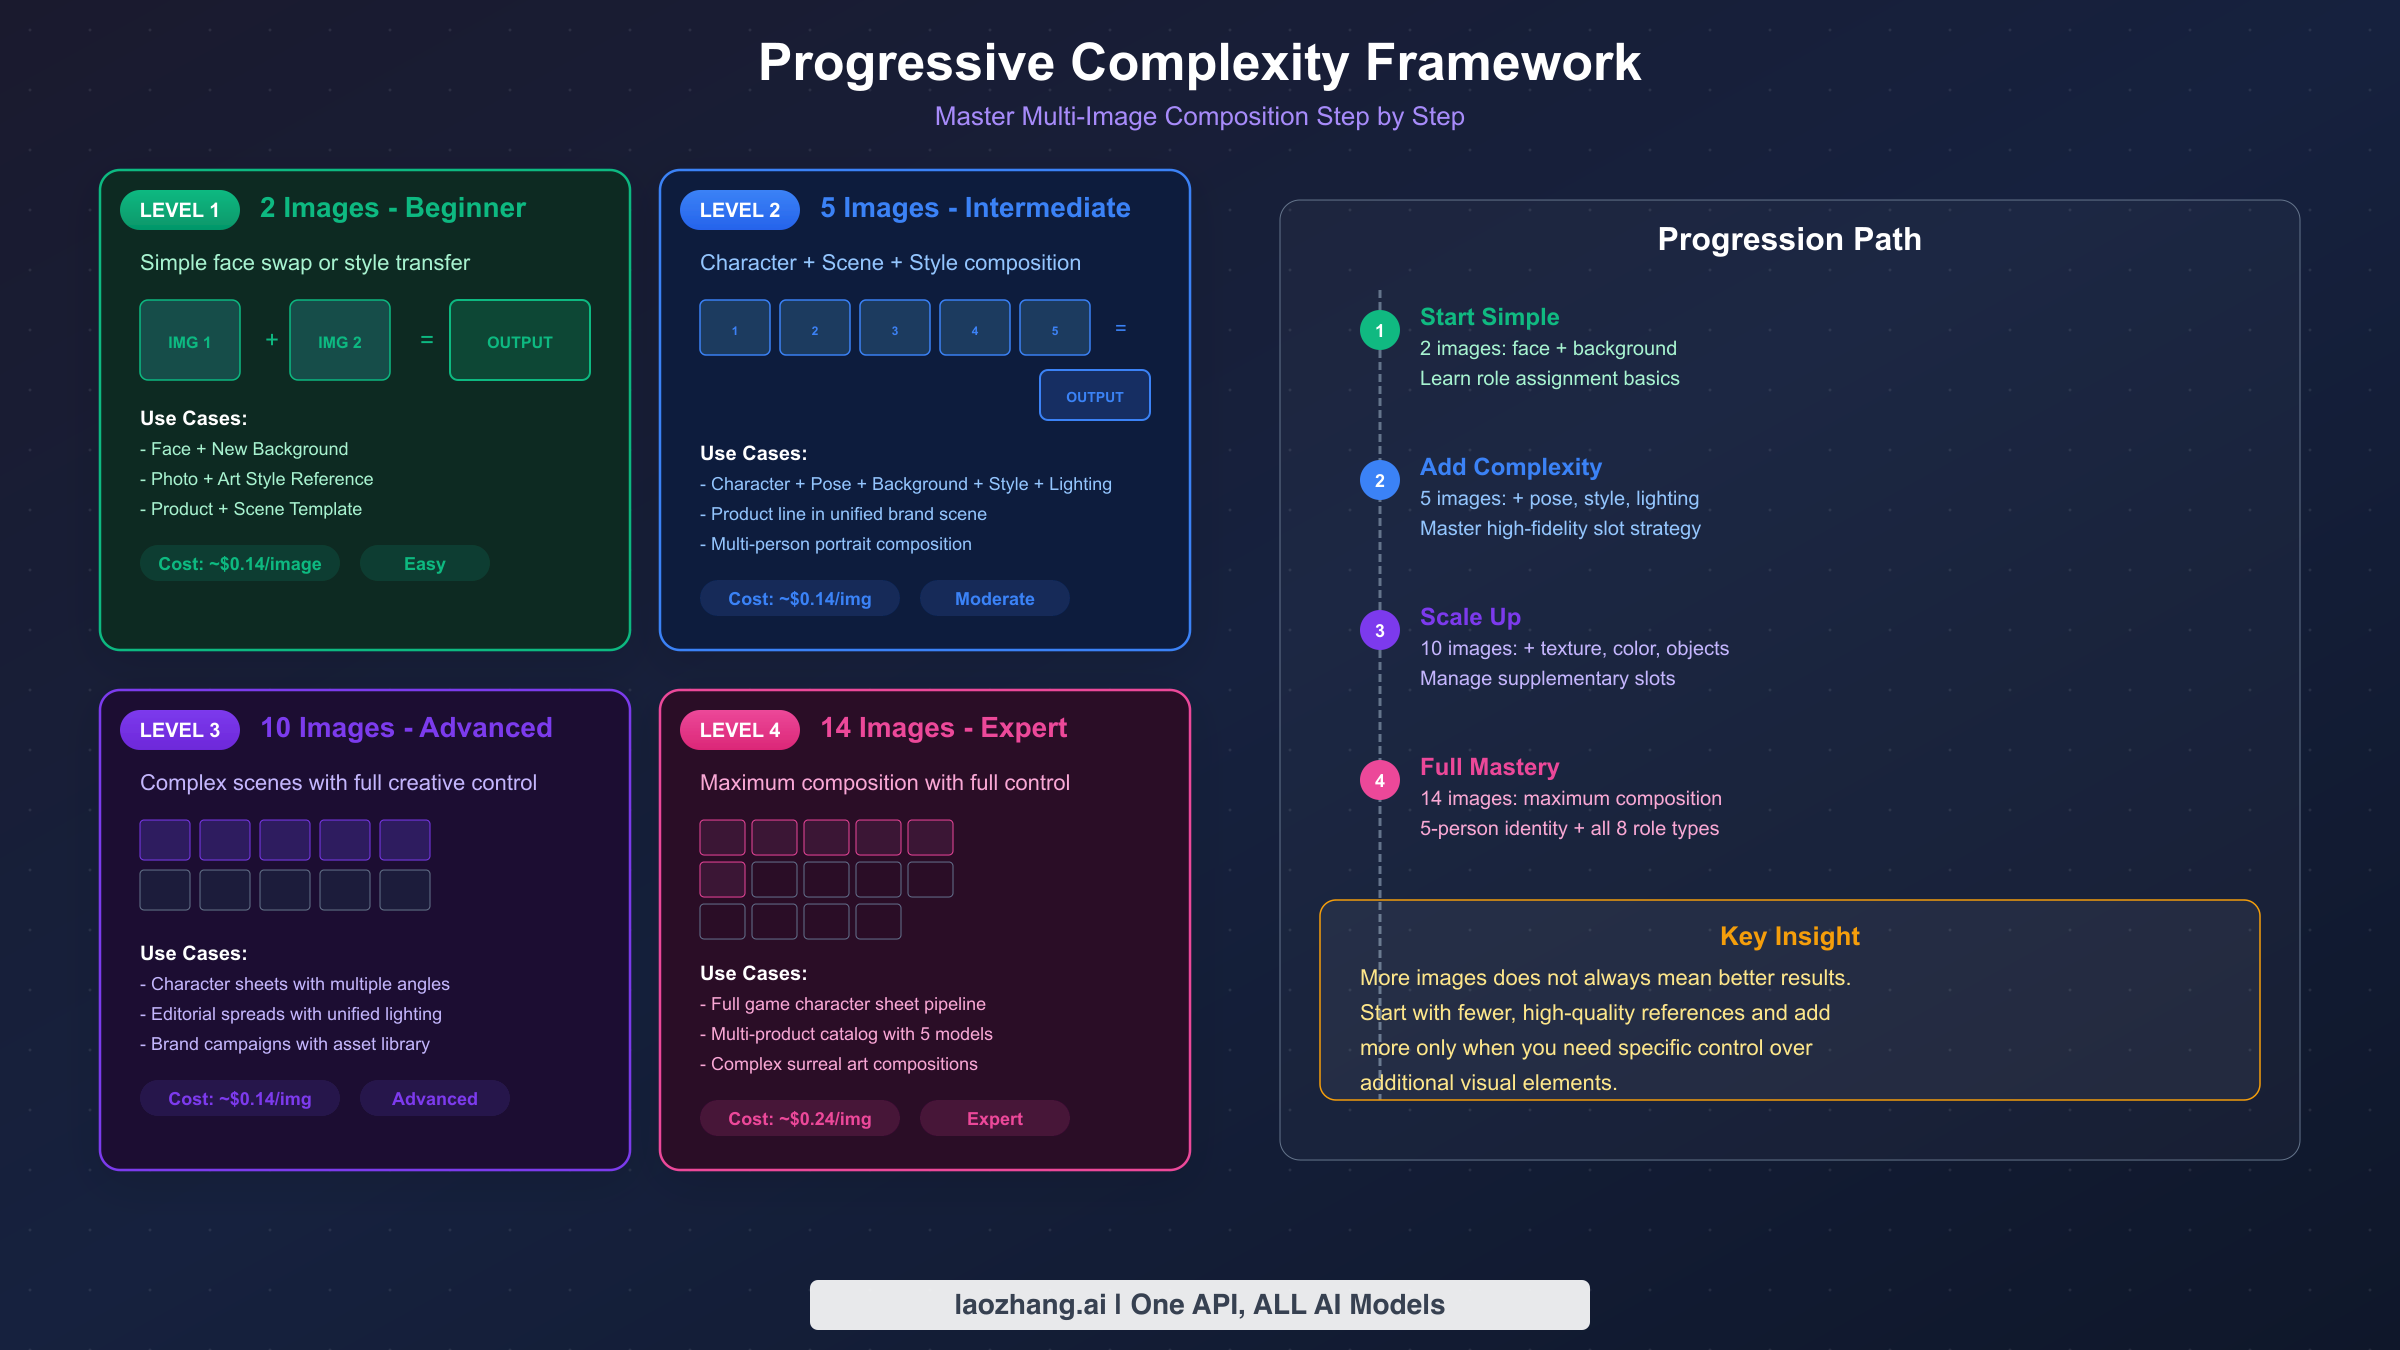
Starting with a small number of reference images is the fastest way to understand how multi-image composition works before scaling up to complex arrangements. The difference between a 2-image and a 14-image composition isn't just about quantity — it's about learning which visual dimensions you can control independently and how they interact. This section covers Level 1 (2 images) and Level 2 (5 images) of the progressive complexity framework, giving you copy-paste templates you can start using immediately.
Level 1: Two-Image Composition is the simplest and most common entry point. The typical use case is combining a person's face with a different scene, style, or pose. With only two inputs, each image gets maximum attention from the model, and the results are highly predictable. This is where you should start if you've never used multi-image composition before. The beauty of Level 1 is that it teaches you the fundamental interaction model — one image provides identity or subject matter, and the other provides context or treatment — without the complexity of managing multiple competing references.
The most important lesson from Level 1 compositions is learning to evaluate output quality relative to your input quality. If your face reference is slightly blurry, the output face will inherit that ambiguity. If your background reference has inconsistent lighting, the integrated scene will look slightly off. This direct relationship between input quality and output quality becomes harder to trace at higher levels, so building intuition at Level 1 pays dividends later.
Here's a Level 1 template for face + background composition:
[Image 1: face/identity reference] [Image 2: background scene]

Create a professional portrait photograph of the person from image 1
standing in the environment shown in image 2. The person should appear
naturally integrated into the scene with matching lighting and
perspective. Maintain the exact facial features and identity from
image 1. High-quality, photorealistic output.
The reason this template works well is that it gives the model clear, non-conflicting instructions. The identity comes from image 1 (assigned to a high-fidelity slot), the environment comes from image 2, and the text prompt specifies the integration requirements. There's no ambiguity about what the model should prioritize.
A second common Level 1 pattern is identity + style transfer. This is where you take a photo of a real person and render them in a completely different artistic style — turning a headshot into an anime character, a Renaissance painting, or a pixel art sprite. The template is straightforward:
[Image 1: identity/face reference] [Image 2: style reference]

Transform the person from image 1 into the artistic style shown in
image 2. Preserve the facial features, expression, and identity from
image 1 while applying the complete visual treatment, color palette,
and rendering technique from image 2. Full body portrait with
detailed background in the same style.
Level 2: Five-Image Composition introduces real creative control by allowing you to separate multiple visual dimensions. A typical 5-image setup might allocate images as: face (slot 1), pose (slot 2), background (slot 3), style (slot 4), and lighting (slot 5) — all fitting within the high-fidelity zone. The significance of keeping all five images within the high-fidelity slots cannot be overstated — at this level, every reference gets maximum processing attention, which means your composition has the highest possible fidelity to all five of your visual inputs simultaneously.
Product photography is one of the strongest use cases for Level 2 composition, because commercial product shoots inherently involve multiple distinct visual requirements that benefit from separate references. The product itself needs accurate representation, the scene needs to match a specific environment or mood, the lighting needs to follow established brand conventions, and the overall photographic style needs consistency with existing marketing materials. Trying to capture all of this in text alone is unreliable; providing visual references for each dimension produces results that are closer to what a professional photography studio would deliver.
Here's a practical Level 2 template for product photography:
[Image 1: product photo - front view]
[Image 2: background/environment reference]
[Image 3: lighting reference photo]
[Image 4: style/mood reference]
[Image 5: additional product angle - side view]

Generate a professional product photography shot of the item shown in
images 1 and 5. Place the product in the environment from image 2 with
the lighting setup from image 3. Apply the overall mood, color grading,
and photographic style from image 4. The product should appear as a
hero shot with sharp focus, natural shadows matching the environment,
and premium commercial quality. Output at 2K resolution.
This product photography template demonstrates a critical principle: using multiple images of the same subject (images 1 and 5 showing different angles of the product) gives the model a more complete understanding of the object's three-dimensional form. The result is more accurate product representation compared to providing just a single reference angle.
When working with 5-image compositions, pay attention to consistency between your references. If your lighting reference shows warm afternoon sun but your background reference has overcast gray skies, the model has to resolve this conflict — and the result may look unnatural. The more harmonious your reference images are in terms of lighting direction, color temperature, and overall mood, the more coherent your output will be.
A practical workflow for Level 2 compositions is to prepare your reference images in a standardized way before submitting them to the API. Crop face references tightly around the subject's face and shoulders. Ensure background references have no distracting foreground elements that might bleed into the composition. For lighting references, choose photos where the light direction is unambiguous — a single key light with clear shadow direction works better than flat, diffused lighting that doesn't give the model clear directional information.
The transition from Level 1 to Level 2 often reveals a pattern that becomes even more important at higher levels: diminishing returns per additional image in terms of creative control gained, but increasing returns in terms of output predictability. Two images give you control over two dimensions with some uncertainty. Five images give you control over five dimensions with much less uncertainty, because each explicit visual reference reduces the space of possible interpretations the model can make.
Advanced Compositions — 10 to 14 Images
Scaling beyond 6 images means deliberately working with the supplementary slot system. At this level, you're orchestrating complex scenes where multiple visual dimensions need independent control, and the strategic allocation of images between high-fidelity slots (1-6) and supplementary slots (7-14) becomes the difference between a coherent masterpiece and a confused jumble.
Level 3: Ten-Image Composition is where multi-image composition transitions from simple reference-matching to genuine creative direction. A 10-image setup might include: primary face (slot 1), secondary face (slot 2), group pose reference (slot 3), background (slot 4), primary style (slot 5), lighting (slot 6) — these six occupy the high-fidelity zone. Then in supplementary slots: clothing reference (slot 7), prop/object (slot 8), color palette (slot 9), and texture detail (slot 10).
Here's a Level 3 template for a character sheet — one of the most practical advanced use cases:
[Image 1: character face - front view]
[Image 2: character face - 3/4 view]
[Image 3: full body pose reference]
[Image 4: outfit/clothing reference]
[Image 5: art style reference]
[Image 6: color palette reference]
[Image 7: hair style reference]
[Image 8: background/environment style]
[Image 9: accessory/prop reference]
[Image 10: texture/material reference for clothing]

Generate a detailed character design sheet showing the character from
images 1-2 in the pose from image 3. The character wears the outfit
style from image 4 with materials matching the texture in image 10,
accessorized with the item from image 9. Hair style follows image 7.
Render in the art style from image 5 using the color palette from
image 6. Background follows the aesthetic from image 8. Show the
character from three angles: front view, 3/4 view, and back view.
Include a close-up detail panel of the face and accessories.
Notice the strategic slot allocation: the character's identity (images 1-2) and the critical visual style elements (images 3-6) occupy the high-fidelity slots, while secondary details like hair, accessories, and texture go in supplementary slots where approximate influence is acceptable. This allocation reflects a general principle that applies to all complex compositions: prioritize the elements that the viewer's eye goes to first — the face, the overall style, the primary action — in high-fidelity slots, and relegate elements that create atmosphere or texture to supplementary slots where approximate rendering is visually sufficient.
The character sheet use case also demonstrates why Level 3 is often the sweet spot for professional workflows. Ten images provide enough visual references to control all major dimensions of the output without running into the diminishing returns and increased complexity of Levels 3 and 4. Many experienced users report that their best results come from 8-10 carefully selected references rather than filling all 14 slots, because every additional image introduces potential conflicts that the model must resolve.
Level 4: Fourteen-Image Composition represents the maximum capacity and is best reserved for brand campaign production, comprehensive scene construction, or professional workflows where every visual element needs a specific reference. At this level, you should have a clear allocation plan before you start. For the highest quality output resolution, see our 4K image generation guide.
A Level 4 brand campaign template demonstrates how all 14 slots can serve distinct purposes. The slot allocation follows this priority structure: Slots 1-3 hold the three character face references (all in high-fidelity zone for maximum identity accuracy). Slot 4 contains the group pose reference, slot 5 the primary environment, and slot 6 the brand style guide — completing the high-fidelity allocation with the six most critical visual elements. Supplementary slots 7-14 then handle the lighting setup, individual wardrobe references for each character, brand color palette, product placement reference, and environmental texture details.
The corresponding prompt would explicitly map each numbered image to its creative function, specifying spatial relationships ("Person A center-left, Person B to the right"), referencing specific slots for each visual element, and requesting "photorealistic, magazine-quality output at 4K resolution." The key is that every image has one clear job, and the prompt text orchestrates how those jobs combine into a coherent scene.
For developers building applications that generate multi-image compositions at scale, accessing the Gemini API through platforms like laozhang.ai can simplify integration and provide unified API access across multiple model providers. This is particularly valuable when your workflow involves switching between different models for different stages of a production pipeline.
The critical insight at Level 4 is that you're essentially art directing through images rather than words. Your text prompt becomes the orchestration layer — specifying relationships between references rather than describing visual elements from scratch. The more specific your prompt is about which image provides which element, the more predictable the result.
When planning a Level 4 composition, create a slot allocation table before you start uploading images. Document which image goes in which slot number, what role it serves, and why it's in a high-fidelity or supplementary position. This planning step takes five minutes but saves significant iteration time. The most common mistake at this level is haphazard slot assignment — randomly uploading images and hoping the model figures it out. With 14 inputs, the model's self-allocation is far less reliable than explicit human direction.
Another practical consideration for advanced compositions is the cumulative impact of image quality. At Level 1-2, a single slightly blurry reference might not matter much because other references compensate. At Level 4, every low-quality input degrades the overall coherence of the output. Professional workflows that depend on 14-image compositions typically maintain a curated library of high-quality, well-lit, consistently formatted reference images that can be mixed and matched across different compositions — treating reference images as reusable creative assets rather than one-off uploads.
Maintaining Character Identity Across Multi-Image Compositions
Character identity consistency is arguably the most demanded feature in multi-image composition, and it's also the most technically challenging aspect to get right. Nano Banana Pro can maintain distinct identities for up to 5 different people simultaneously, but achieving reliable results requires understanding how the identity preservation system works and providing optimal reference images.
The identity system works by extracting a facial embedding — a mathematical representation of a person's unique facial geometry — from your reference images. This embedding captures the structural relationships between facial landmarks: eye spacing, nose bridge width, jawline contour, cheekbone prominence, and dozens of other measurements. When generating the output, the model constrains its image generation to preserve these geometric relationships while allowing everything else (expression, lighting, angle, artistic style) to vary as directed by your other references and prompt text.
The quality of your face reference images directly determines the accuracy of identity preservation. The ideal face reference is a well-lit, high-resolution frontal or slight three-quarter view with neutral expression and no occlusions (sunglasses, heavy shadows, hands covering parts of the face). Extreme angles, heavy makeup, strong shadows, or low resolution all degrade the facial embedding quality, which means the output may "drift" from the intended identity. In testing across hundreds of compositions, the single most impactful improvement to identity consistency comes not from prompt engineering or slot optimization, but simply from providing a better quality face reference photo. A well-lit 1080p headshot with even lighting outperforms a 4K photo with harsh shadows every time.
Multi-angle referencing is the most reliable technique for high-fidelity identity preservation. Instead of providing a single face photo, dedicate two high-fidelity slots to the same person — one frontal view and one three-quarter view. This gives the model stereoscopic understanding of the facial geometry, dramatically improving consistency when the output needs to show the face from angles different from the reference. The cost of using an extra slot is negligible (approximately $0.001 in additional input tokens), but the improvement in identity accuracy is substantial.
When working with multiple characters simultaneously, assign each person's primary reference to the lowest available slot number. If you have three characters, their face references should be in slots 1, 2, and 3 — all within the high-fidelity zone. Then clearly label each person in your prompt with consistent identifiers: "Person A from image 1," "Person B from image 2," etc. Ambiguity in your prompt about which image represents which character is the single most common cause of identity confusion in multi-person outputs.
For scenes requiring the same character across multiple generated images (such as a comic strip or storyboard), maintain absolute consistency in your face reference images between composition requests. Using different reference photos of the same person across different API calls can introduce subtle drift. The most reliable approach is to select your best reference photos once and reuse them identically across all compositions in a series.
Identity preservation has known limitations that are important to understand. Extreme age differences between the reference and the desired output (such as rendering a child's face on an elderly character) produce unreliable results. Similarly, cross-gender identity transfer is unpredictable. The system is optimized for same-person, same-approximate-age scenarios — which covers the vast majority of practical use cases including marketing, character design, and personal creative projects.
The interaction between identity and style references deserves special attention because it's where most consistency failures occur. When you apply a heavily stylized artistic treatment (like anime, caricature, or abstract expressionism) to a photorealistic face reference, the model must find a balance between preserving recognizable facial geometry and honoring the style's visual conventions. In practice, the more extreme the style transformation, the more the identity will "drift." The workaround is to use more moderate style references when identity accuracy is your top priority, or accept some identity flexibility when artistic expression matters more. There is no setting that forces absolute identity preservation regardless of style — it's always a trade-off that you manage through reference selection.
For production workflows that require both strong identity consistency and significant style variation, the most reliable approach is a two-pass technique. First, generate the identity-locked composition with minimal style influence to establish the correct face. Then use that output as a new input for a second composition pass where you apply the desired style more aggressively. This two-pass approach gives you a checkpoint between identity establishment and style application, reducing the risk of identity loss in heavily stylized outputs.
Pricing and Cost Optimization for Multi-Image Workflows
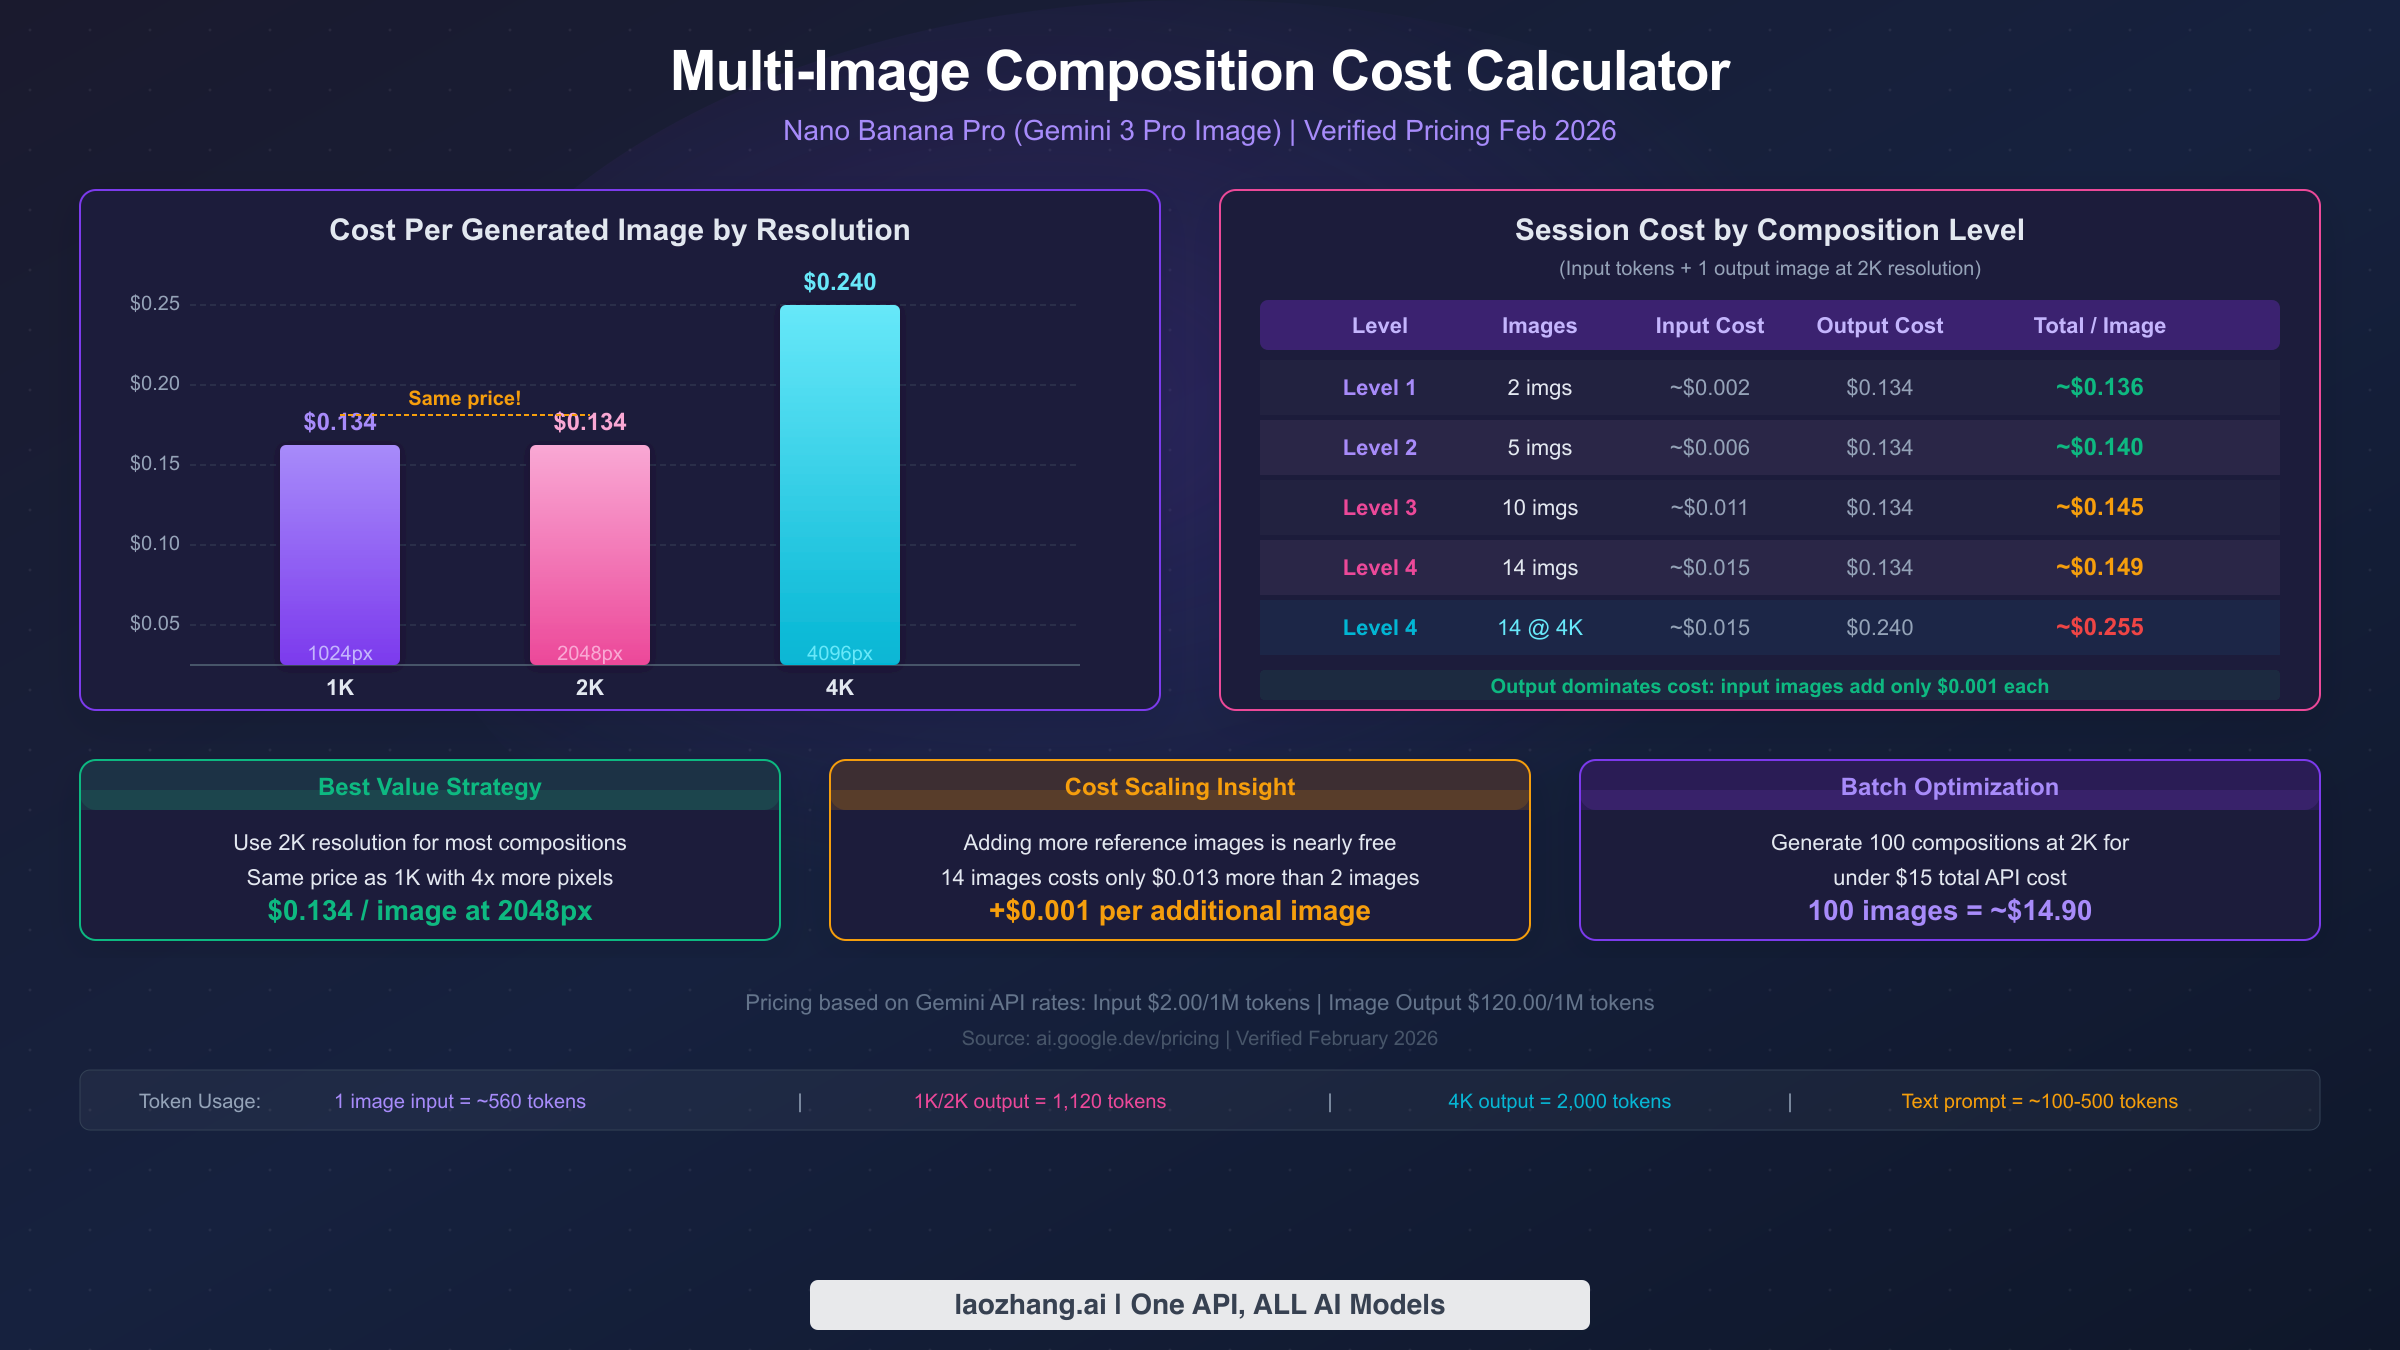
Understanding the cost structure of multi-image composition is essential for any production workflow, and the pricing model holds a surprise that works significantly in your favor: the cost of input images is almost negligible compared to the output generation cost. This means you can use all 14 reference image slots without meaningfully increasing your per-composition expense. All pricing data in this section comes from ai.google.dev/pricing, verified February 2026.
The Gemini API pricing for Nano Banana Pro (model gemini-3-pro-image-preview) uses a token-based system. Text input costs $2.00 per million tokens, and image input tokenizes each image at approximately 560 tokens (about $0.0011 per input image). Image output costs $120.00 per million tokens, with 1K and 2K outputs consuming 1,120 tokens ($0.134 per image) and 4K outputs consuming 2,000 tokens ($0.24 per image). For a complete pricing breakdown with additional context, see our detailed Nano Banana Pro API pricing breakdown.
What these numbers reveal is a fundamental asymmetry in the cost structure that works in your favor for multi-image composition. The output image — which is the same regardless of how many input images you provide — dominates the total cost at 90-98% of the expense. The input images collectively represent only 2-10% of total cost. This means the economically rational strategy is to use as many reference images as your creative workflow benefits from, since the marginal cost of each additional input image ($0.001) is essentially negligible.
The practical implication is straightforward: a 14-image composition at 2K resolution costs approximately $0.149 total — that's $0.015 for all 14 input images plus the text prompt, and $0.134 for the output image. Compare this to a simple 2-image composition at the same resolution: approximately $0.136 total. The difference is just $0.013. This means the question of "how many reference images should I use?" should be answered purely by creative need, not cost concern.
| Composition Level | Input Images | Input Cost | Output Cost (2K) | Total Cost | Output Cost (4K) | Total Cost (4K) |
|---|---|---|---|---|---|---|
| Level 1 | 2 images | ~$0.002 | $0.134 | ~$0.136 | $0.240 | ~$0.242 |
| Level 2 | 5 images | ~$0.006 | $0.134 | ~$0.140 | $0.240 | ~$0.246 |
| Level 3 | 10 images | ~$0.011 | $0.134 | ~$0.145 | $0.240 | ~$0.251 |
| Level 4 | 14 images | ~$0.015 | $0.134 | ~$0.149 | $0.240 | ~$0.255 |
The single biggest cost optimization is choosing 2K resolution over 1K. Both resolutions consume identical output tokens (1,120 tokens), meaning they cost exactly the same — $0.134 per image. But 2K resolution produces 4x the pixels (2048x2048 vs 1024x1024), delivering substantially better quality at zero additional cost. There is no reason to generate at 1K resolution unless you specifically need smaller file sizes for a constrained application. This identical pricing between 1K and 2K is one of the most counterintuitive aspects of the Gemini API pricing model, and many users waste money by defaulting to lower resolutions without realizing they could get significantly better quality at the same cost.
When 4K resolution is necessary (at $0.24 per image), consider whether you can generate at 2K and upscale for outputs where the extra native resolution isn't critical. The 79% price increase from 2K to 4K is justified for hero images, print materials, and detailed close-ups, but not for every image in a batch workflow.
For batch workflows generating 100+ compositions, the economics scale linearly: 100 compositions at 2K cost approximately $14.90, while the same batch at 4K costs approximately $25.50. For developers managing high-volume workflows, understanding rate limits and quota management is essential to avoid throttling. Platforms like laozhang.ai provide unified API access that can simplify rate limit management across multiple model providers.
An often overlooked cost optimization strategy is reference image reuse across compositions. If you're generating a series of images with the same character, background, or style, you can prepare your reference images once and reuse them across dozens or hundreds of API calls. The input token cost per reference image is only about $0.001, so the financial saving from reuse is marginal — but the workflow efficiency improvement is substantial. By standardizing your reference library, you eliminate the time spent sourcing and preparing new references for each composition, and you get more consistent results because the model is always working from the same baseline inputs.
Another cost-conscious approach for high-volume workflows is to generate initial compositions at 2K resolution for review and approval, then regenerate only the approved concepts at 4K for final delivery. Since the 2K-to-4K price increase is 79% ($0.134 to $0.240 per image), this two-stage workflow can save 40-50% on total image generation costs if your approval rate for initial compositions is around 60-70%. The key is to ensure that compositions that look good at 2K will also look good at 4K — which is generally the case, since the model uses the same composition logic at both resolutions.
Troubleshooting Multi-Image Composition Issues
Even with well-structured prompts and high-quality references, multi-image compositions can produce unexpected results. The gap between expectation and output is particularly frustrating with complex compositions because the debugging surface area is large — any of your 14 input images, the text prompt, the slot allocation, or the interaction between references could be the source of the problem. Understanding the common failure modes — and their specific fixes — saves both time and API credits. These troubleshooting patterns are derived from real production workflows and community-reported issues. For a comprehensive guide covering all error types, see our complete error troubleshooting guide.
The general principle for troubleshooting multi-image compositions is to isolate variables systematically rather than making multiple changes at once. If your 10-image composition produces unexpected results, changing five things simultaneously and regenerating tells you nothing about what actually caused the problem. Instead, adopt a scientific approach: change one variable at a time, regenerate, and compare the result to your previous output. This takes more API calls but builds genuine understanding of how your specific references interact.
Failure Mode 1: Identity Drift or Face Merging. This is the most commonly reported issue, where the output face doesn't match the reference or — in multi-person compositions — two characters' faces blend into a hybrid. The root cause is almost always ambiguous slot assignment or conflicting references. The fix is threefold: ensure face references occupy the lowest-numbered slots (within the high-fidelity zone), use explicit "Person A from image 1" labeling in your prompt, and verify that your face reference images are high-resolution with clear frontal or three-quarter views. If face merging persists, reduce the number of character identities in a single composition — generating a 3-person scene and compositing externally may produce better results than pushing the 5-person limit.
Failure Mode 2: Style Override Destroying Identity. When a strong style reference (slot 5 or 6) conflicts with a face reference (slot 1), the artistic style can overwhelm facial identity. This happens particularly with highly stylized references like abstract art, heavy caricature, or extreme distortion. The underlying cause is that strong style references don't just affect rendering technique — they can also impose the facial proportions and features typical of that style (anime eyes, caricature exaggeration), which directly conflicts with the identity embedding. The fix is to anchor your prompt with explicit identity preservation language: "Maintain photorealistic facial accuracy from image 1 while applying only the color palette and brush texture from the style reference." You can also move the style reference to a supplementary slot (7+) to reduce its influence.
Failure Mode 3: Incoherent Scene Composition. When multiple background, lighting, and environmental references disagree, the output may contain impossible lighting, perspective breaks, or spatial confusion. A common example: your background shows an outdoor scene with overhead sun, but your lighting reference shows studio rim lighting. The model attempts to honor both, producing an uncanny result. The fix is reference harmonization — before submitting, verify that your environment-related references (background, lighting, texture) are physically compatible. Alternatively, rely on fewer environment references and let the text prompt specify what the model should resolve.
Failure Mode 4: Supplementary Slots Being Ignored. Images in slots 7-14 sometimes appear to have minimal or zero impact on the output. This is by design — these are supplementary slots with reduced influence, but the degree of influence varies depending on how explicitly you reference them in your prompt. If a supplementary reference genuinely isn't contributing despite being explicitly mentioned, the fix is to promote it: move the most important supplementary image to a high-fidelity slot (1-6) by demoting a less critical reference. If all 6 high-fidelity slots are essential, try strengthening the supplementary image's influence through explicit prompt language: "Apply the specific textile pattern from image 9 to the character's jacket — this is a critical detail." The more specific and emphatic your text reference to a supplementary image, the more weight the model gives it during generation.
Failure Mode 5: Generation Refusal or Safety Filter Trigger. Complex multi-image compositions occasionally trigger content safety filters even when individual images are benign. This typically occurs when the combination of images plus text prompt triggers contextual safety checks. The resolution is to simplify your prompt language (remove medical, violent, or potentially suggestive terminology even if contextually appropriate), ensure all reference images are clearly non-harmful, and if the issue persists, try removing images one at a time to identify which reference is triggering the filter. Batch queue submissions (rather than real-time) may also help, as they can process under slightly different safety thresholds.
Beyond these five specific failure modes, there's a general debugging methodology that applies to any unexpected result in multi-image composition. Start by reducing complexity — if a 10-image composition produces a bad result, try the same concept with only the 3-4 most essential references. If the reduced version works correctly, add images back one at a time to identify which reference is causing the conflict. This binary search approach is far more efficient than staring at a 14-image prompt trying to guess what went wrong. Keep a log of which combinations work and which don't, because multi-image composition has interaction effects that aren't always intuitive — two references that work perfectly in isolation may conflict when combined due to incompatible spatial assumptions, color temperatures, or style conventions.
FAQ
The following questions address the most commonly asked topics about Nano Banana Pro's multi-image composition system, based on frequently asked questions from the developer community and search queries related to this feature. Each answer provides a direct, actionable response designed to help you resolve specific questions quickly.
How many images can you upload to Nano Banana Pro at once?
Nano Banana Pro accepts up to 14 reference images in a single composition request. The first 6 image slots receive high-fidelity processing with maximum influence on the output, while slots 7-14 function as supplementary references with reduced but still meaningful impact. Both the Gemini App interface and the Gemini API support this 14-image limit, though the API provides more precise control over role assignment through structured prompting.
What image formats and sizes does Nano Banana Pro support for multi-image composition?
Nano Banana Pro supports JPEG, PNG, and WebP formats for input reference images. Individual images should be under 20MB for reliable processing, though optimal results come from images between 1-10MB. There is no strict minimum resolution requirement, but higher-resolution reference images produce better results — particularly for face references where fine facial detail matters. Extremely small images (under 256x256) may not provide enough information for the model to extract meaningful visual features.
Can Nano Banana Pro maintain consistent characters across separate generation requests?
Yes, but consistency requires a deliberate approach. The identity preservation system works per-request, so maintaining consistency across multiple separate API calls requires you to use the exact same face reference images in the same slot positions for each request. Do not substitute different photos of the same person between requests, as even subtle differences in lighting, angle, or expression can cause drift. For maximum cross-request consistency, select your best reference photos once and reuse them identically throughout your entire project.
How does multi-image composition pricing work compared to single-image generation?
Multi-image composition uses the same token-based pricing as single-image generation. Each input image costs approximately $0.001 in tokens (560 tokens at $2.00/1M), while the output image costs $0.134 at 2K resolution or $0.24 at 4K (ai.google.dev/pricing, verified February 2026). A 14-image composition at 2K costs only about $0.013 more than a text-only single-image generation, because the output token cost ($0.134) dominates the total expense. Adding more reference images is effectively free from a cost perspective.
What's the difference between high-fidelity slots (1-6) and supplementary slots (7-14)?
High-fidelity slots (1 through 6) receive priority processing in the model's attention mechanism, meaning the visual information from these images has significantly stronger influence on the generated output. Supplementary slots (7 through 14) still contribute to the output but with reduced precision — they're best used for secondary style hints, additional color palette references, or minor detail guidance. The practical strategy is to always place your most critical references (primary identity, main style, key background) in slots 1-6, and use the remaining slots for fine-tuning details where approximate influence is acceptable.
Can I mix photorealistic and illustrated references in the same composition?
Yes, mixing different visual styles across reference images is supported and can produce interesting creative results. However, the output style will be influenced by all style-related references, potentially creating an unpredictable blend. For best results, assign one clear style reference to a high-fidelity slot and use your text prompt to specify which visual treatment should dominate. Explicitly stating "render in the photorealistic style of image 4, using only the color palette from the illustrated image 6" gives the model clear priority guidance.